| Eliminating Flicker in Vray | ||||||||||||||||
| Note: the variance based adaptive sampling introduced in Vray 3.3 makes much of this tutorial outdated. When opening older scenes, it will default to using the old sampling method. You switch it on with this mel command: setAttr vraySettings.dmcAdaptiveMethod 1; The tutorial is divided into two parts. Part 1 deals with render theory and gives the background knowledge you'll need to understand Part 2 which provides a step by step workflow for eliminating flicker in Vray. If you don't need to read the theory in Part 1 you can skip to Part 2. Part 1: Aliasing vs. Noise
Subdivisons vs. samples Increasing the quality of the primary and secondary samples is done by raising the subdivisions (or subdivs for short) either in the render globals or on the individual materials and lights. The samples are equal to the subdivisions squared. So 8 subdivisions are 64 samples (8 x 8 = 64 or 8² = 64).
There are two main places in Vray where sampling is set in the globals: The image sampler (in the Vray tab) and the DMC sampler (in the settings tab): Image Sampler (AA)
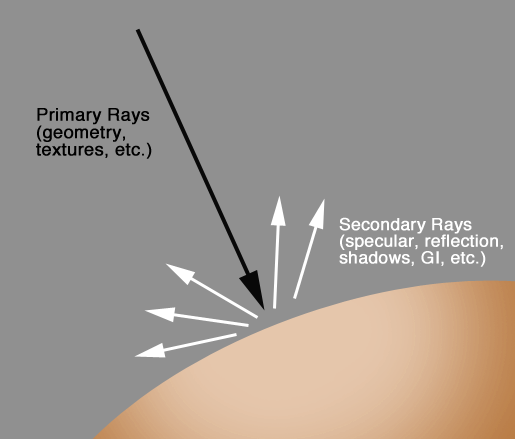
The Image sampler is for anti-aliasing (AA) the primary samples, and thus controls the quality of the geometry, textures, and (when enabled) the DOF and motion blur. Poor quality shows up here on the geo in the form of jagged "stair-steppy" edges known as aliasing. In DOF or MB poor settings will be grainy. Since bump is considered as geometry this would be included here too.
Min subdivs Determine the minimum number of samples taken for each pixel. In cases where there are fine pixel details, (for example with hair/fur, DOF, or motion blur) where an object can occupy only a fraction of a pixel's space Vray can shoot a single sample at that pixel and the neighboring pixels, determine nothing is there and move on. In such cases raising it minimally can fix the problem. For example raising it to 2 subdivs means it will shoot 4 primary samples instead of just 1. Max subdivs are the maximum amount of subdivisions available to satisfy the threshold. So if the threshold says it needs more samples, Vray will continue to shoot more rays until either the threshold is satisfied or it hits the max amount. You can thus think of the threshold as what it needs (how sensitive it is), and the max as how much it has to give based on that need. Antialiasing Filter Size The AA Filter adds a sub-pixel blur to the image which can help to eliminate aliasing and correct moiré effect on fine geometry details and textures. This does not impact render time, but does impact the quality, higher values yielding blurrier results. The second place where sampling is set in the globals is in the DMC sampler:
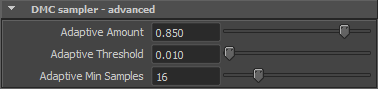
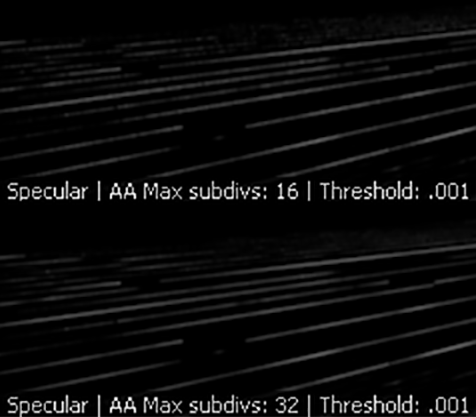
This controls the secondary samples which affect the quality of the specular, shadows, reflections, refractions, and GI. Most flickering comes from these things, so this is where we will need to concentrate.
Setting the Adaptive Amount to 0.8 means that 80% is coming from the globals, and 20% from the individual subdiv settings on materials and lights. So the min secondary samples will either be the value of Adaptive Min Samples or 20% of the max secondary samples, depending on which is higher. The math for determining the max secondary samples is actually pretty complex (we'll get into this a bit more later in this tutorial), so the main thing to keep in mind as far as the Adaptive Sampling is concerned is that we want to have a value lower than 1.0 (the default of 0.85 is fine) so that the min secondary samples can be proportionally raised as we raise the max secondary subdivs in our materials and lights.
Our strategy: Differentiating between anti-aliasing and noise (i.e. between primary and secondary sampling) A common mistake people make when trying to eliminate flickering is to simply increase the max subdivisions. While this will work, the cost is a slow render. A better approach is to determine where the flickering is coming from exactly and then improve that. The first step in doing this is to learn to differentiate between primary and secondary sampling. If our flicker is coming from an aliasing problem (primary sampling) for example because of fine geometry details like hair or grass, then we may indeed need to raise the max subdivs in our AA image sampling. However, flicker and noise that shows up in the shadows, reflections, and refractions is a matter of secondary sampling which is addressed by adjusting the subdivisions on individual materials and lights, (and in the GI in the case of brute force). This is where we will see most of our problems with flicker. Our strategy therefore will be to set the max subdivs only as high as we need to address AA issues with geo edges and the textures and bump, and then raise the secondary samples for the materials and lights as needed to address noise issues there. This will result in a much faster flicker free render than the "gorilla fist" method of simply raising the AA max subdivs in the render globals. This raises a complex question... How high should the secondary subdivs be? Determining how much you need to raise the subdivs on materials and lights can be a bit tricky, so it's important to understand a bit about how Vray is working under the hood: The formula to determine the secondary samples is to take the value for the material's subdivs squared (which gives you the material's samples since samples = subdivs²) and divide this by your AA max subdivs squared, or said differently: material samples / AA max samples = max secondary samples. For example if the max subdivs were set to 8 (64 samples) and you increased the reflection subdivs on a material to 16 (256 samples) you would actually only get 4 secondary samples (Remember, that's samples not subdivisions!) since 16²/8²=4 samples (256/64=4). So even though you set the material to 256 samples (16 subdivs), you actually only got 4 samples. Ouch. At this point you might be thinking "That's nuts! Why is Vray doing that?" The reason is that it is maintaining the total number of samples per pixel. Take a look at the following chart:
As you can see above, even though the material samples are consistently set to 100, as the AA max samples are raised, the secondary samples are lowered so that the total never goes above 100. That means the result of this little math equation is that the total amount of samples per pixel will either be the same as the AA subdivs value OR the value of your material's subdivs, depending on which is higher. The problem is that this can lead to confusion where you think you are raising the value of your material's subdivs when actually it is doing nothing. For example, say we raised the material's samples to 20 with the max samples set to 8. Nothing happens. Let's do the math to see why: 20²/8²=6 samples (400/64=6.25). Since the DMC Adaptive Min Samples are set to 8 by default this has no effect since 6 is less than the minimum of 8 secondary samples. So even though we raised our material's subdivs to 20 (400 samples), which seems like it's a lot, we got nothing since the final amount was less than the default minimum. The moral here is that, depending on what you have the AA max samples set to, you may need to set your material and light samples quite high for them to have any effect. To get a rough idea of what your secondary max will be you can just divide your material subdivs by the max subdivs. For a more accurate idea however you'll want to plug your values into Akin Bilgic's V-Ray DMC Calculator to see what you are actually getting for the secondary samples. Secondary samples can be thought of as additional samples because they, more precisely are secondary samples per primary sample. So if you had 2 primary samples and 10 secondary samples then that means you get 10 additional (secondary) samples for every primary sample, in other words 20 total samples per pixel (2x10=20). Because of this, it is possible to only use primary samples and deal with everything, which is why the "Universal Settings" approach works. However since this leads to long render times, a better approach is to use these additional secondary samples to augment the primary samples in order to deal with issue of flicker specific to secondary rays. It is important to keep in mind however that because of how the primary and secondary samples work together if you have raise your primary samples (say to deal with the AA) you may not need to have your secondary samples as high as you did with low primary samples in order to get the same clean result for secondary sample issues (say noise in the reflection). Do keep in mind as well that, as discussed above, as you raise the primary samples the secondary samples will be divided. So if you double the AA max subdivs you would theoretically need to also double the subdivs on your lights and materials in order to maintain the same max secondary samples as before. The VrayHairMtl3 consists mostly of specular, reflection, and refraction with very little diffuse contribution. These are all normally related to secondary samples, however the VrayHairMtl does not have any reflection subdivs. Instead you need to adjust the GI subdivs which in the case of the VrayHairMtl is tied together with the hair's reflection and refraction. The Spec in contrast is influenced by the AA sample values (see the example above on dealing with spec on fine geo). Unless rendering out a static shot, it is best to render hair with brute force for the primary GI. Both raising the brute force GI subdivs as well as raising the AA samples can be costly. In fact, with hair/grass it may be more costly to raise the GI subdivs than to raise the AA max. Either way this can shoot up your render times. A helpful strategy with the vrayHairMtl therefore is to put the grass or hair on a separate render layer and use wrapper materials to get the cast shadows (for example shadows of the hair on the character's head). This allows you to set the AA min/max values higher in this render layer so you can keep them lower for other objects rather than rendering everything with these high settings. An additional strategy is to use the AA Filter to blur the hair or grass which can look nice and solve flickering issues without increasing render time (again, see the example above). Because it is on a separate render layer the other objects can be crisp while the hair or grass is soft. Okay enough with the theory, let's get to application!
Part 2: Optimizing the Scene
Note that while the following methods will help us to find flicker by evaluating various passes from single images, flicker is often something you can only see in animation. Rather than rendering the whole sequence, a good strategy here is to render out a small amount of frames (say 10-20) where the flickering is prominent in order to test these.
Step 1: Primary samples (Image Sampler):
Setup: In the "Vray" tab under the "Global Options" section (pictured above) uncheck lights, shadows, reflection/refraction, and glossy effects. Make sure "default lights" is checked. Turn off the GI in the Indirect Light tab.
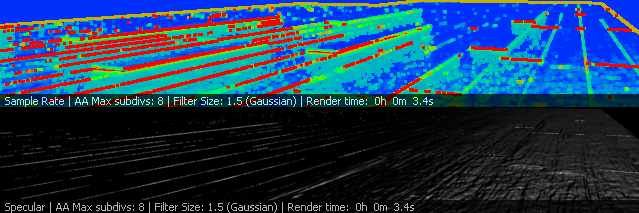
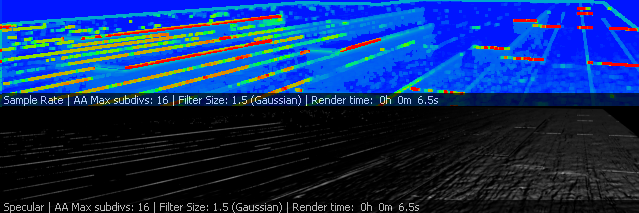
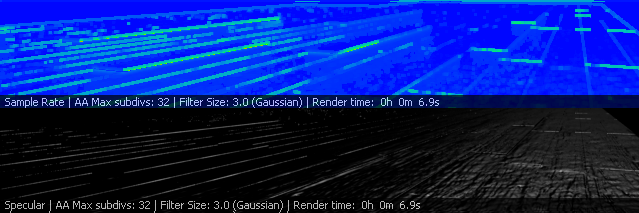
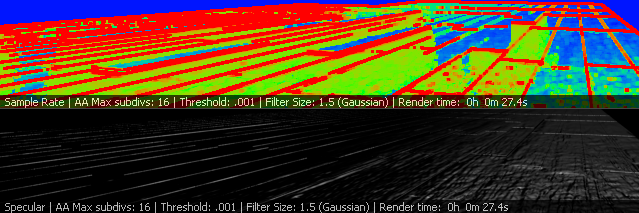
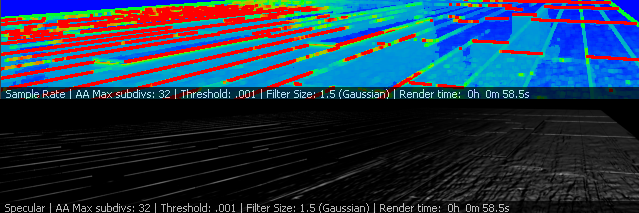
Passes: Diffuse, Lighting, Sample RateMethod: Adjust the AA Max Subdivs. We start with making sure we have our AA samples high enough for our geo (seen by evaluating the diffuse and sample rate passes). Check the aliasing and if it looks jaggy raise the min/max subdivs, and if needed adjust the threshold. Let's discuss our strategy here: The settings we currently have in the Global Options will give us the same result in our Beauty as in our Lighting Pass. The difference is that if we simply rendered out the entire image with spec and reflections, it would first of all take longer to render. More importantly, the Sample Rate pass would include the calculations for these other elements (spec, reflection, etc.). By turning them off globally we are able to focus on just the parts we want to be focused on, which in this first step is to adjust the primary AA samples before we more on to the secondary samples. Understanding the Sample Rate Pass: The sample rate pass shows red, green or blue colors indicating where the AA primary sampling is happening. Red indicates where the render is using 100% of the AA max samples for that area of the render. You thus want to see red on the edges of things (no red is not good either since it means Vray is not even hitting the max values and so you can lower your AA max) and the rest of the image should be blue and green. Large areas of red indicates that the max samples are too low and need to be raised. We will continue to use the Sample Rate pass to adjust the secondary samples below as well.
Passes: GI, raw GI, Sample Rate. Method: Adjust the brute force GI subdivs. The AA sampling only affects brute force GI, so if you are using other methods (IR/LC for example) then this is independent of this workflow. For this see the doc Testing GI settings in Vray for IR and LC. To adjust your BF settings, check for flicker in the GI pass as well as looking at the Sample Rate pass. Raise the BF subdivisions as needed. The vrayHairMtl3 does not have a parameter for reflection subdivs and instead the reflection and refraction are determined by the GI subdivs. See the section A note on hair above for more.
This tutorial draws on Toni Bratincevic's excellent Demystifying V-Ray DMC Sampler and Akin Bilgic's equally awesome V-Ray Render Optimization. |