|
Overview
This serves as a companion tutorial to the Static Pass Rendering doc. We will set things up so the render goes really fast so we can quickly test what the optimal settigs for our irradiance (IR) and light cache (LC) maps will be.
Part I: Testing the Light Cache
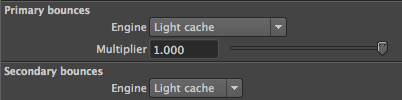
Set both the Primary and the Secondary GI to Light cache:
We'll begin with some general settings:
- Number of passes: is based on how many cores your machine has. You can tell by opening the task manager and clicking on the performance tab and see how many cpu meters you have
- World scale. Turn this it ON for indoor scenes, but OFF for outdoors. Having it on will force constant sample density, meaning we will likely get a lot more (i.e. smaller) samples which we can then adjust in Sample Size (see below).
- Use retrace threshhold: This helps with issues of light leaks as well as with the "Use light cache for glossy rays" option (which speeds up the calculation of blurred reflections). Where the light cache is not precise enough, it will instead use the primary GI engine instead of the light cache to get more precision where needed. This is determined by the threshold amount. The higher the number, the less it will use light cache and instead use brute force. This means high threshold values are more accurate and also slower to render. The default value of 1 is generally good here.
We’ll be adjusting the following settings for the light cache:
- Subdivisions: 200. This effects the speed and quality. We will set it very low at first to get fast feedback while testing.
- Sample Size: 0.02.
- Adaptive Sampling: ON
- Prefilter: OFF. We want this off during testing.
- Filter Samples: 1. Setting this to 1 will mean there is no blending for our testing so we can see what we're doing.
With these initial settings we're ready to do some quick testing in order to get good values for our scene:
Setting the Sample Size:
For our initial test we will put the lights and geo into into a new render layer and an assign a default vrayMtl to everything using a material override. This will allow us to isolate the GI samples described below. Once we get this looking good we will then test this with the textures to make sure we have enough sample detail for those.
- Sample size Render and look at the samples which will be quite obvious since we have turned off the interpolation. These will appear as as a mosaic of little hexagons like this:

We want the sample size as large as possible without getting artifacts (light leaks etc). To adjust this we would raise the Sample Size and re-render. Because we have the Subdivs low this should be very fast. (For added speed we can also set the DMC threshhold to 0.1 for testing.) Note that if you are rendering and outdoor scene (world scale OFF) your sample size will need to be much lower (in the range of 0.001-0.02). For indoors scenes with World ON, this number will need to be much higher (say 10 to 100 times more) to get the same size samples.
- Subdivs quality. Once we get a good sample size (again make sure you test this on your default material first, and then with all the textures so you can see where it needs detail) we next want to increase the subdivs. This will make the samples have less contrast so they blend better, but has a big impact on render times. A value of 2000 is usually pretty good. What it's doing is comparing the adjacent samples and matching the colors.
Blending the samples:
- Save the LC. Once you have nice values here, save the LC map, and set the mode to "from file" and read it back in. This will again make things go really fast.
- Filter Samples. Next we raise up the filter samples to smooth things out. Keep in mind that the more you blur it, the more you may lose shadow detail. I had mine at 100 for my test scene.
- Prefilter and Prefilter Samples. This acts similar to the subdivs above in that it blends the sample colors, except for free. You can see the results most clearly when the Filter Samples are set to 1 so there is no blending. This can be used to augment and improve the subdivs, but can't replace high subdivs quality in detailed areas. The saved light cache map does not include prefiltering which is performed after it is loaded. Consequently, you can adjust this without the need to recompute the light cache.
Part II: Testing the Irradiance Map
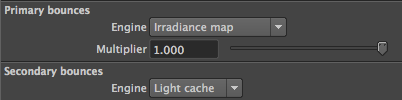
We next set the primary GI to irradiance and keep secondary to Light cache (from file):
First, set the irradiance preset to "high animation" and then to "custom." This will allow us to access all the settings that are usually greyed out. Then set the following:
- Subdivs: 50. This is the main "quality" setting for IR. Well keep it high.
- Show Samples: ON. This will make little dots indicating where the samples are going.
- Min rate: -3.
- Max rate: -3. Setting the min and max the same lets us see the min values, that is, the overall spread.
- Interp Samples: 1. This again turns off the blending so we can see for our test.
Testing the samples:
- First render and look at the sample dots. This shows us the distribution of samples from the min value.
- Next raise the Max Rate to 0 and render again. Note how it now puts more samples in detailed areas.
- Now turn off Show Samples and render. We now get the blocky samples like with our LC, but they are smaller and more detailed. If you have "show calc phase" on you will also see that it progressively adds detail in several passes. This is because LC is a rough overall solution, and IR in contrast is intended to get those fine details.
The idea here is to make sure we are getting enough sampling, but really the presets do a pretty good job of this, so we likely wont change much. The main thing you want to adjust here is the Subdivs if you are not getting enough detail.
The real trick is setting the interpolation samples, which we'll do next.
Blending the samples:
- Save the IR map, set the mode to "from file" and read it in. This again will make things go really fast. We can also set the secondary GI off since the LC will be included in our saved IR map.
- Increase the Interp Samples until things look smooth. As with the LC this will blend (i.e. blur) our samples together. Again, this is where you can really push the values to get nice smooth results, so long as you don't loose too much shadow detail.
This tutorial was adapted from James Shaw's excellent Making sense of VRay Settings
|