| Overview
In order to deal with flickering in GI efficiently we will split renders into static and animated scenes. This will allow us to take advantage of some tricks that only work on static objects in a fly-through animation by splitting the render up into static objects and animated objects. This document deals with setting up the render for a static scene. It is written assuming that we are rendering an outdoor shot. Where the setup would differ for an indoor shot, this is indicated in red
The GI of the Static render is pre-calculated to remove flickering. Because there is no animation (besides the camera) we will not be working with any caches, so we simply need to open the environment file and toggle on the static items for the shot. For a fuller description of how to set up a static render, see Shot setup for backgrounds
The basic workflow is divided into three parts:
Part 1: Save the LC
Part 2: Save the IR
Part 3: Render using these maps
Note: The following step by step workflow assumes you are rendering out from a single render layer (with multiple passes). If you have additional render layers in your scene, then LC and IR maps will need to be calculated for each layer, and read in using layer overrides.
Note: You will want to test both your LC and IR settings to make sure they are optimal for your scene. This primarily involves setting the interpolation for the IR and LC which greatly improves quality without effecting render time. See the tutorial Testing GI settings in Vray for IR and LC for details.
Part I: Quality settings
First we need to set the DMC sampling which affects the overall quality of the render.
Try the following settings:
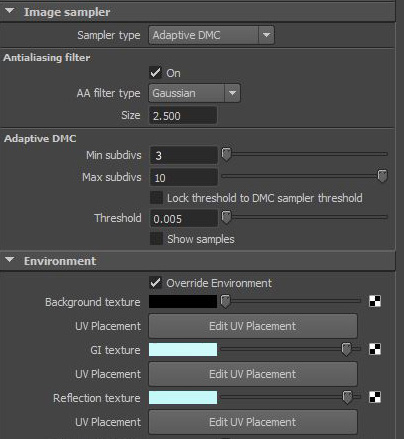
Let's go over some of the above settings:
- Min Samples: When rendering Vray fur (for example grass) you may need to increase the min samples above 1 to get fine details.
- Max Samples: The maximum number of samples for a pixel based on the threshhold (see below).
- Threshhold: Vray will look at the values of the neighboring pixels and determine if they are differ too much based on the threshhold value (big differences in pixel values will cause flickering, so we want smooth transitions). If they do differ then Vray will cast more samples to balance these values out, up to the max samples defined above. So you might say threshhold determines who needs help, and max samples determines how much help they can get. (One can also increase the samples on individual materials and lights as well).
- Environment overrides: Note here that these are using sky blue which helps GI calculations for outdoor scenes. For indoor scenes since the walls block the sky, this is less important. However one can use area lights placed in the windows set to portal to draw the sky color in.
Additionally, the Memory (Under the Settings tab in the Parameters section) should be set to half of your RAM. For example, since our machines have 32GB of RAM this can be set to 16000.
Part II: Rendering the Light Cache (LC/LC: Flythrough)
We will first render a single frame of the Light Cache in flythrough mode, saving it to disc. We will use this LC map later when we do the irradiance precalulation below in Part III.
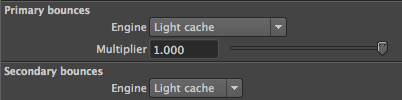
Set both the Primary and the Secondary GI to Light cache:
Next we need to set up the Light Cache:
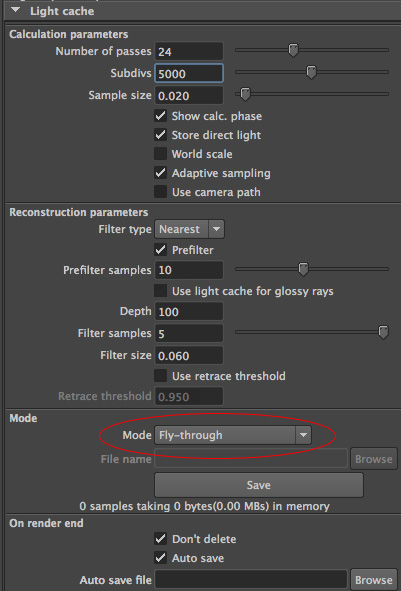
Let's go over some of the settings:
- Subdivisions: is the most important parameter. You can determine the correct value here using the Testing GI settings in Vray for IR and LC workflow.
- World scale: OFF. World space is recommended for fly-through animations, since it will force constant sample density everywhere. However, if your scene is too large (e.g. with a large ground plane) you can run out of memory for the light cache. Screen mode works better here since surfaces that are far away from the camera will get fewer samples. So for exterior scenes, it is recommended to use the Screen mode always. So we would have it ON for indoor scenes, but OFF for outdoors.
- Use camera path: OFF. This helps remove flicker from camera movement on animated shots by combining the sampling over the whole sequence. For static shots we use fly-through instead.
- Use light cache for glossy rays: OFF. This will speed up the calculation of blurred reflections by using the light cache which is less computationally expensive. So for our animated shots we definitely want this to be on as it will speed things up a lot. However for our static pass renders there is a trade off we need to consider: If there are lots of blurred reflections in the static scene then we may want to have this on. However, if there are not (for example in most out door scenes) we can leave this off. The advantage to doing this is that we could then render the LC once with our precalc rather than needing to calculate the LC for every frame. If we instead have "glossy rays" turned on, then the LC must be calculated for every frame since the information is not saved to the LC map. This is basically a speed tradeoff, so you need to determine which will save more time: speeding up the blurred reflections or only needing to render the light cache once. You definitely want this off for most outdoor scenes (which have little blurred reflections anyway). For indoor scenes, which likely contain many glossy rays, we may want this ON. However, as a rule of thumb, you will probably gain more from using the precalced light cache instead.
- Use retrace threshhold: OFF This is explained in more detail in Testing GI settings in Vray for IR and LC. As with the "use for glossy rays" option above, we want this on for our animated renders. For static renders (as explained above) we'd prefer to have both off for outdoor shots so we can instead precalc the secondary GI.
Now that we have the settings, we’re ready to render the Light Cache:
- Make sure that both the primary and secondary GI are both set to Light Cache (LC)
- Set the frame range to only render the first frame.
- Render. Note that although we render only one frame, the Fly-through mode forces the light cache to be computed for the entire animation.
- Save the resulting light cache to disk (see the naming conventions doc).
Part III: Calculating the Irradiance Map (IR: Multiframe Incremental/LC: From File)
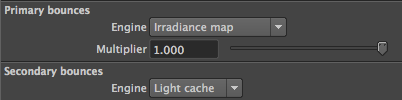
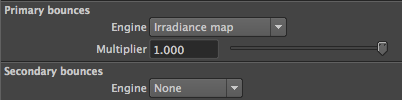
We next set the primary GI to irradiance and the secondary to Light cache:
For the secondary GI we will be reading in the LC map that we saved in Part II above:
- Set the Light Cache Mode to "From file" and select our saved LC file.
- Turn off "auto save" so the LC file is not overwritten.
Next we'll deal with the irradiance settings:
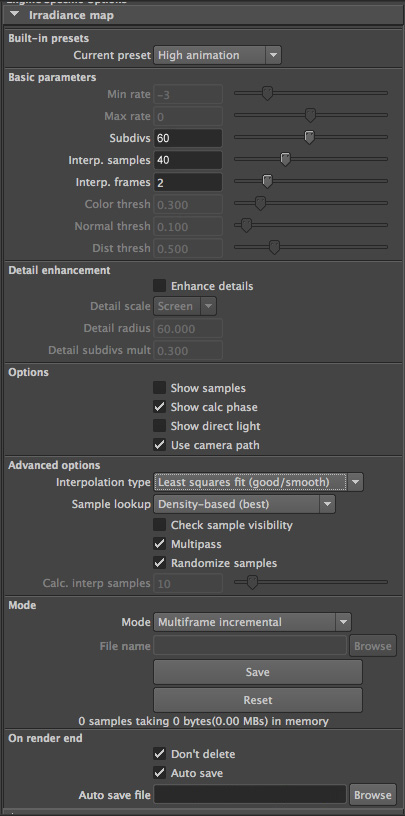
Let's begin with Multiframe Incremental which is at the heart of our strategy for precalculating the GI:
- Multiframe Incremental: This means it will incrementally add detail to the IR map with each new render. In other words, V-Ray computes a full-image irradiance map for the first frame, and reuses and refines that map for each new frame, adding only what is new and needed, causing a smoother transition between frames.
Note: Because of how Multiframe Incremental works we cannot render on the farm since the IR frames can't be blended if they are rendered simultaneously on different machines (which is how a farm works). However this is not so bad since we will not be rendering the entire animation for the precalc, and in fact the fewer frames the better, provided all the information is there. So we will render the precalc for the IR locally rendered in steps, and then use this saved IR in our farm render. See the step by step below for details.
Let's go over some of the other IR options:
- Subdivs: This is the main "quality" setting for IR. You can determine the correct value here using the Testing GI settings in Vray for IR and LC workflow.
- Interp. Samples: Again, use the Testing GI settings in Vray for IR and LC workflow to determine the right value here.
- Enhance Details: OFF. Enhance details basically uses a brute force approach for the details and an IR approach for the other parts. This can help reduce flickering in shots with fine details. However, it will also increase render times, so it is not the first choice. Note that if this is checked ON in the precalc it needs to also be ON in the final render.
- Use Camera path: ON. This is useful for calculating irradiance maps for short fly-through animations in one go, producing information for the entire camera path.
Now that we have the settings, we’re ready to render the IR:
- Under "Auto save file" click the browse button, navigate to your GI cache directory and give the .vrmap file a name (see the naming conventions doc).
- Make sure both "auto save" and "don't delete" are on. When we render, this will cause the IR maps to be saved to our file.
- In the "Vray" tab under global options, turn on "GI: Don't render final image"
- Set the frame range.
The amount of frames we will need to render depends on the camera move. If we have new objects appearing later that were not there in the first frame (and thus not in the GI calculation) then we of course need to include that in the GI. A good place to start therefore is by rendering the first and last frames. This approach will work well for shots with modest camera movement. If there is a lot of camera movement we can instead try rendering out in steps of 10.
Let’s assume we will render the first and last frame for a shot that has 1-120 frames. We then would set the steps to 119 (i.e. one less than the end frame) which will result in the first and last frame being rendered.
- Render the sequence locally (do not use the farm!).
Since we have turned off the image output, this will only render the to a single IR file (it incrementally adds each frame to the IR map, hence the name "multiframe incremental"), and not give us an image. It is critical that this is rendered on a local machine not on the farm for it to work (See “Multi frame incremental” above for an explanation).
Part IV: Rendering the Sequence (IR: From File)
Now that we have precalculated the GI, we are ready to render.
Note that we have secondary GI off. This is because the LC has already been saved into the IR map, so we don’t need to have it on since it’s already there. Having this off will save memory and consequently greatly improve our render times. This relies on having the “Use light cache for glossy rays” (described in the LC section above) set to OFF. The exception would be If we have static objects that are glossy in the shot as is common in indoor shots. In this case having this on can speed up rendering of scenes with glossy reflections quite a lot. This means that for indoor shots we will need to keep the LC on for our secondary GI.
Before we are ready to render on the farm, we first need to read in our saved IR map and turn some stuff back on...
- Keep the primary set to IR.
- Turn the Secondary GI off.
- Set the Irradiance Map Mode to "From File" and make sure our IR map is selected.
Note: when rendering on the farm, vray has trouble with mapped drives which can cause the IR map not to load producing black GI frames. To fix this, the UNC path should be used instead of the mapped drive. So instead of the "Z" drive you would use the full netapp path.
- Turn off "auto save"
- Turn off the Don't render final image option (In the "Vray" tab under global options)
- Set the steps back to 1 if you changed it above.
- You are now ready to render your scene on the farm!
|