| Mistake #1: AO should be applied to ambient light, not direct light
Ambient occlusion (AO) means that the ambient light (also called indirect light, or GI) is blocked (occluded). Because of this, the AO needs to be applied to the GI (the indirect light) and then this is added together with the direct light. Often apply the AO over the combined direct and indirect lights. This then darkens the direct light which is incorrect (by definition "ambient occlusion" means it occluded the ambient not that it occludes everything.
Fig 1. AO should only darken the shadows. Note the incorrect darkening of the floor to the right of the tribble on the left image, compared to the correct use of AO on the right.
(for simplicity we are using a multiply in the above formula, however in comp AO should be applied with a gamma, rather than a gain)
Correct Comp order for AO
With this basic principle in hand, we can then build the comp. The passes should be conceptually divided into two categories: indirect, and direct light.
- Indirect Light: We first build the indirect light by combining the GI and AO, along with any bounce lights which simulate indirect light. (See Fig 2, top row)
- Direct Light: Next, the resulting indirect light is then added to the direct light (See Fig 2, bottom row).
- Shine: The final step (not pictured) would be to add in the specular, reflection, and refraction passes.
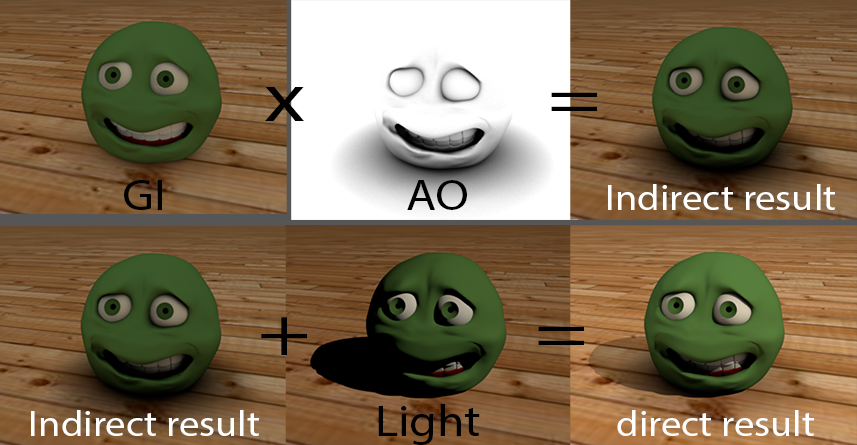
Fig 2. Properly comping AO Observe on the bottom row of images that because light is additive, we either have (a) indirect & direct light together in the lit areas, or (b) only the indirect light (GI + bounce x AO) in the unlit areas.
Mistake #2: Shadows & GI
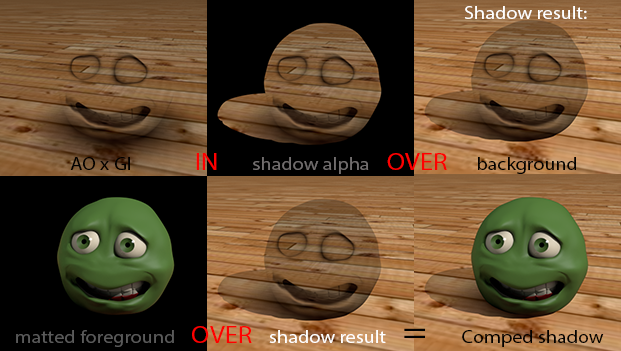
A common mistake when comping shadows -- both when integrating CG into live action, as well as when rendering CG foregrounds and background separately -- is to simply darken the background with the shadow alpha:
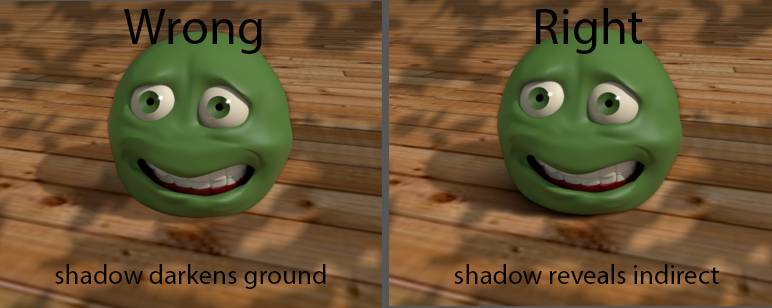
Fig 3. Wrong shadows Incorrectly applying the shadows over the background creates incorrect double shadows and results in an ugly "blackening" look.
The correct way to add the shadows is to have them reveal the indirect light of the background (the GI + bounce x AO) as illustrated below:
Preferable to this however is, rather than simply rendering out a separate foreground (FG) and background (BG), to instead split the FG render up further so we have the occlusion, shadows, and reflections on the background without the FG objects, and the FG objects by themselves with a clean alpha.
The node graph for this in Nuke would look like this:

Fig 5. Comp node chain
Notes The above render elements are based on the FG Maya Template which gives us 3 render layers: the FG elements, the shadows on the BG without the FG elements, and the reflections on the BG without the FG elements. See that doc for details on setting up the various render layers and passes. The numbers below refer to the red numbers in the above image:
- The foreground passes are built together. Note that the hair refraction pass uses an unpremult before it is merged into the multimatte.
Let's consider the math here: the shuffled matte uses the alpha and so a premult (which multiplies the rgb with the alpha, premult = A*a) has no effect.
We unpremult the refraction pass before the merge because a merge "in" is the same as a premult, just using a different alpha (in = A*b) meaning it multiplies the rgb of the A input times the alpha of the B input. . Renders are already premulted, so doing a merge-in (a premult) on a premulted render would result in a double premult.
Another thing to be aware of in relation to alphas is that brightening a pass by raising the gain is fine, but doing so by raising the gamma can cause errors on the object's edge (white halos). This can be helped by first unpremulting before the CC and premulting after, but better is to avoid raising the gamma in the first place, and work with the gain instead. Lowering gamma is fine.
- Our "Main" render layer outputs a clean alpha of the FG elements. We copy this alpha in at the end of the comp chain so the alpha value is 1 (otherwise Nuke will add the successive alphas from each pass creating values above 1).
- Here we multiply the contact AO (from the "Shadow" render layer) with the GI from the BG.
Note that before merging this into the contact shadow alpha, we first add a shuffle which sets the alpha to pure white. We also have a grade on the shadows which does a degamma on the alpha setting it to 0.455 (i.e. setting it to linear). This is because Nuke incorrectly applies an sRGB gamma correction to the alpha. Note too that we are not using passes for the BG, but outputs from the BG comp. So the GI here is actually a combination of the GI and indirect lights multiplied with the BG occlusion. See the section "Background Comp Outputs" below for an explanation.
- Finally the foreground result is comped over the shadowed background.
Background Comp Outputs (Write nodes):
Since we use two separate comp scripts for the background and foreground of each shot, we need to create several write notes from the background comp that will be used by our foreground comp:
- The Shadow build will contain the CCed GI, plus any indirect lights, with AO applied to it.
- The Background build will be the final result of the background comp, minus the DOF.
- DOF mask, that is, the mask used to drive our defocus, which is either a zdepth adjusted with a grade, or a simple ramp.
From this we can add the shadows and DOF. For details on setting up DOF see the doc Proper DOF Settings. See also the doc Comping light passes.
|