| This doc covers how to setup the Maya FG template. This FG file is derived from the BG template. This FG Template is then used to setup a FG shot with Alembic caches, and then comped with the background.
Part I. Maya FG Setup
Derive FG from BG template Begin by opening the BG Template and save as to name it a FG template based on the naming conventions doc. Instructions for creating a BG template are here
Render Settings Since the FG template is derived from the BG template, it should already have optimized render settings. We will make three specific changes to these for the FG:
- Set the primary GI to brute force. We need this for accuracy with character's hair.
- Change the filename prefix to foreground/[SHOT NUMBER]/%s/%l/%s (for details on this see the naming conventions doc)
- For the GI Light Cache, turn off "fly-through" and "camera path" as these will radically slow xGen hair render times.
Render Layer Light Selects Create a "Main" render layer and disable the master render layer. Next create any needed render layers for light selects (see docs: "Light Select in Foreground(FG): Render Layer" for details. At a minimum we will need two Render Layer Light Selects: for direct and indirect light. Of course you can have more for increased artistic control:
Minimum "Light Select" Render Layers
- Direct (for all artificial direct lights, such as light bulbs or candles)
- Bounce (indirect lights, including the sky)
Explanation:These are the "minimum" because in the comp bounce lights are added to the GI (both are ways of simulating indirect light) and multiplied with the AO (ambient occlusion means that the ambient or indirect light is occluded) before this is added to the main comp chain. Direct light in contrast does not receive AO. A more detailed explanation is here
Example "Light Select" Render Layers
- Key Light (the main sun light)
- Rim Light (echoing the sun, to pop the characters, perhaps sky)
- Bounce (for all indirect light. In the case of Wishing Box the candles -- which are of course direct light -- are included in this pass)
Explanation:This setup allows for more artistic control using a 3-point lighting setup.
Making it fast
Simplified HDR geometry This really speeds up the render because it replaces tons of geometry and textures with a single simplified geo of the set mapped with a rendered HDR. The process of creating the rendered HDR maps is described in detail here. Here we will focus on how to integrate this into our scene’s render layers.
In the render stats of the HDRgeo:
- Turn off cast shadows. This allows the scene lights not to be blocked by the HDRgeo.
- Turn off receive shadows.This prevents it from catching shadows from the FG characters & props.
Other stuff: The HDRgeo will be placed in the ENV_GEO group (described below).This will cause it to be treated as matte object along with all the other BG geo. Additionally, we will need to do some stuff in the “Shadows” render layer to integrate the HDRgeo. This is also described below.
Camera fixes: Sometimes camera are placed outside of walls. In this case you can turn off the primary visibility on the particular wall. This is done on per-shot basis. Note that this will mean that the geo will not catch shadows, which is why we only do it on the geo that is blocking the camera.
Removing hair from AO We will exclude the hair from the AO passes by placing it in the “FG_HAIR_IN_HERE” group (described below). This will speed things up a lot too. Later in the comp we will use the multimatte for the hair to matte out the AO with white.
Env Multimattes Turn all environment multimattes OFF in render settings. This avoids redundancy since we already have these from the BG.
Contact Occlusion
We already have occlusion rendered for the BG objects in the BG render, so in the FG we only need to render (1) the occlusion for the FG animated characters and props , and (2) how these affect the BG. For this we will create 2 AO passes, described below.
Render Passes
See the Foregrounds section of the Render Passes Doc for details on setting up the various render passes for the FG. These include passes for our Render Layer Light Selects described above. Additionally, based how we will use occlusion (described above), we will set up two occlusion passes:
1. Main AO: We will also create a switch to apply the AO to the FG characters and props, but flat white to everything else (described here). This will result in BlendColor node that we will connect to an ExtraTex pass.
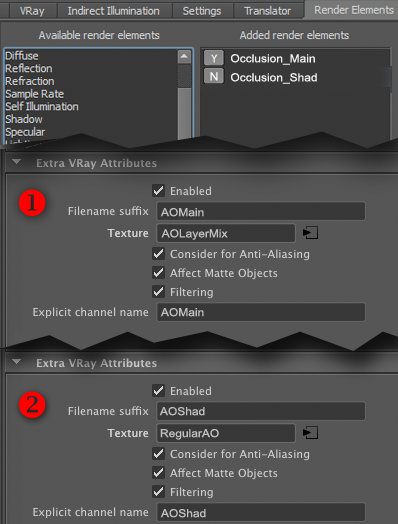
We name the ExtraTex render element "Occlusion_Main" and the render pass suffix name "AOMain" as shown in the image below. We will apply this render element to a render layer called "AO" which is described below.
2. Shad AO: Create an exclusion set for the AO texture (described here). This will allow the BG objecs to receive AO from the characters and props, but not generate their own AO (which we already have from the BG render).
When using an HDRgeo, we will create a switch for the contact AO (same as we did with the MainAO above) so we get contact AO on the BG objects that the characters and props interact with, but flat white on the HDRgeo.
We name the render element "Occlusion_Shad" and the render pass suffix name "AOShad" as shown in the image below.
Explanation:The first (Shad AO) will give us the contact AO cast from the FG objects onto the BG. This is used to integrate the FG objects into the BG in comp. The second (Main AO) will be the regular AO on our FG objects themselves.
Shadow, AO & Reflection Render Layers
Using our custom occlusion setup, we will make three special render layers called "AO" “Shadows” and "Reflections." The shadows render layer will contain the contact shadows (in the alpha) and the contact AO (in a pass) from the FG objects on the BG (the beauty is black and unused). The Reflection render layer will contain the reflections from the FG objects on the BG (in the beauty). The AO render layer will contain the main AO (in a pass). The beauty is again black and unused. Below is a step by step:
Note that we use render elements in order for the AO to work with refractive objects, such as glasses or a window. See "Glass in AO" here. If the scene does not contain any glass (corneas do not count since we don't need to see through them in the AO) then the AO could instead be done on the beauty of the AO render layer, using a surface shader applied with a material override.
A. Creating BG and FG groups
- Create a render layer called “Shadows” adding all of the direct lights (leaving the bounce lights out). In some cases we may wish to only add the main key light.
- Create a render layer called “Reflections” adding all the lights.
- Create a render layer called “AO” with no lights.
- The BG template that you began with should have a group for all the BG geo called ENV_GEO. If it does not, make one. Add this group to all three render layers. If using an HDRgeo, add this to the group too.
- Create a group called “FG_GEO_IN_HERE”
- Create another group called “FG_HAIR_IN_HERE”
- Assign the FG_GEO_IN_HERE group to all the render layers, including the new render layers you just made.
- Assign the FG_HAIR_IN_HERE group to all the render layers, except for the "AO" and "Shadow" render layers (we will exclude hair form the AO to speed it up).
Explanation: When a lighter is setting up a FG shot they just need to put the animated characters and prop's geo inside the FG_GEO_IN_HERE group, and the hair or fur nodes in the FG_HAIR_IN_HERE group. The FG objects will then automatically be populated into the correct render layers. Adding only direct lights, and possibly only the main key light results in a less muddied shadow pass to integrate our characters into the BG.
B. Assigning object properties to the BG and FG groups
- Create a new object properties for the FG_STUFF_IN_HERE group (create > Vray > Create single object property for selected), and rename it FG_VrayObjectProperties. If your scene has grass, add its VrayfurPreview nodes to the object property (drag in the Outliner).
- Create a second object property for the ENV_GEO group, and name it BG_VrayObjectProperties.
- In the BG_vrayObjectProperties, set the following,
receive GI: OFF
matte surface: ON
alpha contribution: -1
shadows: OFF
affect alpha: OFF
reflection Amount: 0
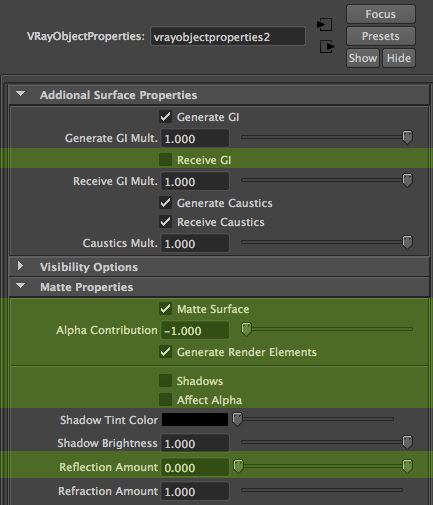
Explanation: This will turn all the geo in the BG environment group into matte objects so they will be affect the reflections and GI for the FG objects, but not appear in the render. We have "Receive GI" off because it produces odd results in the mattes (it adds the negative value of the GI into the shadow mattes).
C. Setting up the "Shadow" Render Layer
Select the Shadow render layer and...
- In the Vray tab of the Render Settings, create and override for the AA min subdivs settings them to 2. This ensures that we get enough quality in the render.
- In the render settings, create a layer override, turning off the GI for this render layer, which we wont need.
- In the FG_vrayObjectProperties, create a layer override, turning the primary visibility OFF.
- In the Render Elements tab of the Render Settings, disable the "Occlusion_Main" and enable "Occluson_Shad"
- In the BG_vrayObjectProperties, create layer overrides for the following:
shadows: ON
affect alpha: ON
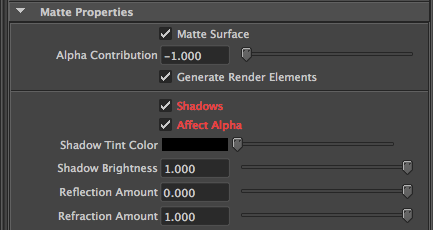
Explanation: This will give us the shadows and occlusion from our FG objects onto our BG elements. The shadow in the alpha channel, and the contact occlusion in the Shadow render layer’s occlusion pass. The beauty will be black and in unused. Note that the occlusion for the characters and props themselves is in the Main render layer. Since the FG object’s primary visibility has been switched off, the FG geo will not be visible in the Shadow render layer, just their effect on the BG.
D. Setting up the "Reflection" Render Layer
Select the Reflection render layer and...
- Repeat step 1-3 above for the Shadows render layer, doing the same in the Reflections render layer.
- In the Render Elements tab of the Render Settings, disable all render passes
- In the BG_vrayObjectProperties, create a layer override, setting the reflection amount to 1

Explanation: This will give us the reflections from our FG objects onto our BG elements. This will appear in the beauty. As with the Shadow render layer above, since the FG object’s primary visibility has been switched off, the FG geo will not be visible in the Shadow render layer, just their effect on the BG.
Render Layer/Passes Summary All together, at a minimum, we would have 5 render layers.
(note: in cases where you would not see the FG objects reflecting on the BG, you could optionally leave out the reflection render layer):
- Main (for global passes such as GI, reflection, etc)
diffuse [optional: for diagnostic purposes]
lighting [optional: for diagnostic purposes]
SSS [optional: for diagnostic purposes]
specular [optional: for diagnostic purposes]
reflection
refraction (for hair)
GI
Z-depth (Note that for the FG depth to match the BG, the FG far distance value needs to be the same as in the BG)
FG multimattes (imported with the animated characters & props)
- Direct (light select)
- Bounce (light select)
- AO
- Shadow
- Reflection
Comp In the animated GIF below you can see the result of three FG render layers (shadow, reflection, and main) when comped together with the BG. Instructions on how to setup the comp are found in the doc Comping background and foregrounds.
|