| Part I: Vray
There are two ways to create depth of field in Vray: in the render and in comp.
A. DOF in render
Rendering depth of field has the advantage that it is perfectly accurate, and the disadvantage that it is slower and that the DOF is locked down in the render and cannot be tweaked in comp.
The setup is simple: You make a physical camera with DOF, and use a distance tool to control its focal point.
- Create a Vray physical camera
- uncheck "exposure color correction" and vignetting
- turn on "enable depth of field" and "focal distance"
- Next, create a distance tool, parenting the first locator under the camera and zeroing out its translations and rotations
- then vertex snap the other locator to the object you wish to focus on
- Finally, connect the distanceDimentionShape node of the distance tool into the "focal distance" of the physical camera.
This will make the camera stay focused on this object throughout the shot. To increase the amount of defocus, lower the camera's F-number.
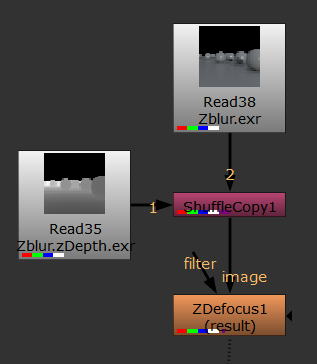
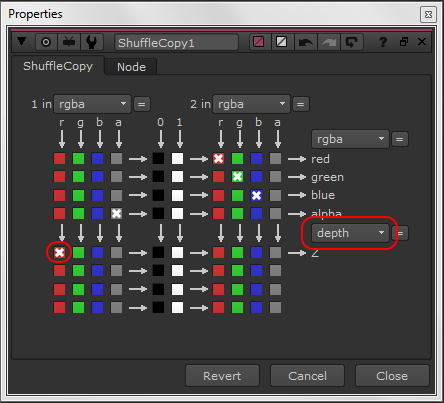
B. Depth of field in Comp
This basically involves generating a zdepth pass in Vray. Because of the speed and flexibility,
we typically prefer this method over rendered DOF. However, it can require rendering on multiple render layers in some cases.
In the Vray render elements for the zdepth pass set the following:
- Uncheck "Use depth from the camera"
- depth black=0
- depth white=1
- Set the distance (as described above)
- uncheck "filtering"
- uncheck "depth clamp"
- Set the unfiltered fragment method to "Closest to camera."
Note: This option is found at the bottom of the in Render Elements tab in the Render settings.
Explanation:
- Depth from camera: uses the clipping plane settings in the Maya camera. We are setting this manually instead
based on scene measurements (described below).
- black=0, white=1: The formula for how the pixel values are set in the zdepth pass is
pixelValue = distance/(far-near)+near. If the near/black value is set to 0 we can simplify the formula from
pixelValue = distance/(far-0)+0 to pixelValue = distance/far. If the far/white value is set to 1, the formula
becomes simply pixelValue = distance. In other words, the pixel value will correspond to the scene distance,
so an object 10 scene units from the camera will have a pixel value of 10. If we instead set the far/white value to 100, this
means that the pixel value will be divided by 100 so that an object 100cm from the camera will have a pixel value of 1
(pixelValue = 100/100 ). Nuke's zDefocus node does not seem to care whether the far
distance is set to 1, 100, or the default 1000. So while setting the far value to 1 is one-to-one accurate
(i.e. a pixel value of one equals one scene unit) you could also just leave the far value at the default 1000. Personally,
I like to set the far value to 100 so the pixel value corresponds to meters from the camera (1m = 100cm).
If you are using the zdepth pass as a mask for color corrections (emulating atmospheric perspective for example) then you will
instead want to set the far depth value based on the furthest object in your scene so that the zdepth pixel values range from black
to white (0-1) from close to far. In this case filtering and clamp should also be on. Note that in this approach
(using the zdepth to produce a mask, rather than for depth of field) the far value needs to be modified per shot. Alternately,
the black and white values can be normalized in Nuke with a Grade node. In contrast, when using a zdepth to generate DOF, the
vaues remain constant between shots, as they represent the distance from the camera for that pixel.
- Filtering: needs to be off for a depth channel. This is because each pixel represents the distance of the
object at that point. When filtering in on, the pixels get anti-aliased, meaning it smooths the values between contrasting
pixels which changes their values leading to inaccurate results.
- Depth clamp: clamps the pixel values between 0 and 1. We want this off so we can get accurate pixel values
above 1 based on their distance from the camera.
- Unfiltered fragment mode specifies how to determine the final values for render elements that have filtering
turned off (Z-depth, object ID). "Closest to camera" means the pixel values are taken from the object closest to the camera.
"Best coverage" (the default) means the pixel values are taken from the object that has the largest contribution to that pixel.
What that means practically is that pixels on the edge of objects get "choked" while the "Closest to camera" dilate them.
Background Sphere
There is currently a bug in V-Ray that will cause the background to be black even though the far value is white.
As a workaround we will need to create a sphere for the background:
- In the Maya scene create a primitive sphere and scale it to be super gigantic. If you can't see it in the clipping planes,
don't worry. V-Ray still can see it.
- Apply a Surface material to it and set the matte color to black (so it wont affect the alpha)
- Create a Vray Object Properties for it, and uncheck the following:
- Visible to GI
- Visible in reflections
- Visible in refractions
- Cast Shadows
- Receive Shadows
Leaving only "primary visibility checked. This will cause the sphere to affect the zdepth,
but not block the lights or environmental GI and so on.
Part II: Nuke
Part III: Statagies
One important issue with depth of field done in comp is that if an object in the foreground is out of focus, as it blurs it we will see the background behind it.
However if everything is rendered together we do not have the pixel information about what is behind the foreground object.
This is equally true with deep EXR images which contain this information for depth, but not for RGB.
The only way around this is to either render DOF directly in Vray camera, rather than in comp (which is of course quite slow to render),
or to render the foreground and background on separate render layers.
Below you can see the problem illustrated:
In the "correct" version pictured above the zDefocus is applied to the foreground, then this is merged over the background.
In the "incorrect" version the zDefocus is applied at the end of the comp, resulting in the blur getting choked.
In other words, because Nuke has no information about the RGB pixels behind the foreground objects it does not know what to show behind it when
it is blurred. When we instead apply the DOF to the foreground and comp it over the background this issue is avoided.
Part IV: Camera theory and DOF
Custom DOF mattes and infinite focus
As covered in the video you can also feed a roto shape or ramp into the depth channel of a Zdefocus to create custom DOF effects. Additionally you can modify the zdepth pass itself with a Grade node.
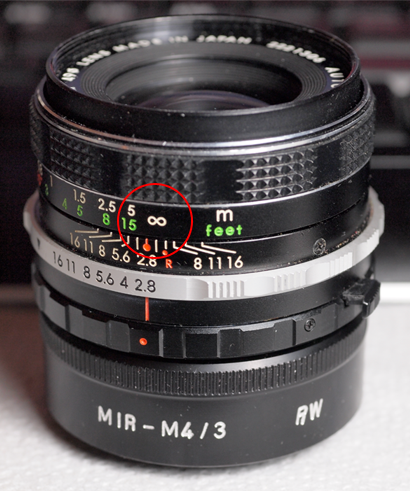
Something that is crucial to understand when taking this manual approach is how depth of field works on a camera. Depending on the lens (telephoto, wide angle, portrait, etc.) cameras will go to infinite focus after a certain distance. For example this 35mm standard lens goes to infinite focus after 5 meters (ca. 15 feet).
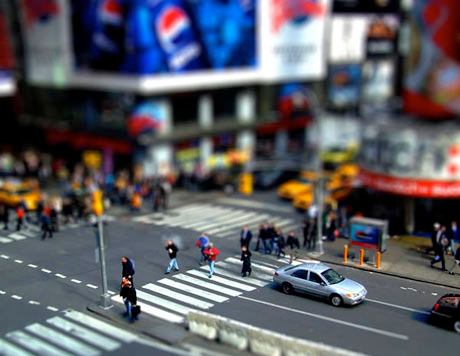
What this basically means is that if objects further than 5 meters away are in focus then everything further away will also be in focus. Where the infinite focus begins will vary depending on the camera and lens. As a general rule, the longer the lens, the further away the infinite focus (aka hyperfocal distance) is. If you want to really nerd-out check out this Depth of Field (DOF) and Hyperfocal Distance Calculator. However, the key point here is that if you make objects that would be in infinite focus on a camera defocused in Nuke it will look like a miniature shoot (This is know as "tilt-shift photography") so it's important to keep this in mind when tweaking the defocus amount in Nuke manually.
Determining DOF on a real camera
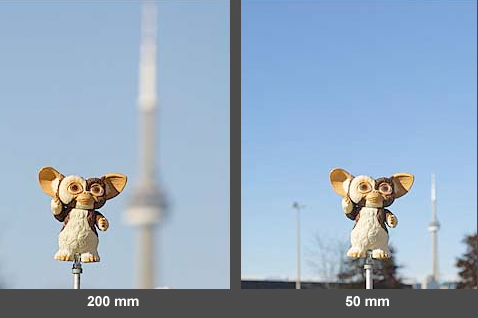
The camera focal length number corresponds in Maya to the "angle" of the Maya camera. The higher the number the closer objects will appear. So 24mm is a wide angle, 35mm a semi-wide angle (similar to how our eyes see), 50mm a portrait lens, a 72mm a closeup lens, and a 200mm is a telephoto. The longer the lens, the more the view is foreshortened, which can give the appearance of a shallow depth of field. However, the focal length does not actually impact the DOF. Rather, longer focal lengths appear to have a shallower depth of field because they enlarge the background relative to the foreground. Note in the following two images how the far tower appears closer to the Gremlin with the telephoto lens (foreshortening) and thus gives the impression of having a more shallow depth of field, while actaully the defocus amount on the tower is the same on both photos
Two main factors determine the DOF: how far an object is from the camera (focusing distance), and the camera aperture setting.
Focusing distance: The closer an object is to the lens (assuming the focus is set on that object) the shallower the DOF. Conversely, the reverse is true - the farther away an object is and focused on, the deeper the DOF. Note that this principle is directly related to the idea of infinite focus discussed above.
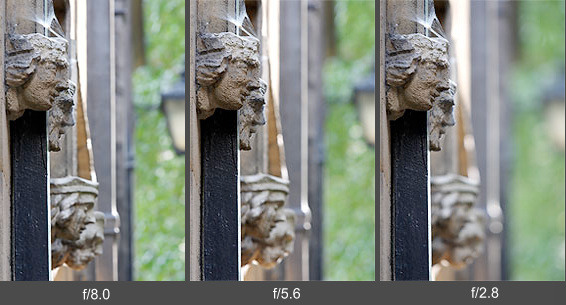
Aperture (F-Stops): Aperture is measured in F-stops. Larger apertures (smaller F-stop numbers) produce a shallower depth of field. The following images maintain the same focus distance, but changes the aperture setting:
|