| Excluding objects from AO |
|
This doc discusses two ways of excluding objects from AO: Exclusion sets and Custom Texture Switches. Custom Texture Switches can also be used to set up custom extraTexture render elements. Exclusion Sets: These are used for objects you want to exclude from the AO calculation. The object can receive AO from the objects, but will not cast AO on other objects.
This can be used for objects you want to render white in AO pass (no AO). Unless you also set up an exclusion set these objects will still cast AO onto other objects in the scene.
Explanation: A blend value of 0 gives color2 and , and a blend value of 1 gives color1 (0=color2 and 1=color1). This is counter-intuitive since it is backwards (you'd think that 0=color1 and 1=color2). We set color1 to white and connected the AO to color2.
Explanation: We are driving the blendColors with our userScaler switch. For objects where the "ExcludeAO" is on (=1) it will use color1 (white), and for the other objects where it is off by default it will use color2 (AO).
Note: The name of the blendColor will be the name of the render pass, so you'll want to rename the blendColor node "AO" or similar.
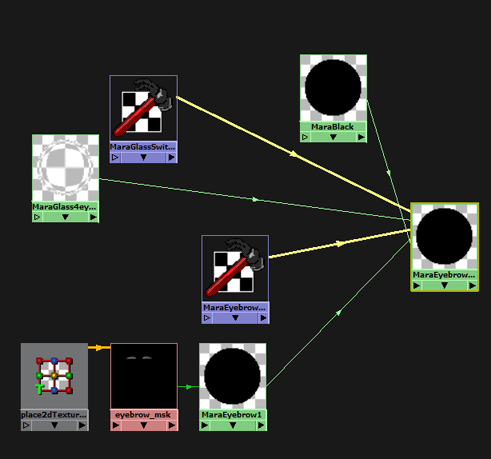
The above workflow uses a blendColors to create an either/or switch: Either it is our AO or it's white. Either it's our custom mask texture or it's black. But what if you want to have multiple materials or textures combined together? In this particular example we want to create a mask for the character's eyebrows, but need to view this through her glasses which distort the mask since it refracts through the glass. So we will need to use materials (for the glass refraction) rather than textures, and we need 3 materials: Glass, the eyebrow mask, and black for everything else. As you can see in the image below we have these 3 materials plugged into the Blend Material: The base is a black material (a VrayLightMtl), then the next two materials are connected to the coat0 and coat1 slots. The eyebrow mask is a VrayLightMtl) and the glass lens is a VrayMtl set to refract but not reflect. We want to combine these additively (so the refraction is added to the eyebrow mask) so we have "additive mode" checked on the blend material. The trick here is that the userScaler nodes are connected to the blend amounts so that if the value is 1 (on) it gets the material, and if the value is 0 (off) it does not. because the output of the UserScaler is a single channel going into a tripple channel for the blend amount we use the connection editor to connect the outAlpha of the scaler with the red, green and blue channels of the blend amount channel.
Below you can see the connections for this in the Hypershade. There are two userScaler nodes (called "MaraGlassSwitch" and "MaraEyebrowSwitch") each with a default value of 0 (off). Each has a corresponding user attribute on its object ("glass=1;" on the lenses and "eyebrow=1;" on her head).
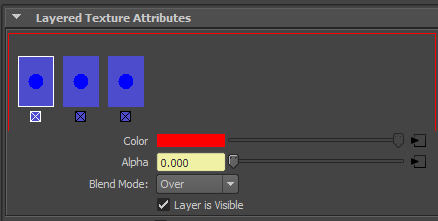
Using essentially the same workflow as above (example #1) we can combine multiple textures into an extraTexture render element. To do this, rather than combining materials in a Blend Material, we will instead combine textures in a Layered Texture:
We need textures or colors for each layer of our Layered Texture. So we either MMB drag a texture into the stack, or we create a color swatch (LMB click) for flat colors like black or white. The blend mode of the Layered Texture is set to "over" so we want the base/default texture on the far right side of our stack (which is the bottom). As in the previous example each texture/color has a corresponding UserScaler node. These are connected into to the corresponding alpha for each texture in the Layered Texture. That Layered Texture then that goes in the extra texture render element. The name of the render pass will be whatever you name the Layered Texture. Background AO: One common example of this approach would be the AO of a background render. For this we would create a extraTexture render element and have white for any non-occluded objects (for example grass) and AO for the others . We could also combine this with exclusion sets (described above) for instance on grass or tree leaves that we want to exclude from the AO calculation to speed up the render.
Now let's get fancy! Here we want to have 3 textures for our occlusion pass in our animated foreground shot:
Applying variables to groups: A key factor in a case like this is how to apply the Vray user attributes to the many objects in the scene? Rather than creating variables for hundreds of individual objects we can instead apply it to a group and all the objects in that group will inherit the variable. So we make two groups for the objects in the environment: one for non-occluding geo that will get a white material (We'll call this variable "white"), and another for all the other static objects that will receive AO from the characters but not generate its own AO (We'll call this variable "staticAO"). Imported assets inhering default variable values: A second issue is that we will be importing in the animated characters and props. So how can we assign user variables to them if they are not even in the scene? In theory would could add variables to objects or groups, however that would mean doing this for every character and prop in the show which would be very time consuming. So what we will do instead is make the regular AO for animated characters and props be the default (value=0) which it will automatically inherit when it is imported. That means all props and characters will automatically get this default value. Glass in AO For the glass objects (i.e. objects with refraction as opposed to transparent objects using opacity) we will need to create an objectProperties node and uncheck "generate render elements." This will cause the objects to not appear in the AO pass. We also want to make sure we have "work with transparency" checked in the VrayDirt textures. This will cause the object to not cast AO onto other objects. Workflow:To set this up we follow the workflow in example #2 (textures in a pass). We plug our 3 textures into the layered texture: The base (on the far right) is the character/prop AO since it is the default. Next is a white color, followed by the static AO texture. Each of these has its corresponding scalers in the alphas for each layer. Materials vs Textures: We are using the texture approach of example #2 rather than the materials approach of example #1 because we want to have refractive materials (a character's glasses for example), and are taking advantage of a trick with Vray to do this which only works in a render pass. Alpha: We also have the issue of needing to get a proper alpha for the AO since we are using wrapper materials in our master layer (which gives us shadows in the alpha) , however we can solve this with Multimattes in comp generated form the background render.
|