| Vue atmosphere settings | ||||
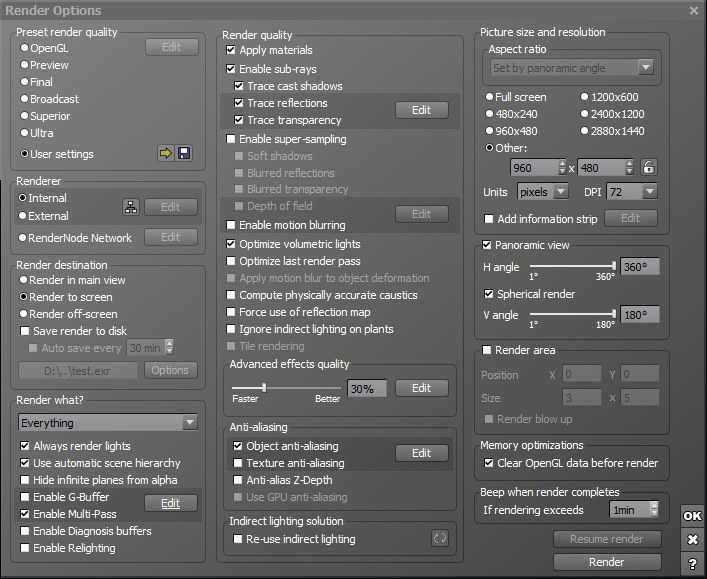
| In addition to the info here, check out the online Vue documentation. An important key to getting good skies is to maintain a linear lighting workflow in Vue. For details of how to set this up, see Part III. Gamma and Linear Workflow in the doc Creating a Vue atmosphere sphere. Additionally, it's important to have optimized render settings, so you can get quick renders. You can download a ZIP of the sky atmosphere described below as well as a render settings preset optimized for cloud renders. Here's a screenshot of the render settings:
Next we turn to the settings in the Atmosphere Editor...
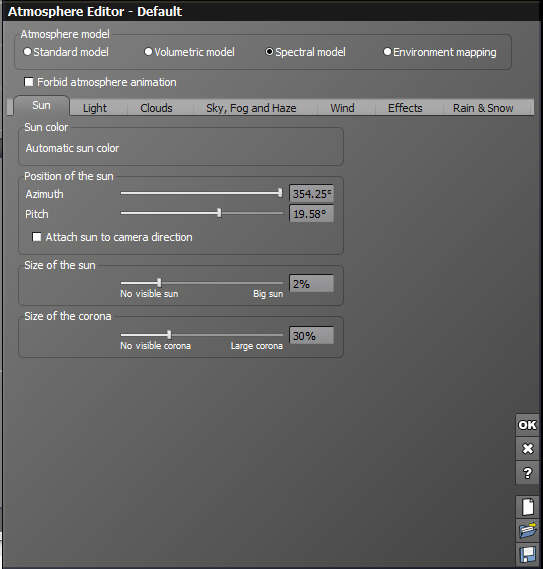
Sun Tab
We wont do much here other than possibly change the "size of sun" slider which is self explanatory. The "size of corona" slider only affects the glow right around the sun, so we will leave this alone as it has little effect.
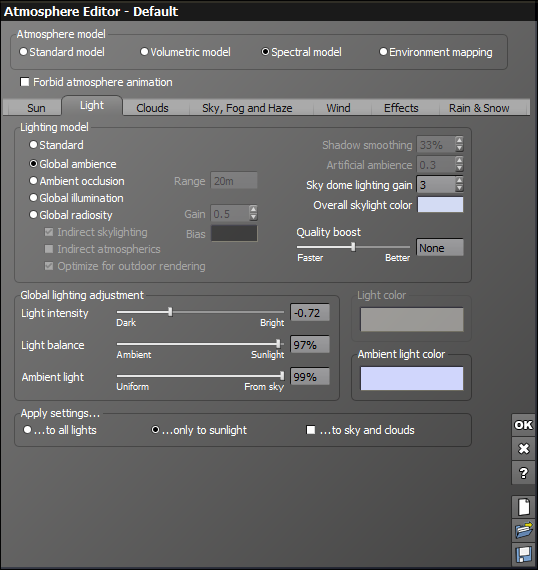
Global Ambiance:
Darks become grey/lighter shadows. Lower contrast.
Global Illumination:
Dark Shadows. High contrast
Sky Color:
Decay Color:
Haze Color:
Fog Color:
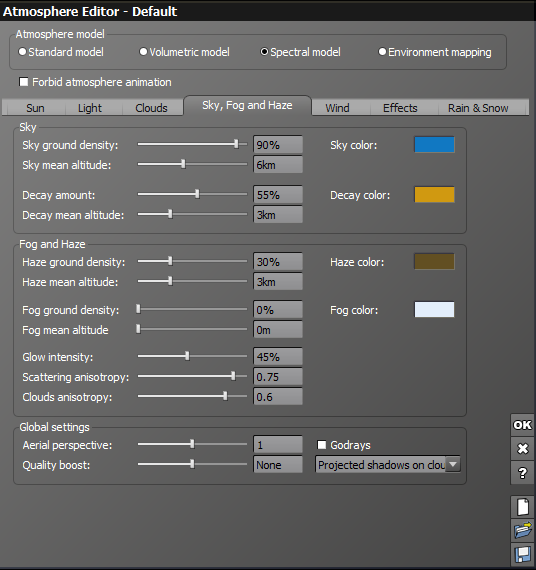
Next we move to the Sky section:
Sky Ground Density: 80%
The density of atmospheric gasses at ground level. Lower values will make darker blue. We generally set this to 80% and leave it alone.
Sky Mean Altitude: 6km
Controls rate of change of the above gasses. Raising it increases blue, lowing it raises turbidity and also darkens the whole sky. This is a good value and so we wont be changing it.
Decay Amount: 55%
This will increase the amount of the orange decay in the sky. Lowering it will instead mix in white from the horizon. We might raise this a bit (at the most to 75% for a strong sunset), but generally will leave it alone.
Decay Mean Altitude: 3km
This controls how high effect of the haze extends up into the sky which will affect the glow around the sun. This also will darken the sky as it is raised as it blocks out the blue, so it needs to be raised carefully. Generally the value of 3-4km is a good height.
Fog and Haze:
Haze Ground Density: 3%
The thickness of dust and pollution at ground level. This will also affect the glow from the sun and lower altitudes.
Haze Mean Altitude: 3km
The higher the value the more haze in the sky. 800m to 1.2km is physically realistic.
Fog Ground Density: 0%
Generally we leave fog off since we don’t want fog.
Fog Mean Altitude: 0m
This is off too.
Glow Intensity: 45%
The strength of the glow coming from the sun. This is an important one that we will want to tweak.
Scattering Anisotropy: 0.87
This might be thought of as the "sunset slider" as lower values will make the whole sky pickup the value of the haze color. As the values are raised higher we can get that golden glow around the sun while still having nice blues in the sky in the opposite direction. When set to 1 there is no glow at all. Small numerical changes here have a big impact on the look.
Cloud Anisotropy: 0.80
Controls the highlights on cloud bulges.
-1 = Light behind cloud that will not travel through it 1 = Sun punches straight through cloud Global Settings:
Aerial Perspective: 1
Setting this to 1 means the atmosphere is scaled according to real world distances. One way to make your scene look bigger than it is, is to pump this number a little higher.
Projected Shadows From Clouds. Finally, we choose "projected shadows from clouds" from the drop-down menu rather that "volumetric sunlight" because this setting will have a major impact of eliminating grain from our atmosphere without needing to boost render times. We would only need to choose "volumetric sunlight" is we wanted to have God rays. Generally wont, and would instead add things like God rays and lens flare in the comp. Cloud Layers Tab
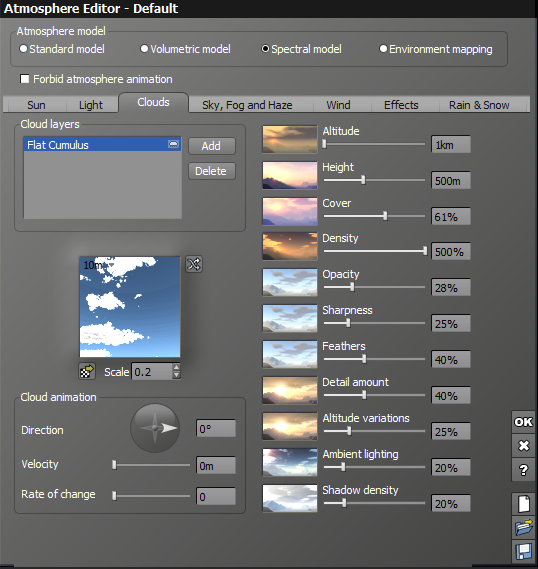
Note: In addition to the changes you can make here in the Atmosphere Editor, you can also use cloud zones and interactively scale the area where the clouds appear. This is useful, for example, to avoid getting too many clouds accumulating towards the horizon.
Altitude:
When the clouds start to form on the horizon. This has an impact of the cloud size in that clouds that are higher up will appear smaller since they are further away perceptually.
Height:
How thick the layer of clouds is, this slider controls where the layer ends. In other words, the height refers to how tall the clouds are, as opposed to altitude above which refers to where they appear in the sky.
Cover:
Minor changes are better, controls cloud cover.
0% = no clouds in sky 100% = no sky visible through clouds
Density:
How dense and solid the clouds appears. Low values not only reduce density, but also give the clouds a thin or wispy feel, while high values make them look more defined.
60% - 80% = Thick and Strong clouds 10% - 40% = High Altitude clouds 0.1% - 1% = Thin and Wispy
Opacity:
How much light penetrates your cloud layer as a whole.
Both density and opacity complement one another so for
low density values (wispy clouds) you'll need to use high opacity settings so they don't blow out.
Sharpness:
This controls the edges of your clouds. Keep this as low as possible. In most cases you want this to be zero (0).
Feathering:
As the Feathering value is increased the billow is mixed together with a fractal noise giving a wispy of "feathered" quality. When the Feathers slider is set to 0 you will get a billowy clouds that are influenced by the details slider (in the Cloud Materials Editor). Note: For feathering to have any effect the Detail Amount slider (below) must be higher than 0%.
Detail Amount:
A very important slider for controlling your cloud style. This adds billowy fluffyness to the edges of your clouds. This slider works together with the Feathers slider above, and the Scaling slider in the Cloud Materials Editor below. Setting the Detail Amount
to 9% and Density to 4% will give us thin fluffy clouds
Altitude Variations:
Random altitude jitter. 30% - 70% is realistic.
Ambient Lighting:
Lightens cloud layer as a whole, this can destroy a lot of contrast so use Opacity first and this one as a last resort. You can also add ambient color just to the shadowed part of the clouds in the Lighting & Effects Tab of the Advanced Cloud Material Editor (right-click the clouds preview image to open it) by checking "Force ambient color" and selecting a color.
Shadow Density:
How dark the shadows on the ground cast by the clouds (and shadows cast on other clouds) are. Keep this low if your Density or Opacity are particularly high. This setting greatly affects the visibility of Godrays (a setting you should only use if you enjoy ridiculous render times).
Scale:
Changes the size of the fractal that the clouds are generated from. If your renders look speckled then raise this slider.
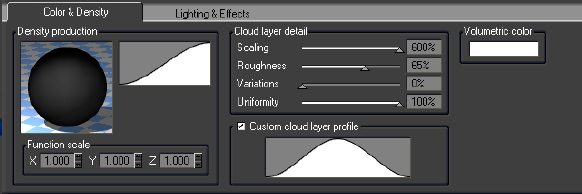
In the Cloud Layer tab, double click on the picture of your cloud to open this up. Any changes here will affect the entire layer as a unit. These parameters allow you to control the size and shape of the clouds by modifying the metanodes. If you are new to this, it’s better to find some nice clouds from the examples and use these.
Color and Density Tab:
Scaling:
The scale of the cloud detail. When increased the detail will become more pronounced so you may need to lower the Detail slider to compensate. If there are too many unnecessary details or small clouds in your scene be sure to pump this up!
Variations: This produces large scale variations over the entire cloudscape (as opposed to on individual clouds).
Roughness: This adds roughness to the detail. Too low = Smooth ice cream bulge clouds. Too high = tons of tiny clouds instead of an edge. Usually 50% is a good value, but in some cases you may need to make it between 60-65%
Uniformity: Low value makes bottom of cloud layer as rough as the top. High value makes lower portions of cloud layer smoother.
|