| Painting Vray Fur Direction Maps in Mari |
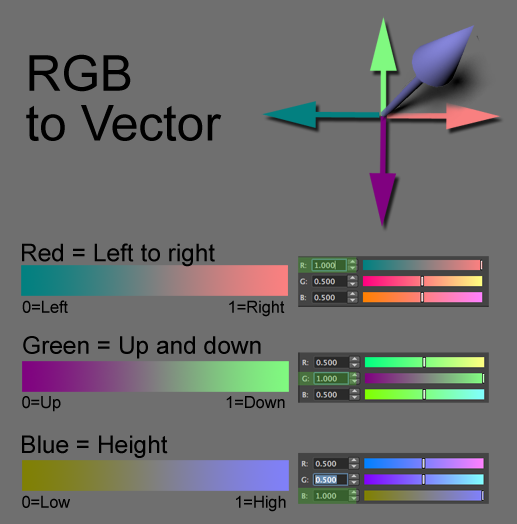
| Mari 2.0 can paint vector maps that can be used to drive Vray fur. However, because the two software do this in slightly different ways, the main issue becomes creating a map in Mari that will be compatible with Vray. This tutorial thus focuses on creating compatible output for Vray, and does not cover the basics of how to paint the vector maps in Mari. For those unfamiliar with vector paint in Mari 2.0, there is a nice video tutorial here. Part I: Technical Overview Let's begin with a chart showing how the vector system uses RGB colors to drive the fur direction:
As you can see above, the RGB channels control the fur direction: The red channel is left to right, blue is up and down, and blue is the height. Or stated differently: R=X, G=Y, B=Z. Mari only paints the red and green directions, not the height. So we will want to start with a map that has the left/right and up/down set to the middle, and the height all the way up. In other words our map's initial color should be set to: 0.5, 0.5, 1. This will give us a nice elevation later in Vray rather than having the fur get buried in the geo. Next, let's go over some technical details of how Mari and Vray both work with vectors:
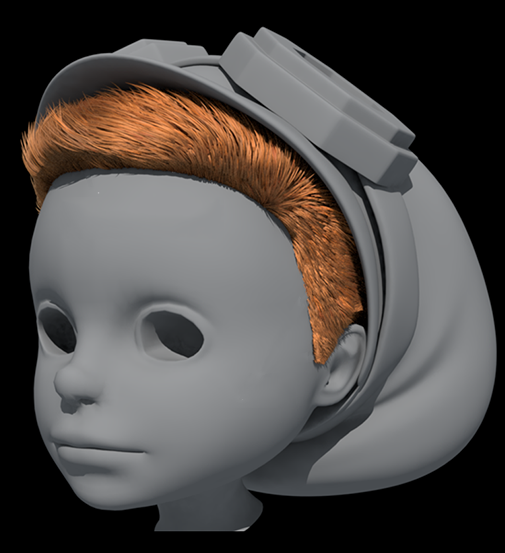
Fur can thus be combed to achieve a good deal of complex looks, ranging from animal fur to short down feathers, end even short human hair, as shown here:
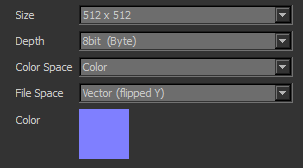
The key is that in each case the hair must be short, and more specifically it cannot have any curve or wave to it. If this is needed then you will need to instead use a hair system. However do keep in mind that it is possible to use a combination approach. For example using fur for short hair on the sides of a character's head and longer wavy hair on the top. Part II: Making the Vector Maps in Mari Based on the above, we therefore need to create a new channel in Mari to paint our vector map onto with the following settings:
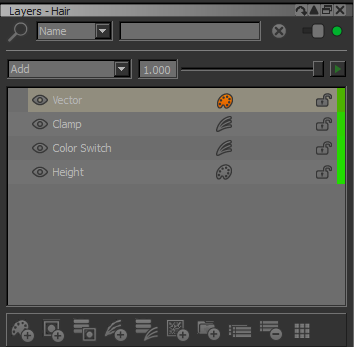
However, if you do want to paint the elevation into the vector map we can do this using some fancy voodoo inside Mari. To accomplish this we just need a basic understanding of what is going on with the blue channel which controls the elevation: Since the blue is already at 0.5 on the vector map, we need to add to that if we want to elevate it more. Our color model is additive, so to make the vector map fully elevated we need to add 50% blue to our map (since 0.5 + 0.5 = 1). However that would be pretty hard to paint. So what we'll do instead is paint a greyscale map, and then covert this to our 50% blue range which we will add into our vector map. Here's how we do it:
The whole thing looks like this:
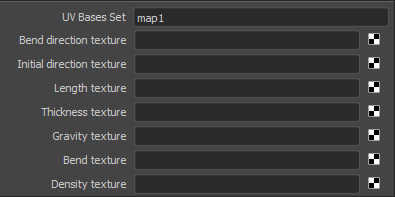
Once our map is done, we next need to plug it into the fur's Initial Direction Texture and Bend Direction Texture slots in Maya. You can either plug the same vector map into both, or if you used the method described above to add height values to the vector map you would put the map with added height values into the bend slot, and the map without these values in the "initial direction" slot. This will give you fur that lies flat along the body with a bend value of 1. If you want the fur to puff out a bit you can put the map with added height values into both slots.
The bend slider can then be used to influence how the fur responds to the vector maps. Unless you want the gravity to additionally influence the fur direction, this should then be set to zero. Let's think a bit about how this works: When Mari paints the vectors it simply sets the blue channel (for height) to grey (0.5). If we raise this up to 1 in the initial direction this will cause the fur to puff out from the body (initially going up before it bends). If we do the same for the bend this will cause it to cause it stay perpendicular to the surface rather than bending back down into it. Thus if you want to vary this (having some fur lie flat while other fur puffs out more) you would have a constant elevation of 1 in the blue for the bend, and varied values of blue (from 0.5 to 1.0) in the initial direction. You can do this easily in Mari by simply making different layers, one set to pure white (for the bend) and another with varied values (for the initial direction). Just toggle these on or off when writing out the maps (right click > export all layers flattened). Bonus Tip: You can add wind to grass in Maya by mapping an animated fractal to the gravity slot. Just keyframe the animation parameter, perhaps setting an infinite oscillating loop in the graph editor. You can preview the results with a playblast. (Note that the alpha output of the textures is used here, so you need to enable the Alpha Is Luminance attribute for the texture) |

