Color Grading
Nowadays, nearly all films incorporate color grading. Color grading films, also known as DI (digital intermediate) can trace its beginning to the film O Brother Where Art Thou at the turn of the century (2000). This was the first movie to use digital color grading for the entire film, adding a sepia look to give the appearance of an aged photograph.

George Clooney squinting in the sepia sunlight of the deep south
Since then DI has become standard in pretty much every film, and these looks have, over the last 15 or so years, become increasingly ubiquitous. One of the most popular of these "looks" is known as "orange/teal" which is highly saturated, with orange skin tones and teal colored sky, creating a very punchy almost candy-like feel. Some examples of the orange/teal look are films like Transformers or the remake of Mad Max, but once you know to look for it you will see it everywhere, particularly in VFX-heavy action movies.

The orange-teal look
Another extremely prolific film-look is known as "bleach bypass" referring to a technique for developing film which entails skipping the bleaching process. The result is inky blacks and desaturated analogous colors, typically yellows or greens, which gives the film a dark and gritty feel. The bleach bypass technique was popularized by David Fincher in films like Se7en and Fight Club. Digitally this can be achieved by shifting the color balance towards yellow, desaturating the image, and then overlaying this with a black and white image.
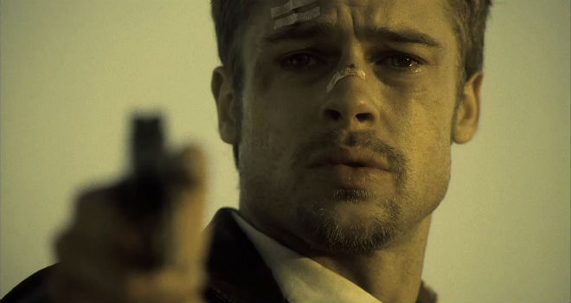
The bleach bypass look
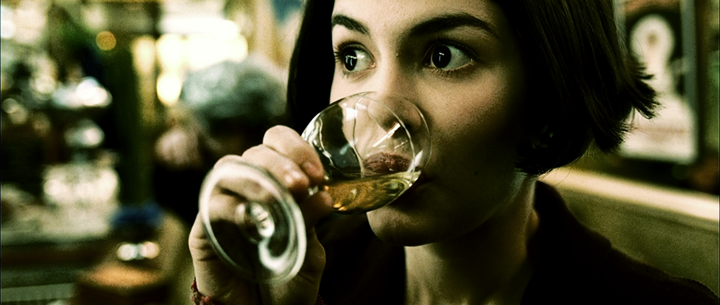
There are of course many other film looks, for example the iconic green/red/golden look of the French film Amelie.
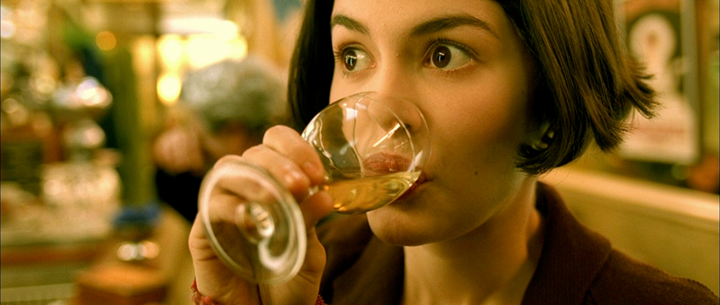
Amelie devises a plot to create a romance between her co-workers
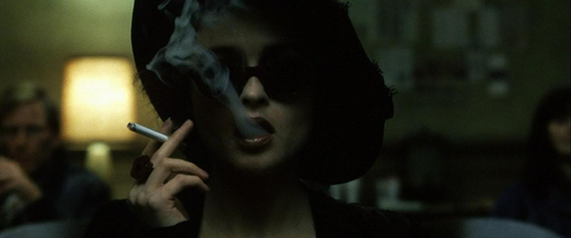
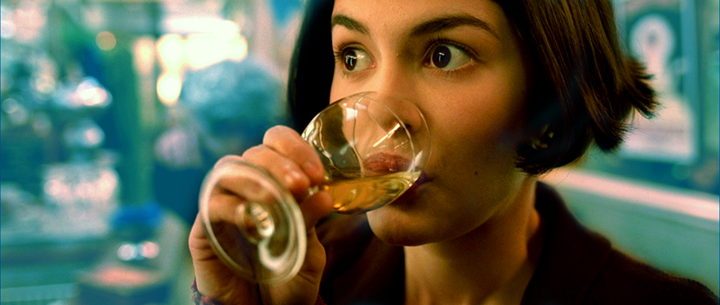
Just for fun let’s take this shot from Amelie and give it a bleach bypass look. Note how the mood changes from the cheerful magical feel of the original to a gritty sinister look.
Amelie drinks to gain courage for a big night of fist fighting with Edward Norton and Brad Pitt
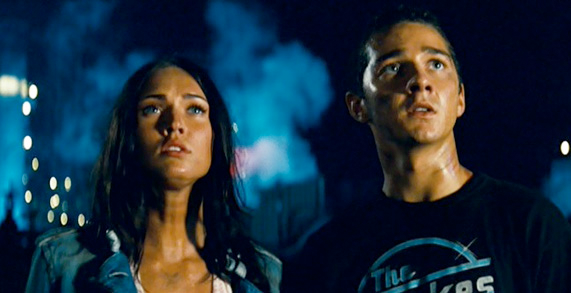
Now let’s see it with an orange/teal look. If you’ll pardon the pun, Amelie has been Transformered.
Amelie feeling jealous that Megan Fox looks much more orange than she does
Regardless of the look that is used in a film, it is frankly neigh impossible to find a film that does not have a color grade "look" of some sort applied to it these days. In fact, not only does every film and tv show use color grading, it seems like they all use one of these two popular looks. Nearly every movie out there seems to be either done with bleach bypass or orange/teal.
Now, to be clear, there is nothing wrong with the bleach bypass or orange/teal looks. When used properly, they can be very effective and powerful. That's surely why they have become so popular. The problem is when they are simply slapped on as a forumla, without any thought or understanding, it becomes the movie equivalent to fast food. "Wrap it in bacon" does not make you a chef, and "throwing a bleach bypass look on it" does not make you a colorist. There is no button for good art.
A major exception to this trend towards uniform looks, where we still see some diversity and originality in the color script, are animated features. Films like the Incredibles, Cloudy With a Chance of Meatballs, Kubo and the Two Strings, and many other animated feature films all employ creative color palettes that change throughout the film, contributing to the emotional impact of the story arc.
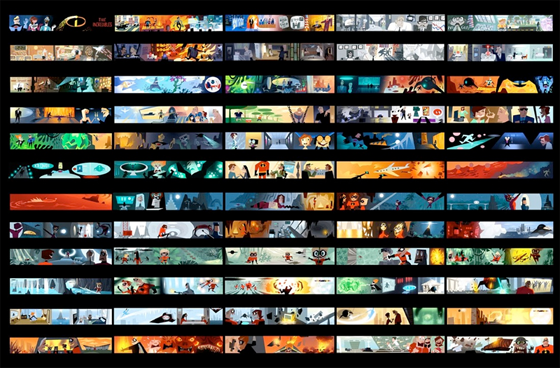
Pixar's color script from the Incredibles
For example, consider the animated short Knob that we did in my StudioX lighting class. Below you can see a sampling of the looks we used. The bathroom scene used a version of bleach bypass, with predominantly yellow/green hues. This was to get the dirty feeling in the bathroom to echo the emotion of our germaphobe protagonist. We then used a purple/green pallate seen through a vignette for the sequences where our hero "sees" the germs to indicate that this was his imagination. Finally, at the end we used a sunny yellow/blue palette for the end to echo his joy at having escaped the bathroom. This uses a complimentary color scheme, similar to orange/teal except without making the skin tones look like an Oompa Loompa. In short, each sequence has a unique color palette which helps to convey the emotions and feel of that part of the film. If we can do this for a three minute short, surely Hollywood can give us a few different looks for a two hour movie!

Partial color script from the StudioX animated short Knob
Display-Referred vs. Scene-Referred Color Management
Rendering using a linear lighting workflow is known as scene-referred, meaning that the values are proportional to real world scene measurements. Nuke also works in scene-referred space. This means that we are working in both rendering and comp with high dynamic range images. As a result the render can work with physically-based shading models and global illumination, and the comp has a wide image gamut for color adjustments.
Traditionally, a DI program like DaVinci Resolve has always worked in display-referred, meaning there is no information about how the source media is supposed to look and, essentially, you are the color management, in conjunction with a trustworthy broadcast display that’s been calibrated to ensure accuracy. DaVinci Resolve 12 introduced scene-referred color management, which works similar to Nuke by applying the appropriate camera manufacturer specified input transform to the footage. In Nuke this is done in the Read node's color space. In Resolve this is set in the input transform, for example using DaVinci ACES color management.
While it was possible do a similar input transform in previous versions of Resolve using LUTS, the new color management system uses mathematical transforms, rather then LUTS, which makes it easier to extract high-precision, wide-latitude image data from each supported camera format, as opposed to a LUT which clips image detail that goes outside of the numeric range they’re designed to handle.
Additionally, when working with digital cinema cameras in Resolve, the data level should be to be set to "full" in the clip attributes to get the full 0-1023 image range. Likewise, when outputting media for VFX comp work as a DPX image sequence the output data level should be set to "full" too. The Resolve manual recommends when working with ACES to output (scene-)linear EXR (i.e. no output transform) instead of DPX. EXR files are 16-bit and thus have more info than a 10-bit DXPX file, meaning they contain a lot more info and can be much larger. For that reason using DWAB compression is advisable as it can dramatically reduce file size without any visible loss in image detail.
Film Emulation Curves and Log Encoding
Cameras typically have an S-shaped tonal curve known as a "film emulation" curve because it emulates the look of film. This gives the image a pleasing toe and shoulder contrast, causing shadows and highlights to more pleasingly roll off into black and white, making the image "pop." This contrast "film emulation" curve is sometimes incorporated into the camera manufacturer’s Log encoding, and sometimes not. Examples include Sony S-Log, RED’s REDLogFilm, Arri LogC, and the classic Cineon Log encoding. Here's an example of Sony S-Log3 Log footage with and without the S-Log3 input transform applied, which does both a Log conversion and applies a contrast curve.
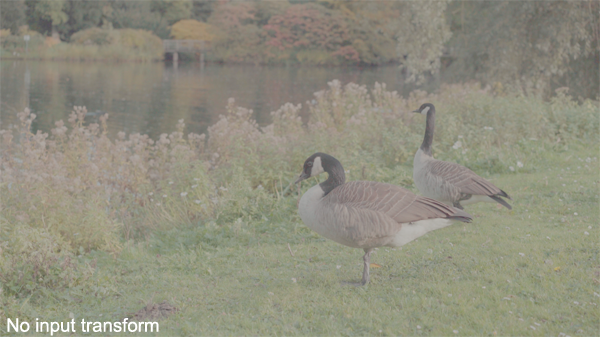
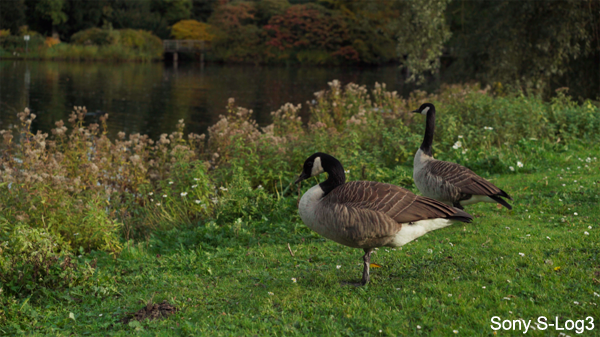
Sony S-Log 3 footage, with and without the input transform applied
Arri's LogC works in a similar way, incorporating both Log conversion and a contrast curve. However, consider the RED camera. The RED camera’s standard REDLogFilm (which is essentially equivalent to Cineon Log encoding) does a Log conversion, but it does not apply an S-shaped contrast curve. In contrast, the REDgamma4 combines the Log conversion with an S-shaped curve. Note in the image below how the REDLogFilm appears flat and washed-out even with the Log encoding, while the REDgamma4 in contrast looks nice with pleasing contrast and saturation.
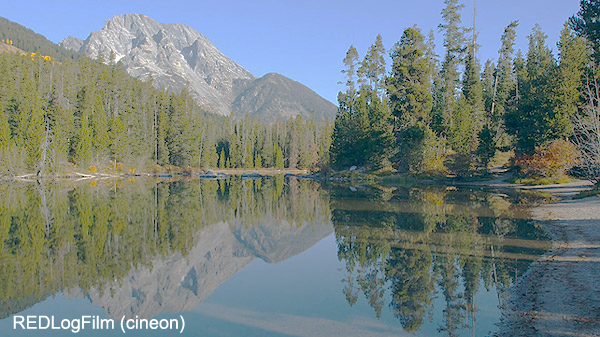
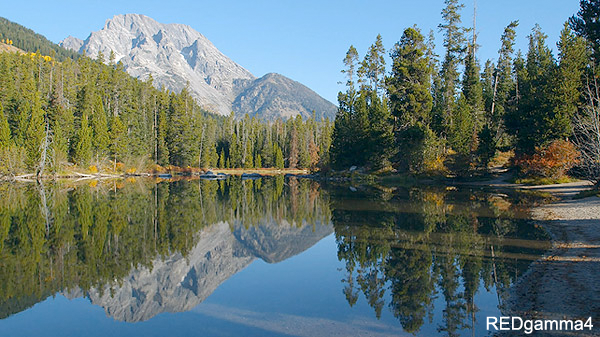
Even with Log conversion applied, the RedLogFilm image (top) still looks washed-out
While a logarithmic conversion is mathematically precise based on the camera's particular specifications, an S-shaped tonal contrast curve is more artistically subjective. The REDgamma4 includes an S-shaped contrast curve, making it convenient but losing artistic control. The REDLogFilm instead allows the colorist to manually add the desired tonal contrast. The mistake would be to simply apply REDLogFilm (or similarly use Cineon encoding on RED footage) without any additional tonal adjustments. This would be like buying ready-bake Pillsbury dough cinnamon buns to eat for breakfast, and popping the raw dough in your mouth instead of baking it first.
Additionally, since each camera manufacturer has its own flavor of Log conversion, it's crucial that the DI house communicate to the VFX house which Log space was used in encoding. DPX files notoriously lose their metadata, and it can be quite challenging to determine which Log flavor was used in encoding the footage after the fact. As a general rule of thumb, if it looks crappy and washed-out, probably something has gone wrong somewhere along the color pipeline.
Display Transforms in CG Animation
(Taking a Linear Workflow Beyond 2.2)
Traditionally the color pipeline for linear renders involved viewing them through a sRGB 2.2 gamma curve. This is still the default in both Vray and Nuke. The "s" in sRGB stands for "standard" and matches old CRT computer monitors. Old CRT computer monitors did not behave linearly in their conversion of voltages into light intensities, so a pixel at 50% intensity would emit less than a quarter of the light as a pixel at 100% intensity, rather than half. This is illustrated in the graph below.
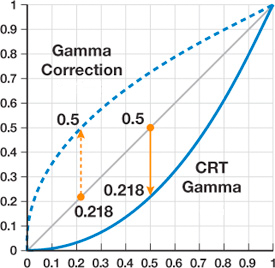
CRT monitor response curve and its gamma correction
Adjusting for the effects of this nonlinear characteristic is called gamma correction. While modern LCD monitors do not inherently have this property, they are usually constructed to mimic the response of CRTs. Rendering (as well as compositing in Nuke) however needs to operate in linear space for the math of the render to be correct. Consequently all input images (color textures) need to have an inverse gamma correction applied so they are linearized. The scene-linear render is then viewed through a 2.2 gamma display transform. This is known as a linear lighting workflow. Similarly, the scene-linear render is read into Nuke in a floating point format such as EXR and viewed through a 2.2 gamma display transform. Working in Linear, both in rendering and Nuke, is critical because otherwise all the math will be wrong.
While a linear lighting workflow is critical for photorealistic rendering, viewing the image through a 2.2 gamma can result in images with low apparent contrast and poor highlight rendition (i.e. highlight clipping). In contrast, using an S-shaped "film emulation" curve, typical of what we see in cameras, yields a pleasing appearance of contrast, with well balanced highlight and shadow details. In addition, we also want to remap the values that go above 1, rather than simply clamping them as a simple sRGB 2.2 gamma correction does. This is known as tone mapping. Note that we are still working in linear in both Maya and Nuke. This is the working space. The difference is how that linear data is displayed.
As we have seen in the previous section, digital camera manufacturers provide specific film emulation curves based on the characteristics of their particular camera. In CG animation where everything is virtual (i.e. we are not combining CG with live action) we instead can use an idealized standard film emulation curve to replace the sRGB 2.2 gamma display transform, which has the dual purpose an aesthetic s-shaped film emulation curve, as well as tone mapping the bright values above 1.
Several solutions have been proposed for this idealized standard, including Filmic, ACES, and Sony Picture Images' spi-vfx and spi-anim. As with all new proposed stadards, there is disagreement about which standard is best. The jury is still out on that one. In the examples below we will look specifically at the spi-anim OCIO config. Let's begin with a render from SPI’s Cloudy With a Chance of Meatballs.

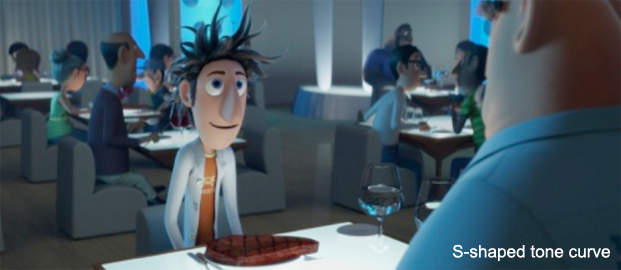
Observe the highlight clipping on the table in the gamma 2.2 image
Below we can see the same thing happening in a Vray render where we compare a regular sRGB display transform with the spi-anim OCIO color transform. Again we can see the pleasing "toe and shoulder" contrast of the s-shaped curve emulating a camera's film response, as opposed to the sRGB transform which does a simple gamma shift. We can also see that while the sRGB is blowing out on the lamp shade, where as it is not in the spi-anim because of the tone mapping.
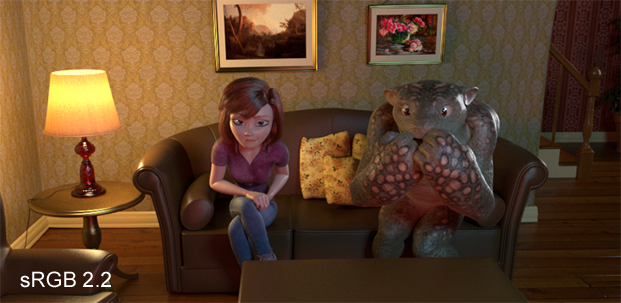
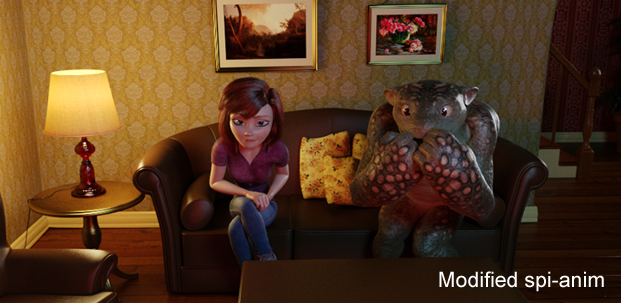
Notice the lamp shade in particular.
While traditional sRGB 2.2 gamma display transform clamps the pixel values when they go above the 0-1 range, the spi-anim instead remaps the bright values. Specifically the spi-anim curve compresses 0.0-4.43 pixel values in the linear render to 0-1 display values. So 1.0-4.43 will be the compressed highlights above diffuse white (1.0),and anything higher than 4.43 will clip. This is illustrated in the following graph:
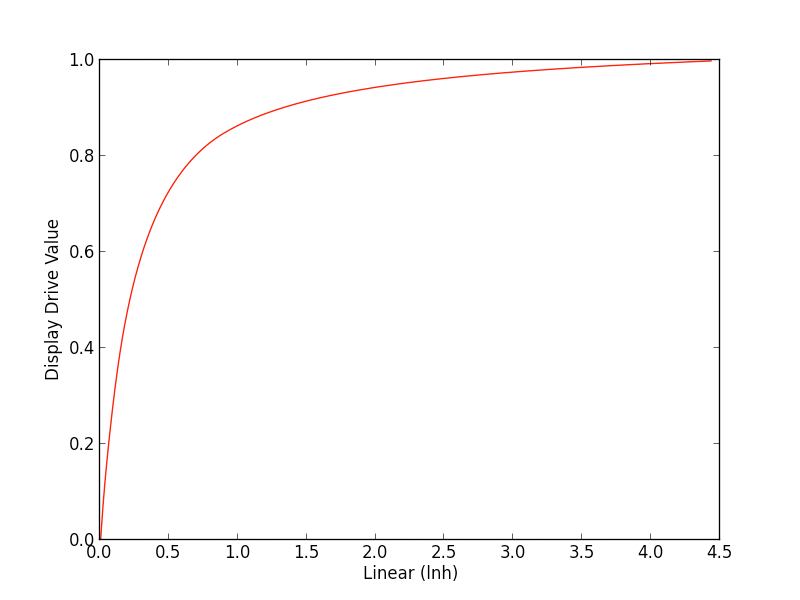
spi-anim remapping of linear render values to display space
That means it is still possible to have the lights blowout if desired, just as it is with a camera's exposure, but they will do so in a way that more closely mirrors how a camera would respond. Because LUTS work in a 0-1 range the linear image needs to be converted to Log space before the display transforms are applied. The spi-anim curve thus contains a "shaper" LUT which first converts the linear render into Log before applying the film emulation tone mapping curve. When we view the x-axis of the above graph in logarithmic scale we can see the s-shaped curve which gives is the aesthetic toe and shoulder contrast typical of film:
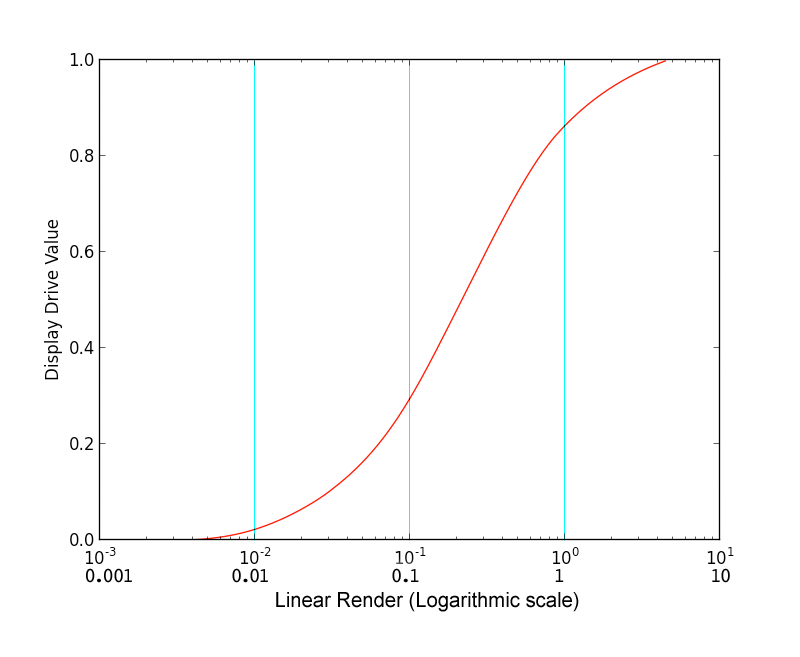
The spi-anim remapping viewed in logarithmic scale, showing the s-shaped film emulation curve
It is important to understand that this is not something that can simply be applied in post. Because a 2.2 gamma curve will clip values that are above 1, lighters traditionally would incorrectly compensate for this, making the lights dimmer so they fit into the 0-1 range and thus do not clip. That however means that the lights are set dimmer then they would be in the real world which in turn results in less GI light bounces, and overall a render that is not using real world light values which modern physically-based renderers need to work properly. When the scene is instead viewed through a better camera response as the lights are being set up (both with a film emulation curve and tone mapping), the lights can be set up in a way that mirrors real world light values.
Note in the images below comparing a traditional sRGB 2.2 gamma (top image) with spi-anim (botom image) how the 2.2 gamma is clipping in the whites of the floor and wall, as well as on the colored sphere, whereas the it is not in the spi-anim as all the values fall under 2 in the linear render values.
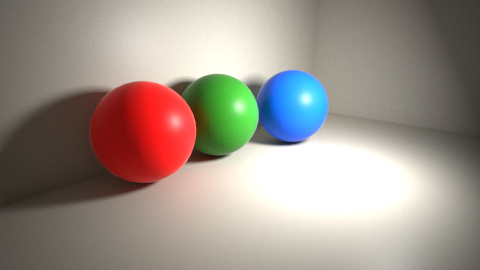
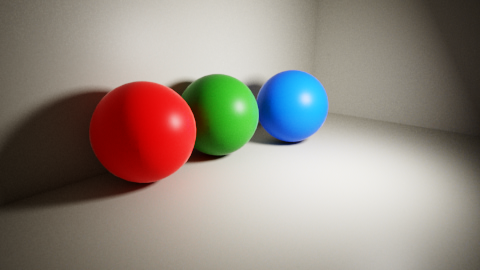
Note the clipping evident in the sRGB image on the top, compared with spi-anim below.
Custom spi-anim OCIO Config With "Look" Color Grades
First let's go over how to load and use the default spi-anim OCIO config in Nuke and Vray.
Nuke: The spi-anim OCIO config comes standard with Nuke. To use it open the Project Settings "color" tab, set the color management dropdown to "OCIO" and the OCIO config dropdown to "spi-anim." To instead use a custom config, you would instead choose "custom" and navigate to its location to load the config.ocio file. The display transform in Nuke (called the "viewer process" menu) should be set to "film(sRGB)" instead of the default "film(DCIP3)" since you are viewing it on a sRGB monitor. Additionally, when writing out a PNG sequence in Nuke, the write should be set to vd16 rather than the default mp16 in order to match the display transform.
Vray: The Nuke spi-anim config (located in the plugins/OCIOconfigs folder of the Nuke install) can be loaded in the V-Ray VFB. Note that the sRGB button in the VFB should be off. Similarly, to use a custom config, you would simply navigate to its location to load the config.ocio file
Currently it is not possible to use a LUT and OCIO config simultaneously in the V-Ray VFB, however you can use the following modified spi-anim OCIO config which includes two additional "look" displays, one using a .cc CDL file and another using a .cube 3d LUT file.
First download the spi-anim-look OCIO config and unzip it. Once the OCIO custom config is loaded in Nuke or V-ray you will see the following menu options:
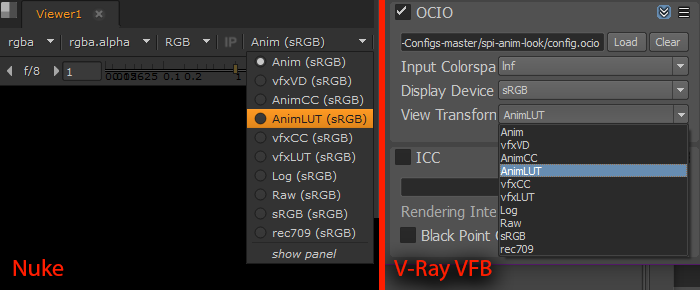
Custom OCIO display transform drop-down menus in Nuke and V-Ray's VFB
- Anim The vd16 color space from spi-anim. See above for details.
- vfxVD The vd16 color space from spi-vfx. In comparison to spi-anim vd16, spi-vfx vd16 has a slightly stronger contrast curve, and perhaps most significantly will clip whites above 64 (in contrast with spi-anim which clips them at 4.3) leaving more room for high-end rolloff.
- AnimCC The spi-anim vd16 color space with a CDL "look" file applied to it.
- AnimLUT The spi-anim vd16 color space with a LUT "look" file applied to it.
- vfxCC The spi-vfx vd16 color space with a CDL "look" file applied to it.
- vfxLUT The spi-vfx vd16 color space with a LUT "look" file applied to it.
- sRGB The standard 2.2 gamma curve from Nuke.
- rec709 is the standard rec709 curve from Nuke.
The main attraction of this config is the four "look" display transforms. You can write your "look" file in one of two formats:
- CDL CDL stands for Color Decision List. Set the display transform to either Anim or vfxVD as desired. Use a OCIOCDLtransform node to make your desired "look" color grade and click the "write .cc" button saving the file in the "lut" folder of the config, overwriting the "show_cdl.cc" file. Load the spi-anim-look and select the desired *CC display transform (AnimCC or vfxCC) to see your .cc "look" CDL.
- LUT LUT stands for Look Up Table. Set the display transform to either Anim or vfxVD as desired. Create your desired "look" color grade using whatever nodes you like (ColorCorrect, Grade, etc.) and create a .cube lut file (use the CMSTestPattern, apply the CC nodes, and export a LUT with the GenerateLUT node). Saving the file in the "lut" folder of the config, overwriting the "show_lut.cube" file. Load the spi-anim-look and select the desired *LUT display transform (AnimLUT or vfxLUT) to see your .cube "look" 3D LUT.
Working With Log Footage and VFX
Digital motion picture cameras often record to 10-bit integer media (such as DPX files) also known as "Log" files (short for logarithmic). This allows for storing a wide dynamic range (i.e. multiple camera exposures) in a small file size, allowing a colorist to adjust the footage across a wide gamut of possible print exposures with high fidelity. This is the advantage of working with Log footage on digital motion picture cameras, comparable to using RAW images on a DSLR camera.
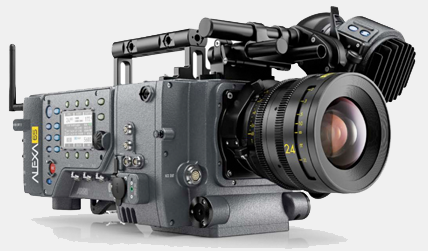
The amazing Arri Alexa 65. Retail $28,000 (no, that is not a typo)
Log footage can thus be thought of as a virtual film negative, allowing for lots of latitude in changing the exposure in post. In other words, it is convenient way to store lots of data in a small file size. However, because of how this data is stored in the digital image file, when a Log image is directly displayed on an sRGB monitor it appears low contrast and washed out, as illustrated below in this Log footage shot on an ARRI Alexa 65mm camera.
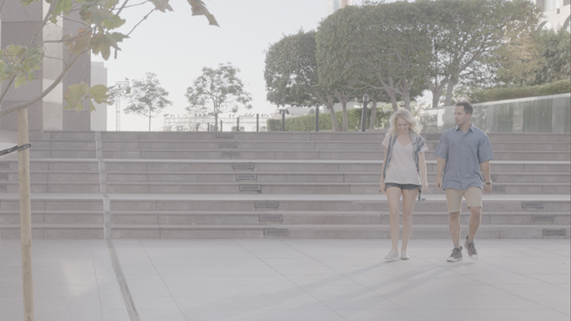
After taking out a second mortgage on your house to buy an ARRI camera you are devastated to see the ugly washed-out footage
Log files store their HDR data in this way for sake of convenience (i.e. small file size), but they are not intended to be displayed in this yucky washed out way and, as discussed above, most camera manufacturers have their own custom Log encoding equations based on the camera’s particular characteristics. As we have seen above, this often includes an s-shaped film emulation curve particular to the camera. In an OCIO pipeline like spi-anim or spi-vfx the film emulation curve is part of the display transform, and only an invertible Log to linear conversion is performed on the footage for compositing.
Below is the same DPX Log file with proper Alexa LogC input transform applied.

Click. Ah, now that’s much better. Thanks color space encoding!
The next step for DI is to adjust the exposure to match our sequence. This is known as plate timing or neutralizing, the idea being that footage for something like an action sequence is often shot at different times over the course of a day for a sequence and therefore needs to be adjusted so it looks like all the action happened over a short time. Note that in the image below the exposure has been lowered, revealing detail in the ground which was not visible in the default exposure above. That’s the power of working with HDR footage.
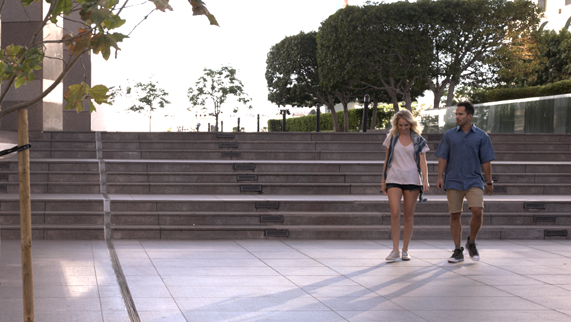
The neutralized plate, ready for some VFX magic
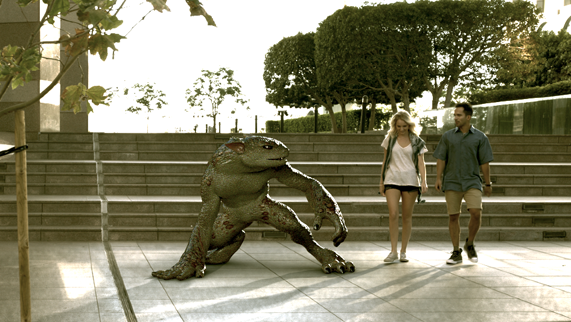
Notice we are not adding any sort of film "look" at this point, and only doing things that we could have theoretically done in the camera. This neutralized footage will be what we match our CG render to, and a lowres proxy version of the plate can be read into the Vray VFB as a background image, so the lighter can see their render in context against the plate as they are doing the match lighting. Note that because V-Ray will apply the OCIO display transform to the background image as well as the render, the background image needs to be saved as an EXR in linear format. If you use DWAB compression for the EXR the file size will be quite small, often smaller than a PNG. Below we see the CG render comped into the frame. Notice the shadows and occlusion on the ground which help to integrate the character into the scene.
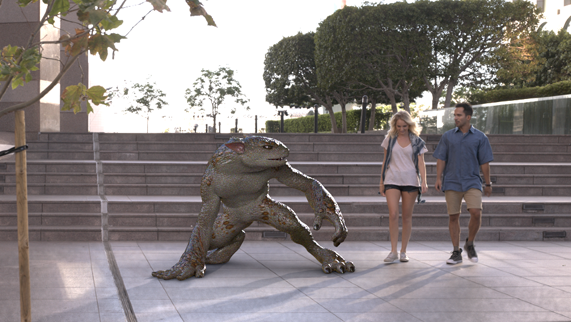
CG render comped over neutral grade footage
The CG is rendered as a linear EXR and comped over the footage in Nuke. The film footage in contrast, as we have seen, is read into Nuke as a Log file and converted to linear as explained above (Nuke always processes everything in linear). The output from Nuke is then delivered as a DPX Log file to DI where the color grade "look" of our film is applied. In this case the look is a flavor of bleach bypass with prominent green hues sometimes referred to as the "war" look.
Color grade "look" applied to comped footage
If desired, the color grade "look" of the film can be written to a .cube LUT file and then applied both in Nuke and in the Vray VFB, or this "look" can be applied in the custom OCIO as discussed above. In both cases this is non-destructive, meaning that no changes are made to the actual images, rather it is simply viewed through the LUT. Think of it as a pair of film-look glasses you can put on and take off.
Matte Paintings and Photoshop
LDR Matte Painting
By default Photoshop works in a display-referred 8-bit sRGB color space. We might call this LDR (low dynamic range) painting. In this method we won't do anything different in Photoshop, but we do need to do something in Nuke if we are using a film emulation display transform so our matte painting images look the same in Nuke as they did in Photoshop.
The trick is to apply the same color space in the Read node that we have in the display transform. This will create an inverse 1D transform, essentially canceling out any tone mapping on the image. So if the display transform is set to "Anim" the read node for the matte painting should likewise be set to anim_vd16. If the display transform is set to "vfxVD" the read node should be set to vfx_vd16. The custom spi-anim-look OCIO config defaults to reading 8-bit images in Nuke in anim_vd16 (the inverse of the default "Anim" display transform) for this purpose.
HDR Matte Painting
It is generally preferable to paint matte paintings as high dynamic range images. This is particularly important when matte paintings will be motion-blurred in compositing, color corrected in DI, or interact with the render in other ways (such as used as a reflection map). Unfortunately, unlike Nuke or Mari, the functionality of Photoshop is very limited when working in linear 32-bit mode. As a workaround, we will work in 16-bit mode and use Log format. As discussed above, the Log format will allow us to store lots of information efficiently, but we will need a display transform in Photoshop to view our Log files, just like we would in Nuke. This won't give us quite the dynamic range as we can get in 32-bit linear floating space, but we can get a lot more than the 0-1 range of an 8-bit file. Specifically, 100% white in Log space maps to 13.52 in linear.
First we need to install the ICC profile, if it is not installed already. This is really easy to do. In a file browser, navigate to the location of the OCIO config lut folder, where you will find several .icc files:
- PSD_log2anim.icc (for the Anim display transform). In Photoshop will be named "SPI Log to Anim"
- PSD_log2vfx.icc (for the vfxVD display transform). In Photoshop will be named "SPI Log to VFX"
- PSD_log2rgb.icc (for the sRGB display transform). In Photoshop will be named "SPI Log to sRGB"
- PSD_log2rec709.icc (for the rec.709 display transform). In Photoshop will be named "SPI Log to rec709"
To install the icc profile on Windows, right-click the file and choose install profile.
On a Mac copy the profiles into the /Users/[username]/Library/ColorSync/Profiles folder.
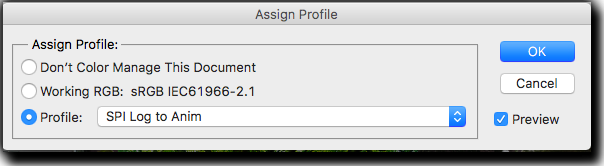
Let's assume that we are beginning with a DPX film plate which is in 10-bit Log that we got from Nuke. Photoshop will read this in 16-bit integer mode. Next, we need to assign our film emulation profile to our Log file so it will display properly. Select the menu option edit > assign profile. In the window that opens, select the desired profile from the "profile" drop-down menu.
To toggle between the Log image and the display transform, first select view > proof setup > monitor RGB. This will set the working space to linear/raw. You can then use the ctr-Y hotkey (view > proof colors) to toggle between the Log and film emulation display transform. You'll want to toggle between the two views frequently while painting, especially when painting darks.
You can save this as either a 16-bit TIF or PSD format (only these formats allow for both 16-bit and embedding the ICC profile). Be sure when saving the file that "embed color profile" is selected. The Log file will then open in Photoshop with the embedded film emulation display transform. However, since this does not affect the actual pixel values, and only how it is displayed on the monitor, the file can also be opened properly in Nuke where it should be read in with the Log color space. The custom spi-anim-look OCIO config defaults to reading 16-bit images in Nuke in Log for this purpose.
When saving the final matte painting out for Nuke, it's best to flatten the image when possible since layers will composite in Log space differently than in linear space, especially if you have soft feathered edges or use transfer modes such as Screen.
Converting Images to Log with the OpenColorIO Photoshop Plugin
Since we are working in Log space, when matte painters want to paste an sRGB image such as a PNG or JPG from a digital camera or from the web into the matte painting, these will need to first be converted to 16-bit Log space. While this can of course be done in Nuke, there is also a Photoshop plugin that can be used to do this which can be found in the plugins folder of the the custom spi-anim-look OCIO config. Once installed, the plugin is found in the Filters menu (Filter > OpenColorIO).
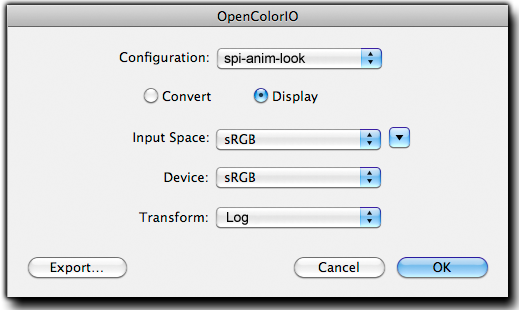
First, convert your image to 16-bit mode (image > mode > 16 bit). Next, select the plugin, load the OCIO config, and choose an sRGB to Log conversion (pictured below). Hit "ok" and it will convert the image to Log. You are now ready to paste this into your matte painting.
|