This tutorial proposes workflows for incorporating xGen for character hair grooms into a production pipeline using alembic caches. This is divided into the following sections:
Each part below is contained within a collapsable/expandable bar.
PART I: Creating and Grooming
This first section presents a survey of possible workflows for grooming hair with xGen. Extremely helpful in this regard are the many xGen videos by Autodesk, both in the Maya Mondays series, as well as the Maya Learning Channel. So in addition to the videos embedded below, be sure to check out these playlists as well. Finally, although not covered here, this video by Steven Roselle gives a great intro to working with archives.
Let's begin with the initial creation of an Xgen description:
Annotations:
The description (1) is the name of what you are making (in this example "Mery's Hair" and in contained in a collection (2). Note that xGen is very pedantic about naming and it is quite an ordeal to rename an xGen stuff. Most important are the names of the collection and the name of geometry you bind to. You will want these to have unique names. For example, ones that include the name of the asset like "MeryScalpGeo" rather than just "scalpGeo".
In order to add the description to an existing collection, the collection must be present in the Maya scene. Otherwise this option is greyed out.
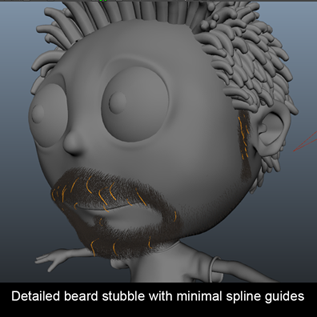
Here we pick "splines" which will allow us to use curves as guides for the hair groom. As stated in the above pic, this is best for most hair styles. For buzz cuts, beard stubble, eyebrows, and fur the "groomable splines" option is recommended, although as we will see below (section I.B) splines often work better for this too.
We want to spread the primitives "randomly across the surface" the way that hair grows evenly from the scalp.
Finally, we want to control the hair primitives by "placing and shaping guides"
Note that it is also possible to control the description using both guides and expressions. To do this pick "using attributes controlled by expressions" and then after setting up your expressions, change the "control using" to "guides" and add guides.
This will create the xGen description, but we will not see any hair primitives until we have placed some guides. Here we need a strategy:
A. Spline Methods
Spoiler Alert In the following section I will discuss various approaches to approaching hair grooms, and in the end conclude that a spline based method (the "strait-ahead method described below) is best, even for short hair. I would not recommend using the "groomable splines" method, and the tube method is often too complex.
1. Tube method
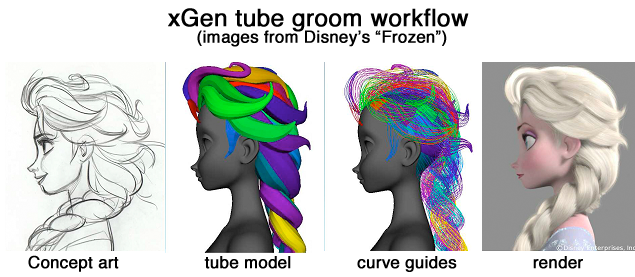
One method is Disney's tube method. This requires a fairly complex model which defines hair clumps. The geo tubes are then used to generate hair clumps. The workflow is illustrated here:
The details for setting it up are described here:
2. Strait-Ahead method
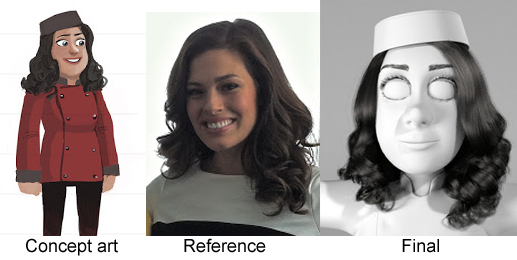
While the above method affords a great deal of control and art direction, in many cases a more strait ahead approach is more manageable. The key here is to have a plan, beginning with concept art for the hair style, real-world research, and the final implementation:
The workflow is to create guide splines which drive the hair primitives direction. While it is possible to do this by first creating a rough NURBS geometry (sometimes called a "hair helmet") which can be used to generate the curves, it is also relatively easy to simply create the guides from scratch in xGen as described in this video:
Topics covered:
creating guides:
rebuilding a normalizing curves buttons
copy & paste curve utilities
primitive tab:
modifier CV count (for resolution)
increase primitive density
setting primitive width, taper, etc.
adding details:
region maps & masks
clump, noise, cut, noise, and curl modifiers
expressions (randomizing)
Paint Effects
Because curves and can easily be converted to guides in the utilities, one can use paint effects to create things like braids, convert these to curves (modify > PFX to curves) to generate guides for braids.
In this video, Paint Effects is used to draw lines on a polygon model of hair. This is then converted to curves, and then to xGen guides.
The basic idea here is that there are lots of ways to create curves (Fiber mesh in Zbrush, Xgen Groomable splines, and xGen interactive grooming introduced in Maya 2017, etc).
These curves can then be converted to guides which drive your xGen groom.
B. Groomable Method
Groomable Splines use brushes to "comb" the hair. These brushes create PTEX maps which replace the sliders in the primitive section. The initial creation of Groomable Splines is simple: Select "groomable splines" in the xGen Create Description window, and all other options are greyed out.
Beards and Stubble
Begin with a clean scene. When using geo from Maya 2013 & earlier, xGen fails to create the groom PTX maps when creating the xGen description. To solve this, import the geo as an FBX into a new scene in Maya 2015.
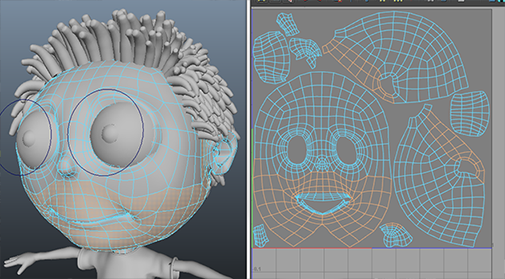
Select faces (tip: selecting faces in the UV texture editor)
Make a selection set (create > Sets > set > options) and name it "stubbleSet"
With the faces selected, create a new description.
Increase the groom and primitive density as desired. (Note: if you display the grooms as cards instead of lines you can see the width)
Add a density mask in the Primitive Generator section. Name it "density" and give it map resolution of 15 TPF (texels per face).
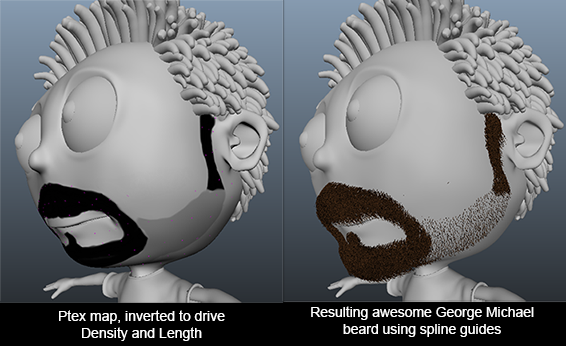
We will paint black for the stubble and white for clean skin, and then use an expression to reverse the map (since white=1 and black=0 density). You could alternately use a map created in a 3D paint package (see importing maps). It's important to note that the brush tip needs to be hard rather than feathered as the feathered brush never paints fully black and will thus leave stray hairs.
Save the map and open the expression editor. Add the following line (indicated in bold) into the expression:
To shorten hair, use the Length brush with the goal set lower (0.1) and a negative increment (-0.1). You can also use this method to effectively remove the guides (setting their length to zero) to match with your density map.
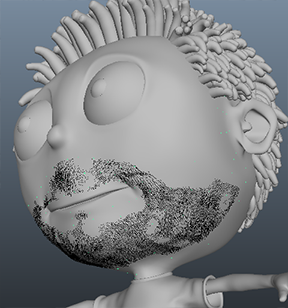
As you comb the stubble/fur with the Pose brush a common problem is that the hair becomes buried under the skin, creating bald spots
This can be addressed with the Elevation brush, however, in many cases it is easier to work with spline guides instead, even when working on short hair and stubble. In the case of beard stubble, you can paint a map to control the density and length, as described above, allowing us to achieve both short and long hair in a single description,
Working with splines allows us to get curved hair (groomable guides can bend but not curve), and do so with only a few guide splines,
It's a good practice to be able to re-build a scene. This can be helpful when troubleshooting issues that arise as a scene gets more and more complex. This also allow one to go back a step in the process if changes need to be made.
A. Exporting xGen files
The two ways to do this in xgen are by exporting the collection or description. Exporting a collection includes spline guides. A description does not, and so the guides must be exported additionally as curves, and then converted back to guides. Further, to import a description into a collection, that collection must be present in the Maya scene. From this we derive the two following workflows:
1. Export Collection (simple)
From the xGen window choose xgen > Export collections or descriptions. Then export the collection (.xgen)
Done! (Note that when working with groomable splines for fur you would also need to export the groom from the Xgen Window file menu (file > export grooming)
2. Export Description (complex)
Save the spline guides as curves:
Modifier tab: select bottom modifier stack (clumping1), click Export guides.
This creates a "curves" folder containing a mel file in the collections folder.
This mel file can later be opened and run in the Script Editor when importing. Alternately, you can use the xGen Utilities Tab to convert the guides to curves and export them as FBX or MA.
Save the description or collection: xgen > Export collections or descriptions exporting the description (xdsc).
Delete the description in the outliner, keeping empty collection, then "save-as" the file to import the description into.
(As noted above, if working with groomable splines for fur you would also need to export the groom)
3. Saving Modifiers
Right-click on a modifier and save it as a .xgfx file. Alternatively you can click the little "open folder" button in the modifier toolbar (top right of the tab).
B. Importing xGen files
The trick here is to keep the description name the same so that the ptex maps connect. To work with Maya, IFF maps are painted onto the geometry that xGen grows out of, and applied to the geo using custom attributes. When the name of the collection or description is changed, these attributes no longer match and must be re-created manually, which is possible but tedious. Therefore, when possible it is desirable to keep the names of the xGen collection and description the same as in the original export.
1. Import a Description (overwriting)
Xgen is very particular about names, so if you are importing and wish to keep the same name (which is desirable), xgen will want to instead create a new description name. To get around this,
Temporarily rename the description folder (ex: descriptionName-tmp).
In Maya, select the scalp geo, and import the xGen description.
Convert the curves to guides (xGen utilities tab)
Delete the new description folder, and rename the original description folder back to its original name
Save the Maya file, and re-open it. The maps will now read in.
2. Import a Collection (overwriting)
Select the geo, import collection, choose "overwrite"
Done! Since the maps are already in the folders on disc, the description, guides, and all the ptex maps read in perfectly.
3. Import a Collection (new collection)
In a text editor, edit the xGen file (.xgen) and change the names as desired. To change the collection name, edit the name and xgDataPath in the palette section. To change the description, edit both the Description: name and the patches token with the same name (just do a search for the description's name in your text editor)
Create directories for this collection & description, copying the subdirectories and ptex map files into it from the old collection
In Maya select the geo, import collection, choose "overwrite"
4. Reconnecting Ptex Maps
In the above workflows the maps will read in automatically. However if you wish to edit them further you will need to re-connect the IFF maps if the collection or description names have changed. The issue here is that xgen creates extra attributes on the scalp geo based on the collection and description name which have IFF maps connected to the geo.
You can use the following mel script to rename these attributes: xGenRename.mel.
Source the script and type "xGenRename" to launch the GUI. The geo must be selected before you launch the script. You can make a mel shelf button for it with script editor > file > create shelf button
C. xGen Directory Structure and Files Locations
The majority of xGen files are located in the xgen folder of the Maya project. This is defined by the system environment variable $XGEN_ROOT which you can query with the following mel command:
getenv "XGEN_ROOT";
The two exceptions for this are the .xgen and .abc files that are used for batch rendering. These are instead located in the same directory as the Maya scene. If desired this path can be modified in the .ma file with a text editor.
There are two basic ways the hair can be setup for animation: (A) As non-animated hair that simply follows the body's movement (B) As animated hair, either through key-frame animation of the hair, dynamics simulations, or a combination of the two. The first is very easy to setup, and the second is more complex.
A. Animation Workflow (Simple)
Turntables
In this workflow the basic idea is that the scalp geo is animated, and the hair just follows. For a shot with an Alembic cache this is very straightforward.
When doing a turntable it is a bit more complex since xgen hair does not update when the parent of a geo is moved and only when the geo itself is.
Therefore the scalp geo needs to be rotated in the turntable directly, for example by parent constraining the geo to a rotating group,
or by skinning the geo to a rotating joint.
In the turntables we use, the geo is parented under a locator that is parent-constrained to the rotating curve
so it should follow the turnable animation correctly.
Note that when batch rendering turntables (as with all batch renders for xGen you will need to export the patches for batch render with xgen>file>export patches for batch render. This is described in more detail in the Shot Animation section below.
Shot animation
Import the Alembic cache for the geo, the xgen hair automatically follows. This will work inside of Maya. To render it, we need a second step:
Use xgen>file>export patches for batch render. This will write an Alembic cache for the scalp geo to disc, which is kind of redundant since we already have an Alembic cache, but a necessary step for batch rendering to work with xGen. The file is saved to the project's scene folder and uses the following file naming conventions: __.abc.
Notes:
Translate is locked in the scalp geo when an abc is imported. So once the cache is applied you can no longer move it (unless you disconnect the cache)
If you translate geo manually you need to refresh the primitives
Scalp geo must be parent constrained directly in rig, not under a parent. Otherwise the xGen will not update it's location on the timeline properly.
B. Animation Workflow (Complex)
1. Exporting curves for animation
In this step we need to create curves from the xGen guides that we can pass to rigging in order to animate the hair.
In the utilities tab convert the guides to curves (keeping the guides)
Rename the curves with modify > prefix hierarchy names. This will add the character's name to all the curves which Alembic likes (ex: Mery_xGenCurve2 etc.)
Export these curves as .ma or FBX. Suggested naming convention: FileName_nCurves.ma. (see the naming conventions doc for more details).
Alternative method (this is more involved, so only use this method if the above does not work):
In primitives tab, check "use animation" and click the "create hair system" button
Select the curves in the model view and group them (so they are not nested under the follicles)
Parent curves under character's name group, rename the curves with modify > prefix hierarchy names
Export these curves (not the output curves) as .ma (open it to make sure nothing else was exported)
2. Setting up the Rig
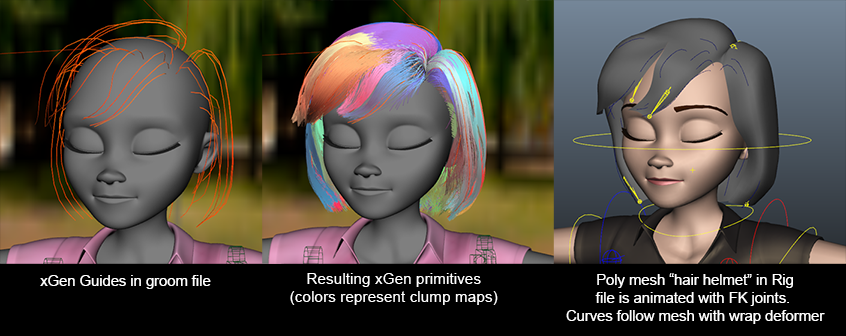
Import the curves into the rig file. Make sure to remove any namespaces (with the namespace editor) when importing, otherwise you will get name clashes and your cache will not work. Here we see an example of a rig setup:
Above we can see that the rig file has a simple mesh for the hair that the animators can see. This is rigged with FK joints for keyframe animation. The hair mesh is then wrap deformed to the curves which we exported from the groom file (III.B.1 above).
As noted above (III.A.notes) the scalp geo must be directly skinned or constrained to rig, not its parent.
3. Populating the character into the scene (importing Maya files with xGen descriptions)
Xgen gets lost when imported due to namespaces. For this reason xGen does not work with referencing since namespaces cannot be removed from referenced objects. They can however be removed from an import:
1. Import the character into the environment file (file>import) with the option "Merge into selected namespace and rename incoming objects that match" selected. With the "root" namespace selected.
The file will import in without any namespaces so the maps will work, but you wont see xGen yet.
2. Save and re-open scene, and xGen will appear
4. Exporting/Importing ABC for xGen
Exporting the Alembic cache (from animation):
Export curves to ABC (strip namespaces, world space, HDF5). Curves must be individually selected, not the group. Note that we use HDF5 because we observed errors using the newer Ogawa format both in Maya 2014 and 2015.
Export the geo to ABC (strip namespaces, world space, UV write). The group can be selected for geo.
Importing ABC (to lighting)
Note that in a normal production pipeline the character file would be populated into the environment (as described above in III.B.3) and the animation caches applied there.
Note also that the following covers the process of importing the Alembic curves to drive xGen hair. In a shot if the geo is animated with Alembic caches these would also need to be imported. See the doc FG: Shot Setup for Alembic Caches for details.
Import the Alembic curves: In the xGen Primitives tab, Guide Animation section, check "Use animation" and uncheck "live mode" and load the curve ABC cache file.
Prep for batch render: Run xgen > export patches for batch render on scalp geo for batch rendering. Confirm that an .abc file was written to the project scene directory.
5. Baking Modifiers
We can also bake the modifiers to an XPD file to make the scene render faster.
In the modifiers section create a GroomBake modifier. It should be at the top of the mod stack, but below anim wires (if present). Click the bakeXPD button to write an XPD file to the bake folder of the xGen description.
To use the XPD, in the Primitives tab change the Generate Primitives dropdown to "from XPD file" (instead of "randomly across the surface").
PART IV: Textures and Rendering
The majority of the information in this section is gleaned from the xGen section of very helpful new Vray 3.0 manual.
Connect your texture map to the root_color attribute and convert it to ptex.
(See A. Applying Texture Maps below)
Finally we need to get the xGen root_color attribute into our hair material.
In the Hypershade, create a VrayHairSampler node and MMB-drag it into the desired color channel(s) of a VrayHairMaterial in the Attribute Editor.
(The VrayHairSampler has many useful outputs, but the default is root_color)
A. Applying Texture Maps
Open hypershade, drag the scalp geometry's shape node into workspace, graph it.
To create a new file node, click the
"paintable texture" icon . The map will appear in the hypershade.
Load the texture file you want into the appropriate file node (you can copy-paste the image path into the name slot in the attribute editor for the file node).
Click the xGen "save" icon
to save as a ptex:
B. Assigning Materials and Multimattes
In Maya 2015 with Vray 3.0 this works quite simply:
Materials: Select the xGen description and assign the material.
Note that for archive geometry you will also need to check "use per patch/material description for archive" in the Vray Settings section of the xGen Preview/Output tab. Otherwise it will use the material assignment saved with the archive.
Multimattes: Either add a material ID to the VrayHairMtl3 (this did not work in previous versions), or add an Object ID to the xGen description.
C. Root and Tip Color
Simple method (flat colors)
Connect the DistanceAlongStrand channel of a V-RayHairSampler node to the V-coordinate of a Ramp Texture using the Connection Editor in the HyperShade.
Complex method (with texture maps)
In the Preview/Output tab, go to the Custom Shader Parameters section and type "root_color" in the name slot, set the type pulldown to "color" and click the + button
This creates a new shader parameter like this:
You can assign a texture map to it, as described above, or use the following expression to create an editable color swatch.
$a=[0,0,0];#color
$a
Repeat the above to create "tip_color". (Note: These are internal variables for xGen so the spelling matters)
To use the root and tip, Create a V-Ray Hair Sampler in the Hypershade and assign it to the Diffuse Color of the material.
Note that these two approaches can be combined as well.
D. Randomness & Expressions
Simple method (if you just want randomization)
Similar to the simple method described above for using a ramp for the root and tip colors, the randomByStrand channel of the VRayHairSampler can be connected to the V-Coordinate of a ramp node to get color variation. This allows for a very intuitive workflow.
Complex method (sky's the limit)
You can use expressions to drive the color, either providing your own expressions, or using the library.
Expression Library To load an expression click the little triangle and select something groovy from the Load expression menu.
Expression Editor To write your own click the sigma icon and type away.
For example this multiplies the color with a random number between 0.5 and 1:
$a=[1,0,0];#color
$a= $a * rand(0.5,1);
$a
This one can be used with a cut modifier to decrease length by a randomly value the ends of the hair.
This works by using the built-in $cLength variable which represents the final
computed length of the current primitive.
$a=rand(0,0.5);
$a * $cLength;
E. Combined Methods
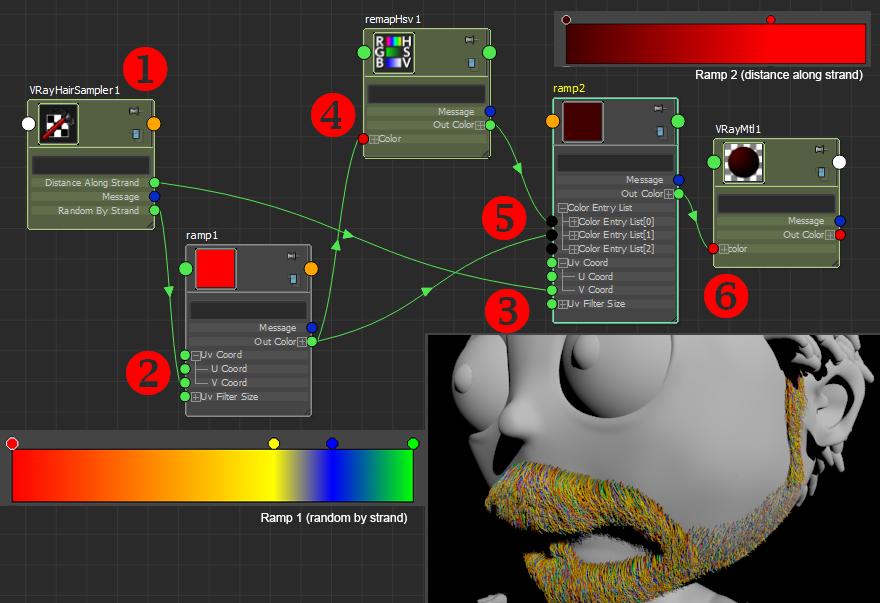
In the following example we will combine the root fade and randomization techniques described above. Notice that the colors on ramp1 are predominantly red-orange-yellow with smaller portions being blue and green. This balance is reflected in the distribution of random colors on the beard in the render. Next notice that ramp2 goes from dark to light. This drives the root to tip of each hair, making it darker at the root. Below you can see how these two ramps are combined with a numbered walkthrough below
(Click to enlarge. Opens in new window)
Walkthrough
A VRayHairSampler's Ramp1 "random by strand" attribute (1) drives the colors (shown here as rainbow colors for illustration purposes) of Ramp1 to create random colors on each hair (2).
The VRayHairSampler also outputs its "disatnce along strand" attribute into ramp2 (3). The output of ramp1 is piped through an HSVremap node which darkens the value (4).
The resulting darker random colors is then piped into the top of ramp2 along with the original random colors (5) so we get random colors that are darker at the root.
Note that a VrayMtl is shown here for simplicity sake (6), and one would instead use a VrayHairMtl (see Hair Material Setup)
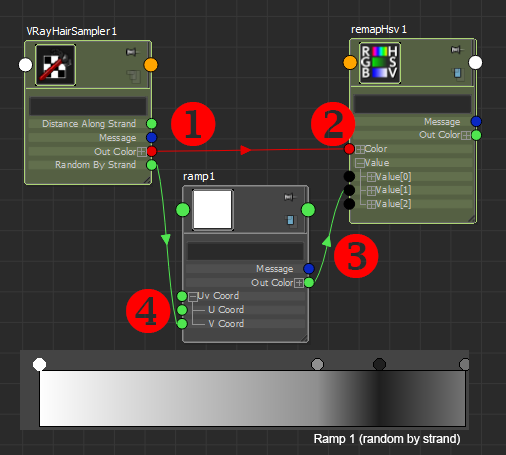
With texture maps
(Click to enlarge. Opens in new window)
To do the above using a randomized texture map you could output the root_color through the VRayHairSampler (1), run that through an HSVremap (2) and drive its value attribute with a ramp using shades of grey (3) driven by a "random by strand" attribute (4).
F. Modifiers
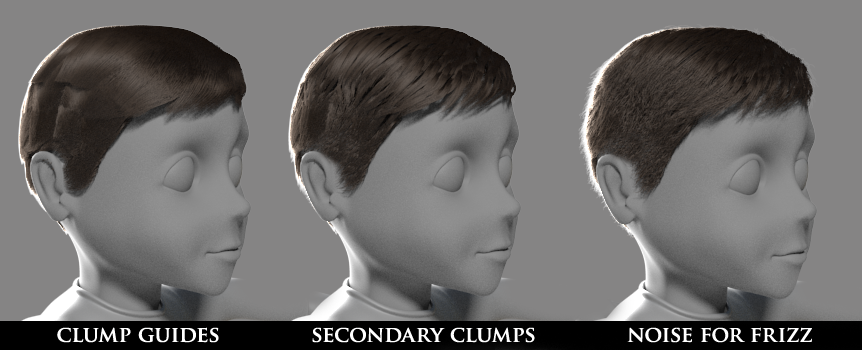
Modifiers allow one to add layers of detail beyond the spline guides. Working with these is essential to get a good final look. In the example below we have three modifiers:
The first clumping mimics combing of the hair, following the guides. The second simulates the way hair tends to clump together. This modifiers has a mask so the hair clumps on the top but not the sides of the head where the hair is shorter. Finally a noise modifier adds random frizz at the ends of the hair. Notice how this creates more rim light.
Stray hair
Here are two methods for getting noise to only affect a certain percentage of the hair.
Procedural noise expression
Go to load expression>samples>xgen>waterRelatedExpresion>noise>noise smoothstep. This will load an expression with a texture noise pattern. Next increase the contrast, and raise the low slider to add more black. This will act as a mask to give you noise on the small percentage of white in the texture.
Stray hairs
Go to the menu Description > Set stray hair percentage and set it to 10%. Next in the magnitude of your noise modifier (or whatever you want to vary) type the following expression:
stray() ? 10 : 1
This is an if-then-else conditional statement that says if the hair is a stray make it 10, or else set it to 1. So 10% of the hairs will have a magnitude of 10 and the rest will have a magnitude of 1. Of course you can further control this with masks as well.
PART V: Troubleshooting
This is an ever expanding list of troubleshooting tips based on feedback of common errors. In addition, you can also check out the xGen troubleshooting section of the Maya manual (2015).
Sometimes geometry created in earlier versions of Maya will not work with xGen. A good workaround is to export the geo as FBX and import it back into the scene.
xGen does not load masks.
This is usually caused by illegal path or file names (i.e. ones containing spaces or special characters). Look for an error message in the Script Editor (usually "Failed to find... Searched path includes...") and confirm that the path and file name exist, and do not contain any spaces or special characters. Once the naming is fixed you may need to re-start Maya.
Another possibility is that the maps cannot be found by xgen because when importing a file, a new xgen description was created. Consequently, all of the maps are missing. Go to the directory where the original xgen description is located and copy-paste the folders and maps into the new description folder. Reload the scene and all the maps will be there.
Can't paint masks.
Make sure you have a unique material assigned to the geo the xGen description is attached to. Additionally, if you have a material with maps assigned to the geo, in order to edit ptex maps you may need to temporarily assign a default material.
Masks set to black for density still show hair.
When painting the mask the brush tip needs to be hard rather than feathered as the feathered brush never paints fully black and will thus leave stray hairs.
Guides do not follow geometry.
In the Utilities, convert the guides to curves, then convert the curves to guides. A note on functionality: Guides will not update when the parent of a geo is moved, and only when the geo itself is. Primitives will update when refreshed.
Rogue guides: the end CV of a guide stays, while the rest moves in a turntable
In the Utilities, convert the guide to a curve, then convert back to a guide.
Guides do not follow geometry when Alembic is applied.
See the rigging section above. Scalp geo must be parent constrained directly in rig, not under a parent.
Guides "explode" (jump to random locations) when when Alembic is applied.
This is likely because of geo flipped UVs. Note that it is possible that flipped UVs may be on a geo that has the same
Alembic cache applied, even if that geo is not used by xGen. To check this in Maya, open the UV Texture Editor and click the
"shaded UV display" button. Flipped UVs will be red. You can also check this in Headus UVlayout by hitting "T"
to display the numbered grid on the geo. Flipped UVs will have backwards numbers. You can flip the UVs on a shell in
Headus with the keyboard arrow keys. This will need to be done on the geo in your scene, and on the rig file.
Guides "freak out" when animation "use animation" is turned off.
Either turn it back on, or recreate the guides by (1) creating curves (utilities tab: guides to curves). (2) deleting the guides (3) Making new guides from the curves (utilities tab: curves to guides).
xGen does not load when importing a character into a shot
Save the Maya file and re-open it.
xGen does not load when scene is opened in Maya.
XGen appears in the Outliner, but there is no XGen window and the primitives do not appear.
This is an issue of an incorrectly set XGen project, often caused by moving the Maya project between network drives.
First check to see that the project has been set in Maya before opening
the file, and confirm that the XGen files are all present in the XGen folder. Also check that there are no spaces or special characters
in the project directory path. If all of the above checks out, the problem is likely in the .xgen file in the Maya scenes
directory corresponding to the Maya scene file (this is known as a sidecar). Open this .xgen file in a text editor and look
at the directory paths in it. If they are incorrect (for example the XGen project path points to a non-existent hard drive)
then edit the file to have correct directory paths, save it, and re-open the Maya scene.
It is too hard to control multiple descriptions.
Yes, it sure it. That's why it's preferable to create the groom using a single description, adding variation and styling with masks, modifiers and expressions.
B. Rendering troubles
Hair does not render in Vray
Check that vray is listed in the output settings and the xgenVRay.py is on auto in the plugin manager. See the xgen prerequisites in the Vray docs for more on this.
Hair does not appear in batch render
Make sure to export the patches for batch render. See Part III A in the Shot Animation section for details. This will write an ABC (alembic) file in the Maya scenes directory. If you do not see the .abc file in your scenes directory, it did not write. For this, see "Can't export patches for batch render" below.
See also "Hair does not render in Vray" above.
Can't export patches for batch render
First, make sure the patch has a unique material assigned to it. Then check that there are no spaces or illegal characters (&+!* etc) in the project path or file name. Finally check the Script Editor for error messages.
Render is slow or wont render
On the GI turn off "use camera path" and possibly "retrace threshhold" (the latter will cause flickering which you can fix by upping Light Cache subdivisions to three times their normal value (ex: 6000 for 1080p) and by using a fixed filter size of 0.02 and sample size of 0.01)
Hair "jumps" or "pops" to different positions on frames (on hair using Alembic animated curves)
When exporting the curves to Alembic, make sure that none of the Character's geo is hidden.
Hair flickers/wiggles
There are two common causes here.
First is the clump stack. The clumps that are first in the modifier stack (i.e. lower in the stack) need to have a lower clump count than the children clumps (clumps higher in the stack). When this is reversed, it can cause the hair to jitter or "wiggle" in the render.
The second possible cause is a noise modifier. Noise modifiers can cause the hair to be different on every frame, thus appearing to flicker. To fix this you can bake the noise modifier. At the bottom of the noise modifier, expand its "bake options" section and click the "bake noise data" button. Another approach is to apply a bake modifier to the top of the mod stack (see 5. Baking Modifiers above)
Hair primitives disappear after applying a bake modifier
This is caused by the bake modifier's XPD file being out of alignment with the clump modifiers. Autodesk lists the error as "Clumping guide ID larger than number in xuv file (bc_body_rhinAA): 132611(guide ID) 128777(xuv file size) (Clumping)." To fix it you just need to save the clump maps and bake mod again.
Delete the bake modifier and set the primitives back to "random by strand" the primitives should now appear.
Next we need to save the clump maps to disc. Click the "setup maps" button at the bottom of the clump modifier section, in the window that opens click "generate" and then "save."
Create a new bake modifier and click the "bake XPD" button to save it. Check the date of the file to make sure it wrote the file. (Note: The XPD file does not overwrite if you click bake again. If you want to bake another one, set the Bake Dir to an absolute directory, then copy the new one back to the Bake folder to replace the old one.
in the Primitives tab change the Generate Primitives dropdown to "from XPD file" (instead of "randomly across the surface").
![[-]](../images/tutorials/collapse.gif "[-]") PART I: Creating and Grooming
PART I: Creating and Grooming![[-]](../images/thecure/collapse.gif "[-]")

 . The map will appear in the hypershade.
 to save as a ptex:


 and select something groovy from the Load expression menu.
  and type away.
For example this multiplies the color with a random number between 0.5 and 1:
and type away.
For example this multiplies the color with a random number between 0.5 and 1: