Open Shader Language (OSL) is a C++ based open source shader language developed by Sony Picture Imageworks. The most immediate way to work with OSL is to simply take an OSL shader someone else wrote and use it. Part I of this tutorial therefore will offer a number of OSL textures and materials which can be used to extend the functionality of Vray beyond what it can normally do.
Note that OSL in Vray does have some limitations. For example it does not currently work with
IPR/RT. Additionally, it will tend to crash when multiple
renderer plugins are loaded into a scene (for example Vray + Renderman + Mental Ray). This crash typially occurs either while rendering or when the Hypershade is
opened (which renders the shader balls).
This texture reproduces the effect of thin film interference on a surface. This can be used to reproduce the colored iridescent reflections on soap bubbles, or a host of other things: pigeon feathers, insects, and so on. It's based on the paper Thin Film Interference for Computer Graphics.
To use it, download (right-click "save link as") iridescenceTex.osl and load it into a VRayOSLTex, then connect that to the reflection color slot of a VRayMtl with Fresnel turned off (the shader does its own Fresnel calculations).
/* Amplitude reflection coefficient (s-polarized) */
float rs(float n1, float n2, float cosI, float cosT) {
    return (n1 * cosI - n2 * cosT) / (n1 * cosI + n2 * cosT);
}

/* Amplitude reflection coefficient (p-polarized) */
float rp(float n1, float n2, float cosI, float cosT) {
    return (n2 * cosI - n1 * cosT) / (n1 * cosT + n2 * cosI);
}

/* Amplitude transmission coefficient (s-polarized) */
float ts(float n1, float n2, float cosI, float cosT) {
    return 2 * n1 * cosI / (n1 * cosI + n2 * cosT);
}

/* Amplitude transmission coefficient (p-polarized) */
float tp(float n1, float n2, float cosI, float cosT) {
    return 2 * n1 * cosI / (n1 * cosT + n2 * cosI);
}

/* cosI is the cosine of the incident angle, that is, cos0 = dot(view angle, normal)
 lambda is the wavelength of the incident light (e.g. lambda = 510 for green)
From http://www.gamedev.net/page/resources/_/technical/graphics-programming-and-theory/
thin-film-interference-for-computer-graphics-r2962
*/

float thinFilmReflectance(float cos0, float lambda, float thickness, float n0, float n1, float n2) {
    float PI=3.1415926535897932384626433832795;

    // compute the phase change term (constant)
    float d10 = (n1 > n0) ? 0 : PI;
    float d12 = (n1 > n2) ? 0 : PI;
    float delta = d10 + d12;

    // now, compute cos1, the cosine of the reflected angle
    float sin1 = pow(n0 / n1, 2) * (1 - pow(cos0, 2));
    if (sin1 > 1) return 1.0; // total internal reflection
    float cos1 = sqrt(1 - sin1);

    // compute cos2, the cosine of the final transmitted angle, i.e. cos(theta_2)
    // we need this angle for the Fresnel terms at the bottom interface
    float sin2 = pow(n0 / n2, 2) * (1 - pow(cos0, 2));
    if (sin2 > 1) return 1.0; // total internal reflection
    float cos2 = sqrt(1 - sin2);

    // get the reflection transmission amplitude Fresnel coefficients
    float alpha_s = rs(n1, n0, cos1, cos0) * rs(n1, n2, cos1, cos2); // rho_10 * rho_12 (s-polarized)
    float alpha_p = rp(n1, n0, cos1, cos0) * rp(n1, n2, cos1, cos2); // rho_10 * rho_12 (p-polarized)

    float beta_s = ts(n0, n1, cos0, cos1) * ts(n1, n2, cos1, cos2); // tau_01 * tau_12 (s-polarized)
    float beta_p = tp(n0, n1, cos0, cos1) * tp(n1, n2, cos1, cos2); // tau_01 * tau_12 (p-polarized)

    // compute the phase term (phi)
    float phi = (2 * PI / lambda) * (2 * n1 * thickness * cos1) + delta;

    // finally, evaluate the transmitted intensity for the two possible polarizations
    float ts = pow(beta_s, 2) / (pow(alpha_s, 2) - 2 * alpha_s * cos(phi) + 1);
    float tp = pow(beta_p, 2) / (pow(alpha_p, 2) - 2 * alpha_p * cos(phi) + 1);

    // we need to take into account conservation of energy for transmission
    float beamRatio = (n2 * cos2) / (n0 * cos0);

    // calculate the average transmitted intensity (if you know the polarization distribution of your
    // light source, you should specify it here. if you don't, a 50%/50% average is generally used)
    float t = beamRatio * (ts + tp) / 2;

    // and finally, derive the reflected intensity
    return 1 - t;
}

shader irridescenceTex
[[ string description = "Thin film coating shader. Use as reflection color for the material, with Fresnel for the material OFF (this texture computes its own Fresnel)" ]]
(
 float thicknessMin = 250 [[ string description = "Minimum thickness of the film, in nm" ]],
 float thicknessMax = 400 [[ string description = "Maximum thickness of the film, in nm" ]],
 string thickness = "test.png" [[ string description =
 "Texture map (usually noise) that determines the thickness of the film as fraction between the min and max" ]],
 float nmedium = 1 [[ string description =
 "Refractive index of the outer medium (typically air)" ]], // approximate refractive index of air
 float nfilm = 1.5 [[ string description =
 "Refractive index of the thin film itself" ]] , // approximate refractive index of water
 float ninternal = 1 [[ string description =
 "Refractive index of the material below the film" ]], // approximate refractive index of the lower material
 output color result = 0
)
{
 float cos0 = abs(dot(I , N));

 color thickTex=texture(thickness, u, v);
 float t=(thickTex[0]+thickTex[1]+thickTex[2])/3.0;
 float thick=thicknessMin*(1.0-t)+thicknessMax*t;

 float red=thinFilmReflectance(cos0, 650, thick, nmedium, nfilm, ninternal);
 float green=thinFilmReflectance(cos0, 510, thick, nmedium, nfilm, ninternal);
 float blue=thinFilmReflectance(cos0, 475, thick, nmedium, nfilm, ninternal);

 result=color(red, green, blue);
}
Artist Friendly Metal reflections (texture)
The Fresnel on a VrayMtl is a simplified Fresnel equation which works for dielectric materials such as plastic or glass, but not for metals (conductors) which require a more complex Fresnel calculation involving both the index of refraction (n) and extinction coefficient (k). This is the reason that the values for metallic materials listed on a site like http://refractiveindex.info seem wrong (for example it lists aluminum as IOR: 0.97). The physics are right, but only if you have both the n & k parameters in your Fresnel calculation and the VrayMtl only has n so the reflective IOR for metals are wrong. Further, as the reflective IOR is raised above 2 using this simplified equation, it begins to get darker on the edges rather than brighter the higher you go.
There's two ways to address this: First is the super hard technical way, and second is a more intuitive artist friendly way.
Hard: Calculating reflective IOR for metals from measured data
Chaos has a Complex Fresnel shader which can be used to input the measured data for the n & k parameters of complex Fresnel.
Here's the process. The visible spectrum of light is measured in wavelengths. The human eye can see wavelengths from about 390 to 700 nanometers (nm). Because metals such as gold have colored reflections, we need to input the wavelength values for red, green, and blue to get the corresponding IOR values. Using this Wavelength to RGB calculator we can see that red is 645, green is 510, and blue is 440. Next we go to http://refractiveindex.info, choose the measured data we want (for example gold) and enter the wavelength we got for red, green and blue. These are in nanometers (nm), but refractiveindex.info wants micrometers (µm) which would be red 0.645, green is 0.51, and blue is 0.44. From this we will get the n and k values for the red, green, and blue wavelengths which we can then input into our complex_ior shader. For example, here are the values for gold:
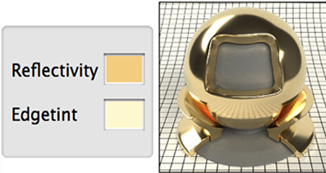
Easy: An artist friendly approach to complex Fresnel for metals
While complex Fresnel using measured data is more accurate for metals, it can be unintuitive for artists to work with since you must enter numbers, rather than working with colors. If you want exactly the numbers you type in from the measured data, you're fine, but if you want to tweak the colors a bit (which of course you will!), you're in trouble.
That's where the artist friendly shader comes in. This shader remaps the complex Fresnel equation for n (refractive index) and k (extinction coefficient) to the more intuitive reflectivity (r) and edge tint (g) which are input as RGB colors. In other words, you enter in a color for the metal and another for the edge tint, and the shader uses the complex Fresnel equation of n and k to give you proper Fresnel reflections for metal.
The shader is based on the paper Artist Friendly Metallic Fresnel written by Ole Gulbrandsen from Framestore. To use it, download (right-click "save link as") AFMFresnelTex.osl and load it into a VRayOSLTex, then connect that to the reflection color slot of a VRayMtl with Fresnel turned off (the shader does its own Fresnel calculations).
//--Artist Friendly Metallic Fresnel--
    // BY Ole Gulbrandsen - Framestore
    //olegul@hotmail.com
    //http://jcgt.org/published/0003/04/03/
    //OSL version by JayCMiller
    //jcmiller.web@gmail.com

	/*
	*	A remapping for the approximated unpolarized complex Fresnel equations of
	* 	n (refractive index) and k (extinction coefficient)
	*	to the more intuitive reflectivity (r) and edgetint (g), both normalized to 0 to 1 range.
    */


float n_min( float r )
{ return (1-r )/(1+ r ); }


float n_max( float r )
{ return (1+ sqrt ( r ))/(1- sqrt ( r )); }

float get_n ( float r , float g)
{ return n_min( r )*g + (1-g)*n_max( r ); }


float get_k2 ( float r , float n)
{
float nr = (n+1)*(n+1)*r-(n-1)*(n-1);
return nr/(1-r );
}

float get_r ( float n, float k)
{ return ((n-1)*(n-1)+k*k )/(( n+1)*(n+1)+k*k);  }

float get_g ( float n, float k)
{
float r = get_r (n,k);
return (n_max( r)-n )/( n_max( r)-n_min( r ));
}

float AFMF ( float r , float g, float theta )
{
//clamp parameters
float _r = clamp(r ,0 ,0.99);

//compute n and k
float n = get_n (_r ,g);
float k2 = get_k2 (_r ,n);
float c = cos ( theta );
float rs_num = n*n + k2 - 2*n*c + c*c;
float rs_den = n*n + k2 + 2*n*c + c*c;
float rs = rs_num/ rs_den ;
float rp_num = (n*n + k2)*c*c - 2*n*c + 1;
float rp_den = (n*n + k2)*c*c + 2*n*c + 1;
float rp = rp_num/ rp_den ;

return 0.5*( rs+rp );
}

shader AFMFresnelTex
(

color Reflectivity = color(0.9451,0.7294,0.3725),
color Edgetint = color(0.9961,0.9725,0.7333),
//float Color_Gamma = 0.4545,

output color result = color(0.5)
)

{
float thetaB = acos(dot(-I,N));
float RCH = AFMF(Reflectivity[0],Edgetint[0],thetaB);
float GCH = AFMF(Reflectivity[1],Edgetint[1],thetaB);
float BCH = AFMF(Reflectivity[2],Edgetint[2],thetaB);


//result = pow(color(RCH,GCH,BCH), 1/Color_Gamma);

result = pow(color(RCH,GCH,BCH), 2.2);

}
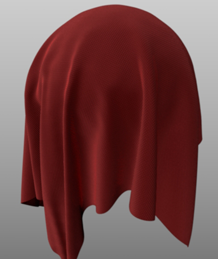
Fabric (material)
This is an artist friendly fabric shader. To use it, download (right-click "save link as") DFfabricMtl.osl and load it into a VRayOSLMtl.
/*
 *
 * fabric.osl shader by Derek Flood (c)2015
 * from http://docs.sharktacos.com/vray/osl.html
 * version 1.5 uses GTR with small tail falloff to get better spec.
 *
 */

 color getTextureDif(string texture_name, color no_texture_default_color)
{
    int channels = -1;
    if (gettextureinfo(texture_name, "channels", channels))
    {
        return texture(texture_name, u, v);
    }

    return no_texture_default_color;
}


float fresnelReflectionFactor(normal bumped_normal, float ior)
{
    float c = abs(dot(I, bumped_normal));
    float g = ior * ior - 1.0 + c * c;
    if (g > 0.0) {
        g = sqrt (g);
        float A = (g - c) / (g + c);
        float B = (c * (g + c) - 1.0) / (c * (g - c) + 1.0);
        return 0.5 * A * A * (1.0 + B * B);
    }

    return 1.0;
}

normal getBumpedBump(color centerColor, color uColor, color vColor, float inverseBumpAmount)
{
    vector worldTangent = normalize(dPdu);
    vector worldBitangent = normalize(dPdv);
    vector worldNormal = normalize(N);

    vector average = vector(0.3333333);
    float center = dot (average, vector(centerColor));
    float ddu = center - dot(average, vector(uColor));
    float ddv = center - dot(average, vector(vColor));

    return normalize(ddu * worldTangent + ddv * worldBitangent + inverseBumpAmount * worldNormal);
}

normal getBumpedNormal(color compressedNormalSample, float Bump_amount)
{
    vector worldTangent = normalize(dPdu);
    vector worldBitangent = normalize(dPdv);
    vector worldNormal = normalize(N);

    color normalSample = 2.0 * compressedNormalSample - 1.0;
    normalSample *= color(Bump_amount, Bump_amount, 1.0);

    return normalize(normalSample[0] * worldTangent + normalSample[1] * worldBitangent + normalSample[2] * worldNormal);
}

surface fabricMtl
    [[ string description = "artist based fabric material" ]]
(
    /* Diffuse section */
    string Sheen_color = "sheen.png" [[ string description = "Sheen color can be black for nylon sheen." ]],
    float Sheen_opacity = 1.0 [[ string description =
		"Determines amount of sheen effect as fibres pick up light at incident angle." ]],
    float Sheen_tint = 0.5 [[ string description =
		"Tints both the sheen and specular." ]],
    int Sheen_ramp_type = 3
        [[ string widget = "mapper", string description =
			"Six types of interpolation for sheen: Linear(1), Exponential(2), Smooth(3),
			Sigmoid(4), Square Root(5), Fresnel(6).",
        string options = "linear:1|Exponential:2|Smooth:3|Sigmoid:4|Square_root:5|Fresnel:6" ]],

    string Diffuse_color = "color.png",
    float Diffuse_weight = 0.8,
    float Diffuse_roughness = 0.4,

    /* Spec section */
    string Spec_color = "specular.png",
    float Spec_amount = 0.5,
    float Spec_glossiness = 0.6,
	float Spec_tail = 1
		[[ string description =
		"GTR tail below 1.0 gives nice cloth-like sheen to the spec."
		]],
    float IOR = 1.33
		[[ string description =
		"Determines the strength of Fresnel reflections; fabric generally has low frontal reflections."
		]],
    int Subdivs = 8,
    int Trace_reflections = 1
        [[ string widget = "checkBox" ]],

    /* Anisotropy section */
    float Anisotropy = 0.25 [[ string description =
		"Fabric is anisotropic due to weave." ]],
    float Aniso_rotation = 0,

    /* Bump section */
// Disabling bump until it is fixed in OSL for Vray. Use VrayBumpMtl instead
//    string Bump_Map = "normal.png",
//    float Bump_amount = 1.0,
//    int Normal_Mapping = 0
//        [[ string widget = "checkBox" ]],

    float Texture_gamma = 1.0,

    output color result = 1 )

{
    /* Define Bump */
    normal bumped_normal = N;

// Disabling bump until it is fixed in OSL for Vray. Use VrayBumpMtl instead
/*
    float BumpAmount = clamp (Bump_amount,0.001,10);
    if ( Normal_Mapping == 1 )
    {
        color compressedNormalSample = getTextureDif(Bump_Map, color(0.5,0.5,1));
        bumped_normal = getBumpedNormal(compressedNormalSample, BumpAmount);
    }
    else
    {
        float delta = 0.004;
        color center = texture(Bump_Map, u, v);
        color uColor = texture(Bump_Map, u + delta, v);
        color vColor = texture(Bump_Map, u, v + delta);
        float BumpAmount = BumpAmount * 10;
        bumped_normal = getBumpedBump(center, uColor, vColor, 1.0 / BumpAmount);
    }
 */


    /* Define Main color */
        color MainColor = getTextureDif(Diffuse_color, color(0.5,0.2,0.2));
        MainColor = pow (MainColor, Texture_gamma);

    /* Define Sheen */
        color SheenTint = Sheen_tint * 2; // intensify tint amount
        color TintBoost = transformc("hsl", MainColor);
        TintBoost[2] = TintBoost[2] + 0.5; // make the tint (2=luminance) a brighter version of the mainColor
        TintBoost[2] = clamp(TintBoost[2],0,1); // clamp tint luminance
        TintBoost = transformc("hsl","rgb", TintBoost);

        /* read in sheen color and modify it with tint */
        color SheenColor = getTextureDif(Sheen_color, color(1,1,1));
        color EdgeColor = SheenColor / 2; //dim sheen value
        color TintEdge = EdgeColor * TintBoost;   //colorize sheen with the tint
        EdgeColor = mix (EdgeColor, TintEdge, SheenTint); //mix between tinted & untinted sheen based on tint value
        EdgeColor = clamp (EdgeColor, 0, 1);

    /* Define Spec */
        color SpecColor = getTextureDif(Spec_color, color(1,1,1));


    /* mix between tinted & untinted spec based on tint value */
        color TintedSpec = SpecColor * TintBoost;
        SpecColor = mix (SpecColor, TintedSpec, SheenTint);

		float Roughness = 0;

    /* Define Ramps */

        float facingRatio = 1 - abs(dot(I, bumped_normal));

        if( Sheen_ramp_type == 1) // linear
            {facingRatio = facingRatio; }
        if( Sheen_ramp_type == 2) // exponential (Down)
            { facingRatio *= facingRatio;  }
        if( Sheen_ramp_type == 3) // smooth
            { facingRatio = smoothstep (0,1, facingRatio ); }

        if( Sheen_ramp_type == 4) // sigmoid S-curve
            {
            float Sigmoid = facingRatio / (1 + abs(facingRatio));
            facingRatio = clamp( 2 * Sigmoid, 0, 1);
            }
        if( Sheen_ramp_type == 5) //  square root
            { facingRatio = sqrt (facingRatio); }

        if( Sheen_ramp_type == 6) // fresnel
            { facingRatio = 2 * fresnelReflectionFactor(bumped_normal, IOR);  }


    /* BRDF Mixes*/
        color SheenMix = EdgeColor * facingRatio * Sheen_opacity;
        color EdgeMask = mix(1, SheenColor, (facingRatio * Sheen_opacity) );
        MainColor *= EdgeMask;
        MainColor *= (1.0 - SheenMix);
        SpecColor *= EdgeMask;

        closure color sheen_component = SheenMix *
			diffuse(bumped_normal, "roughness", Diffuse_roughness);

        closure color diffuse_component =  MainColor * Diffuse_weight *
			diffuse(bumped_normal, "roughness", Diffuse_roughness);


		closure color specGTR =  Spec_amount * SpecColor *
			microfacet_ggx (bumped_normal, Roughness, IOR,
			"gtr_gamma", Spec_tail,
			"subdivs", Subdivs,
			"reflection_glossiness", Spec_glossiness,
			"highlight_glossiness", Spec_glossiness,
			"anisotropy", Anisotropy,
			"aniso_rotation", Aniso_rotation,
			"trace_reflections", Trace_reflections
        );


        Ci = diffuse_component + specGTR + sheen_component;

}
Shader description: The approach of the shader is phenomenological, based on observances of the material properties of fabrics and how they react to light. The shader is an anisotropic Blinn BRDF with added sheen and tint terms to capture how the tiny fibers of fabric pick up light at incident angles. Additionally the tint affects the specular to approximate how the specular color of fabrics are often tinted by the diffuse color. The sheen color can also be used to darken the sheen as some fabrics (for example black nylon) are darker at the edges, rather than brighter. The sheen fall-off has six options to choose from in order to get the desires sheen of the particular fabric: linear, exponential, smooth (hermite), sigmoid (s-curve), square root, and Fresnel.
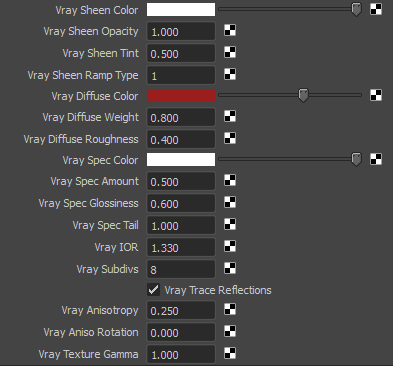
Interface
Sheen parameters:
Sheen Color: Determines color of sheen. Defaults to white. Sheen color can be black for nylon sheen, but be aware that when set to pure black (0,0,0) as with all color swatches, the default color will be used. Setting to almost black (0.01,0.01,0.01) will work fine.
Sheen Opacity: Determines amount of sheen effect as fibres pick up light at incident angle. Can be used to disable the sheen.
Sheen Tint: Tints both the sheen and specular color with the diffuse color.
Sheen Ramp Type: Six types of interpolation for sheen: Linear(1), Exponential(2), Smooth(3), Sigmoid(4), Square Root(5), Fresnel(6).
Diffuse parameters:
Diffuse Color: Same as in a VrayMtl. Defaults to deep red when swatch is set to black.
Diffuse Weight: Same as in a VrayMtl. Can be used to disable the diffuse.
Diffuse Roughness: Gives the diffuse a soft powdery look, typical of cloth.
Spec parameters:
Spec Color: Same as in a VrayMtl. Defaults to white when swatch is set to black.
Spec Amount: Same as in a VrayMtl. Can be used to disable the spec.
Spec Glossiness: Same as in a VrayMtl.
Spec Tail: GTR tail falloff set to 1.0 or below gives nice cloth-like sheen to the spec.
IOR: Determines the strength of Fresnel reflections; fabric generally has low frontal reflections.
Adv Reflection parameters:
Subdivs: Same as in a VrayMtl. This option is disregarded when "use local subdivs" is off in the render settings.
Trace Reflections: Same as in a VrayMtl. Disabling this will result in spec only without reflections
Anisotropy parameters:
Anisotropy: Fabric is anisotropic due to weave.
Aniso Rotation: Same as in a VrayMtl. A value of 0 = 0 degrees, 0.125 = 45 degrees, 0.25 = 90 degrees, 0.375 = 135 degrees, and 0.5 = 180 degrees. So the range is 0-0.5 which gives 0-180 degree rotations.
Texture Gamma: Gamma correction for diffuse color.
GUI limitations: Note that with the current implementation of OSL in Vray colors that can have texture map inputs default to black.
They are set to use grey for diffuse and white for spec by default, but the swatch in Maya will still look black.
Feel free to change the color to whatever you like. Setting it to black will use the default values (grey for diffuse and white for spec).
Further, since OSL widgets are not implemented yet, the dropdown menu for ramp_type does not work, and you need to manually choose one of the 6 options
described above.
A bug with OSL and vrayBumpMtl: There is currently a bug in Vray, when an OSLmtl is plugged into a VrayBumpMtl, resulting in the shadows on the bump being hard and aliased (one could say posterized), rather than soft and feathered. This bug affects both bump and normal maps. Because of this, bump mapping has been disabled on the shader. As a workaround simply plug the OSLMtl into a VrayBumpMtl.
Recipe for cloth with a VrayMtl
While not as interactive, it is possible to create a reasonable cloth material using a VrayMtl and a few tricks.
The first step is to set the material attribute as follows:
Diffuse Color:
1. Create a RemapHSV node and connect your diffuse texture to it. Increase the value and lower the saturation.
2. Create a Vray Falloff map, and plug the diffuse texture into its front color, and your RemapHSV into its side color.
3. Set the Falloff type to "perpendicular/parallel" and change the interpolation type of it's mix curve to "smooth"
for both points.
4. Finally, plug the Falloff map into the diffuse color of your VrayMtl.
(This will create a sheen effect mimicking cloth fibres picking up light at incident angles.
Sheen is visually by far the most import aspect of our cloth shader recipe)
Diffuse Weight: 0.8
Diffuse Roughness: 0.5 (Gives the diffuse a soft powdery look, typical of cloth)
BRDF Type: Blinn
Reflection Color:
Plug the RemapHSV node you made above into the reflection color.
(This will produce spec tinted by the diffuse color,
mimicking the general appearance of cloth specular)
Reflection Amount: 0.5
Reflection Glossiness: 0.6
Reflection IOR: 1.33 (Produces low frontal reflections typical of most fabrics)
Anisotropy: 0.25 (fabric is anisotropic due to the weave)
You will of course need to have good diffuse and bump maps to make the cloth convincing. Note that with high frequency bump maps, typical of a cloth weave,
Vray can get an error where the diffuse terminates in a sharp line rather than gradually over the surface. This is apparently caused by an error in the viewport subdivisions.
Apply Vray subdivisions to the geo's shape node instead (add attribute > subdivision), and it should work fine.
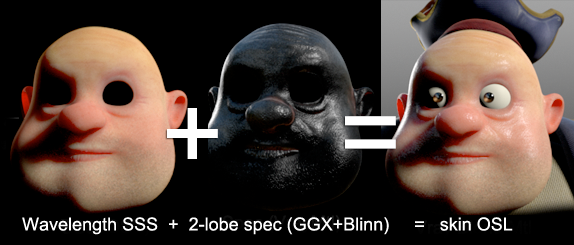
The following OSL material emulates the skin shader made by Tony Reynolds, which employs layered subsurface scattering modulated by red, green, and blue wavelengths. Additionally the shader implements a two-lobe spec to capture the subtle variation of spec on human skin. To use it, download (right-click "save link as") DFskinMtl.osl and load it into a VRayOSLMtl.
/*
 *
 * Wavelength dependent subsurface scattering OSL material by Derek Flood (cc)2016
 * Inspired by the hypershade tree by Tony Reynolds, with added double-lobe spec and mappable glossiness.
 * from http://docs.sharktacos.com/vray/osl.html
 *
 */


color getTextureDif(string texture_name, color no_texture_default_color)
{
    int channels = -1;
    if (gettextureinfo(texture_name, "channels", channels))
    {
        return texture(texture_name, u, v);
    }

    return no_texture_default_color;
}

float fresnelReflectionFactor(normal Nb, float ior)
{
    float c = abs(dot(I, Nb));
    float g = ior * ior - 1.0 + c * c;
    if (g > 0.0) {
        g = sqrt (g);
        float A = (g - c) / (g + c);
        float B = (c * (g + c) - 1.0) / (c * (g - c) + 1.0);
        return 0.5 * A * A * (1.0 + B * B);
    }

    return 1.0;
}


float blendGloss(float GlossMin, float GlossMax, color Blender)
{
	Blender = luminance(Blender);
    return GlossMin * (1.0 - Blender[0]) + GlossMax * Blender[0];
}


surface DFskinMtl
    [[ string description = "blended skin material" ]]
(
    /* Global Section */
    string Transparency = "trs.png",
    float Depth_Scale = 1,
    float Overall_Brightness = 0.8,
	color Diffuse_Color = 0.5,
	float Diffuse_Amount = 0.5,

    /* SSS Section */
    string Subsurface_Color = "color.png",
    float Subsurface_Amount = 1,

    string RGB_Scatter_Depth = "RGB.png"
		[[ string description =
		"Proportional scatter depth for red, green, and blue wavelengths."
		]],
    float Texture_Gamma = 2.2,

	 /* Spec section */
    string Spec_color = "specular.png",
	string Gloss_Mask = "mask.png"
		[[ string description =
		"black and white mask for glossiness min/max values."
		]],

	float Spec_total_amount = 0.5
		[[ string description =
		"Total amount of sharp and soft spec."
		]],
	float Sharp_Amount = 0.3
    	[[ string description =
		"For the sharp spec lobe."
		]],
	float Bloom_Amount = 0.7
    	[[ string description =
		"For the soft spec lobe."
		]],

	float Gloss_Min = 0.6
	[[ string description =
		"Glossiness value for the black parts of the Gloss Mask map."
		]],
	float Gloss_Max = 0.8
	[[ string description =
		"Glossiness value for the white parts of the Gloss Mask map."
		]],
    float Spec_bloom = 0.3
    	[[ string description =
		"For the soft spec lobe (Blinn). Controls tail size of spec."
		]],

    float Reflection_IOR = 1.5,
    int Reflection_Subdivs = 8,
	int Trace_Sharp_Reflections = 1
        [[ string widget = "checkBox" ]],
	int Trace_Bloom_Reflections = 1
        [[ string widget = "checkBox" ]],
	int Use_Single_SSS = 0
        [[ string widget = "checkBox" ]],

    output color result = 1
)


{
	/* Define Bump */
    normal Nb = N;

    /* Declare sss variables and read texture map */
	color TrsColor = getTextureDif(Transparency, color(0));
	color Opacity = 1-TrsColor;

    color Depth = getTextureDif(RGB_Scatter_Depth, color(0.8,0.2,0.1));
    Depth = clamp(Depth,0.001,1); // Prevent depth values from being zero which breaks the shader RGB mix
    color SubColor = getTextureDif(Subsurface_Color, color(0.85,0.75,0.65));
    SubColor = pow(SubColor, Texture_Gamma); //gamma correct texture

    SubColor *= Overall_Brightness;

    color SubR = SubColor * color(1,0,0);
    color SubG = SubColor * color(0,1,0);
    color SubB = SubColor * color(0,0,1);


	/* Define spec */
    float IOR = 1.38;
    float PhaseFunction = 0.8;
    int Subdivs = 8;

    color SpecColor = getTextureDif(Spec_color, color(1,1,1));
	color GlossMask = getTextureDif(Gloss_Mask, color(1));
	float Spec_sharpness = blendGloss(Gloss_Min, Gloss_Max, GlossMask);
    color Fresnel = SpecColor * fresnelReflectionFactor(Nb, Reflection_IOR);  //fresnel for Blinn

	float SoftGloss = (1-Spec_bloom * 0.6) * Spec_sharpness; //modify spec sharpness with inverted bloom at 60%

	float Tail = 2.0;
    float Roughness = 0;
	float Anisotropy = 0;
	float Aniso_rotation = 0;


    /* Closures */

	closure color Diff = Diffuse_Color * Diffuse_Amount * Overall_Brightness *
			diffuse(Nb, "roughness", 0);

	closure color SSS = vray_subsurface (
       IOR, PhaseFunction,
       Depth * Depth_Scale * 0.5,
       SubColor * Subsurface_Amount,
       "subdivs", Subdivs);

    closure color SkinR = vray_subsurface (
       IOR, PhaseFunction,
       SubR * Depth[0] * Depth_Scale,
       SubR * Subsurface_Amount,
       "subdivs", Subdivs);

    closure color SkinGB = vray_subsurface (
       IOR, PhaseFunction,
       ((SubG * Depth[1]) +
       (SubB * Depth[2])) *
       Depth_Scale,
       (SubG + SubB) * Subsurface_Amount,
       "subdivs", Subdivs);

	closure color spcHard =  Sharp_Amount * SpecColor * Spec_total_amount * 0.5 *
        microfacet_ggx (Nb, Roughness, Reflection_IOR,
        "gtr_gamma", Tail,
        "subdivs", Reflection_Subdivs,
    	"reflection_glossiness", Spec_sharpness,
        "highlight_glossiness", Spec_sharpness,
        "trace_reflections", Trace_Sharp_Reflections
        );


	closure color spcSoft = Bloom_Amount * Fresnel * Spec_total_amount * 2 *
            vray_blinn (Nb, SoftGloss, Anisotropy, Aniso_rotation,
            "subdivs", Reflection_Subdivs, "trace_reflections", Trace_Bloom_Reflections);


	if (Use_Single_SSS)
	{ Ci = Opacity * Diff + SSS + spcHard + spcSoft + (1.0 - Opacity) * transparent(); }
	else
	{ Ci = Opacity * Diff + SkinR + SkinGB + spcHard + spcSoft + (1.0 - Opacity) * transparent(); }


}
Shader description (and a little bit of physics)
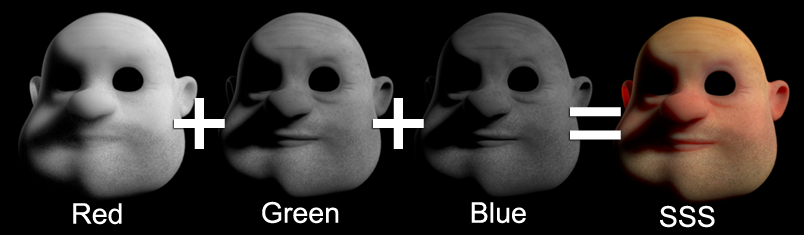
Each wavelength of light penetrates the skin to a different depth. If we simplify our visible spectrum to three colors (red, green and blue) the mean free path (the distance a photon travels through a particular material before it gets scattered or absorbed) will take a different value for each one of these colors. For human skin red goes the deepest, then green, and blue is quite shallow.
Based on this, the shader separates the main color texture (the Subsurface Color) into its red, green and blue components, and pipes these into three subsurface shaders, which are then combined together. The depth of each these three subsurface shaders (i.e the mean free path) is then driven by the corresponding red, green, and blue channel of the "RGB Scatter Depth" color. To speed things up the green and blue are combined, so the shader combines two sss closures together (red + green&blue) rather than three. The idea here is that the dominant scatter color for all humans is red (since we all have red blood under our various skin colors).
In other words, the RGB Scatter Depth is not actually a color per se, but rather represents the scattering coefficients in the volume for the red, green and blue wavelengths respectivly. So setting the red channel of the Wavelength RGB Depth color to 1.0 means the depth of the red wavelength is at 100% while setting it to 0.7 means it is 70%, and so on for all three RGB channels. Note in the image below that the red channel is softer than the green or red since it has more depth.
Fig 2. RGB scatter depth values: 1.0, 0.4, 0.2
One added benefit of this approach is that it virtually eliminates the "green error" that can appear on thin parts of an SSS2 material when the scattering amount it set to large values since it linearly blends multiple subsurface shaders together, rather than the more complex interaction of the subsurface and scatter colors in the SSS2 material, which, while more physically correct, can be unintuitive for artists to work with.
Overall, the focus of this shader is to prioritize artistic control over physical correctness. One drawback of layered skin shaders like the VraySkinMtl is that a user needs to mix different, often unintuitive, colors together to arrive at the desired skin color. As autodesk says of their layered Misss* shader, "Each layer had it's distinct color, which made it difficult to aim for a given "final" color, and changing the balance between the layers threw the color off." Similarly, a drawback of the SSS2 material is that because of the complex math involved in subsurface scattering calculations an artist may select a particular color and will get a completely different one in the render.
In contrast, with this shader the user simply inputs a single texture map of the skin into the Subsurface Color and that's what you get. Likewise, the user sets the color for the Wavelength RGB Depth that they want to see in the bleed (keeping in mind that this also affects the scatter depth) and you get that too. WYSIWYG.
Single scatter/Diffuse
The shader contains a diffuse parameter set to grey in order to simulate single scattering in realistic skin. In other words, this is like a very rough specular reflection, and so should be colorless since skin is dielectric. Because of how OSL works with linear blending, this works better than the diffuse in a SSS2 which effectively cancels the sss. in contrast, here a value around 0.5 works nicely. For more cartoony looks you can set the amount to 0 to turn it off if desired.
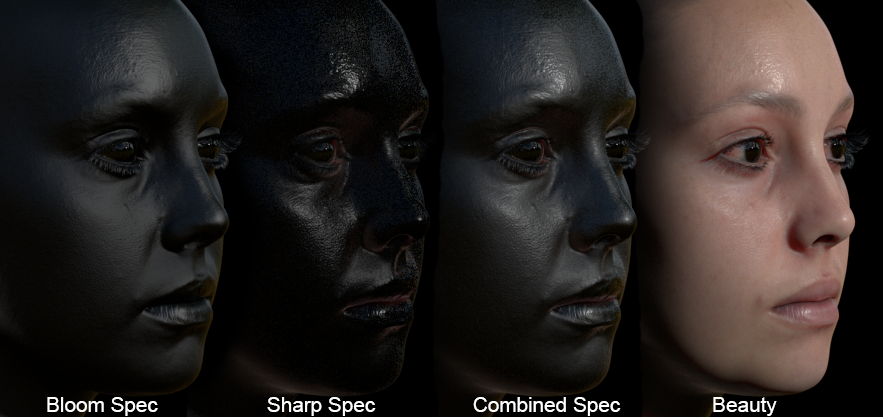
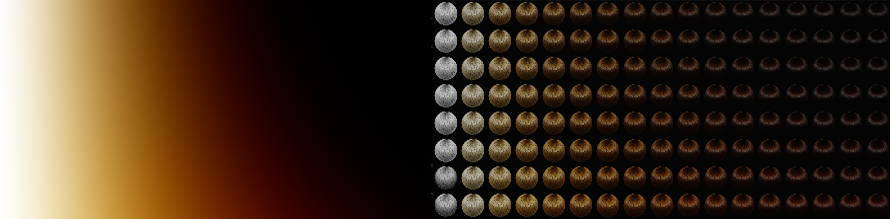
Two-lobe Specular
The shader combines two specular lobes together. A "sharp" specular lobe, using a GGX microfacet BRDF (a GGX is equivalent to a Generalized Trowbridge-Reitz (GTR) BRDF with its tail falloff parameter locked at 2.0), and a "soft" specular lobe using a Blinn BRDF. The OSL closure balances these two spec lobes with the SSS so the total does not exceed 1.0, making it energy conserving (i.e. the total amount of reflected light cannot be more than the incoming light). If you want to get a little technical, the renderer sums the weights of the closure components, and if they exceed 1.0, it divides the weights by their sum, keeping them in the same balance but ensuring that they never sum to more than 1.0.
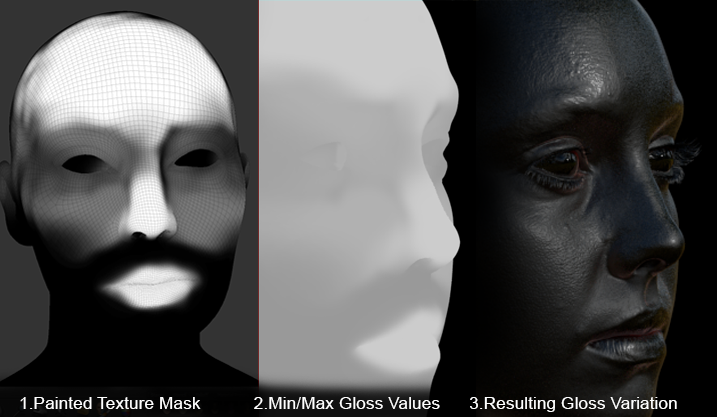
The spec glossiness can be driven by connecting a black and white map (see Fig 3.1 below) to the Gloss Mask parameter. The white parts of this map will get the "max glossiness" value, the black parts will receive the "min glossiness" value, and the grey areas will get a value inbetween the min and max values (see Fig 3.2 below). If no map is provided the shader will default to use the max glossiness value. This allows the artist to define parts of the face that are more glossy, such as the lips and the T-zone. Note for instance in the image below (Fig 3.3) how the lips and nose appear smooth and shinny since the mask is white here and receiving the max gloss value, while the area above the lips is rough since the mask is black here and thus receiving the min gloss value.
Fig 3. A Black and white gloss texture map and the resulting specular variation from the Min/Max Glossiness values.
The two-lobe spec setup further adds detail, combining a sharp spec (controlled by the min/max glossiness values) together with a softer spec controlled by the "spec bloom" amount. The higher the bloom amount, the larger the spec becomes, so it is akin to a "roughness" parameter. The bloom is also affected by the gloss mask. Both spec lobes can be isolated (i.e. turned off) through the use of their "amount" sliders.
Fig 4. OSL sharp and bloom spec lobes. Model courtesy of the Wikihuman Project
Bump
The shader does not have bump, due to a current limitation in OSL for Vray (or to state things differently, the Vray bump is quite sophisticated, and so implementing it in OSL is not trivial). To get bump, just connect the OSLMtl to a VrayBumpMtl.
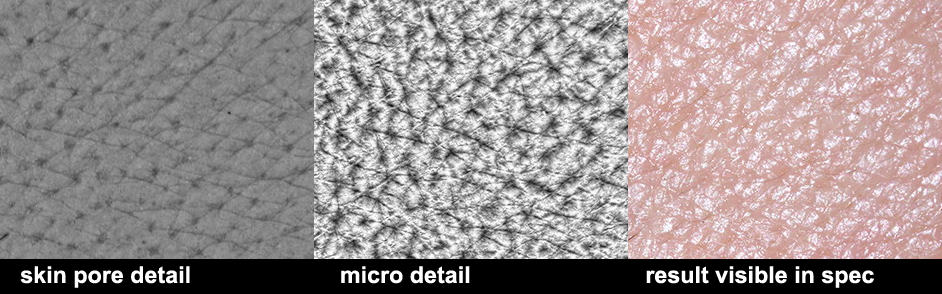
As an additional tip to users, having a nice bump map--including the micro detail between the skin pores--
is essential to effectively capturing human skin. Note in the image below (fig 5) how you can see details in the spec that is
much smaller than even skin pores. The two spec lobes are essential to capturing this detail. One way to create these
maps is to sculpt the detail in a modeling package and extract a floating-point EXR displacement map. However, it is often easier
to simply paint these as bump maps in a program such as Mari, using different layers for the pores and the micro details inbetween
the pores. The trick to getting this kind of detail in the bump (as opposed to displacement) is to
lower the bump delta scale (say from 1 to 0.1) which produces a sharper result comparable to the fine detail look of a
displacement map. Another approach is to separate the micro detail and apply this to a spec map.
Fig 5. Micro detail on skin from photometric scans. Images from Lee Perry-Smith's Infinite Realities
Interface
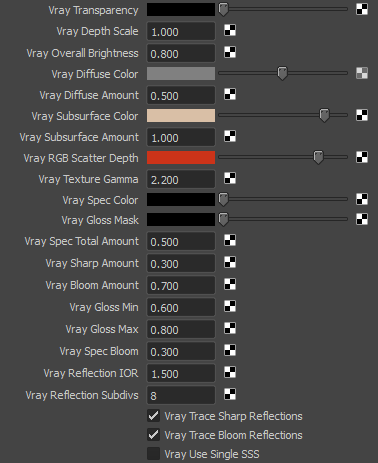
Fig 6. Attribute Editor
General parameters:
Transparency: Controls the transparency
Depth Scale: Global control for the depth of the subsurface scattering
Overall Brightness: Controls the brightness of the colors. Can be used to disable the sss and diffuse.
Diffuse Color: Simulates single scatter with a colorless Labertian diffuse.
Diffuse Amount: Controls the diffuse amount. Can be used to disable the diffuse.
Subsurface parameters:
Subsurface Color: The main color of the material. This is where your color texture goes. Default RGB values: 0.85,0.75,0.65
Subsurface amount: Controls the amount of shallow scatter, as opposed to deep scatter. Can be used to disable the sss.
RGB Scatter Depth: Controls the percentage of scattering for the red, green, and blue wavelengths, which also affects the scatter color. Default RGB values: 0.8,0.2,0.1
Texture Gamma: Gamma corrects the subsurface color
Reflection/Spec parameters:
Spec Color: The color of the specular highlights (skin is dielectric, so this should be white)
Gloss Mask: Black and white map to modulate between the min/max glossiness values below.
Spec Total Amount: controls the total amount of both spec lobes. Can be used to disable the spec.
Sharp Amount: Amount of the sharp spec. Can be used to disable the sharp spec.
Bloom Amount: Amount of the soft spec. Can be used to disable the bloom spec.
Gloss Min: Glossiness value for the black parts of the Gloss Mask map
Gloss Max: Glossiness value for the white parts of the Gloss Mask map
Spec Bloom: Controls the size of the spec bloom. Larger values increase the size of the bloom/tail.
Advanced Reflection parameters:
Reflection IOR: reflective index of refraction for the spec
Reflection subdivs: Subdivs for reflection (SSS in OSL for Vray does not currently have subdivs). This option is disregarded when "use local subdivs" is off in the render settings.
Trace Sharp Reflections: Enables raytraced reflections for the sharp spec BRDF (disabling this produces the spec component only)
Trace Bloom Reflections: Enables raytraced reflections for the bloom spec BRDF (disabling this produces the spec component only)
Use Single SSS: Disables the RGB Wavelength layered SSS, and uses a single subsurface term instead (equivalent to the VraySSS2Mtl). Not as nice, but faster.
Matcap (texture)
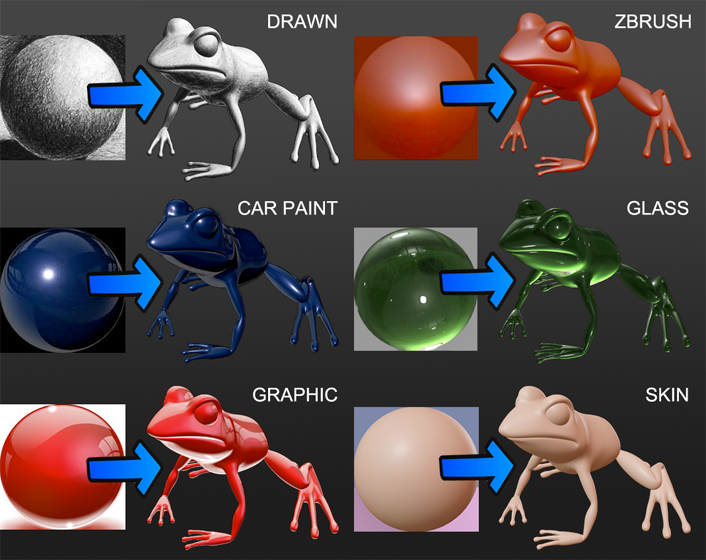
Matcap stands for "material capture" and is a method of real time shading made popular by Zbrush. All the shading information (including shadows and lights) are baked into the texture in the form of a "lit sphere" which is applied to the geometry based on the camera normals.
The baked lighting of a matcap works well so long as the camera does not move, since when it does it is revealed that the lights and shadows are moving with the camera. Because of this, matcaps are best suited for "toon shading" like a Bugs Bunny cartoon where light direction is not taken into account.
To use it, download (right-click "save link as") MatcapTex.osl and load it into a VRayOSLTex, then connect that to a VRayLightMtl. You will also need a litsphere texture map to connect to the matcap OSL texture. You can download this zipped archive with several example LitSphere textures or make your own.
Below you can see several example of lit sphere textures and the resulting matcap render.
Lit sphere textures work best that are smooth, rather than ones with lots of fine detail.
For example, note that the "drawn" matcap below has some stretching of the pencil lines,
whereas the smooth design "graphic" matcap reads perfectly.
/*
 *
 * A simple shader to emulate the Matcap material used in Zbrush
 * from http://docs.sharktacos.com/vray/osl.html
 *
 */

shader MatcapTex
(
	string LitSphereMap_texture = "color.png",
	float Gamma = 2.2,
	output color result = 1
)

{
	vector Normal_camera = transform ("common", "camera", N);
	float norU = clamp (Normal_camera[0] * 0.5 + 0.5, 0.0, 1.0);
	float norV = clamp (Normal_camera[1] * 0.5 + 0.5, 0.0, 1.0);
	color c_out = texture (LitSphereMap_texture, norU, norV);

	result = pow(c_out, Gamma);
}
Hair Color (texture)
This texture reproduces physically accurate hair color based on melanin content, based on the paper
"An Energy-Conserving Hair Reflectance Model". The hair color is determined by the "melanin amount" color. Note that
while melanin is a color input, the value should be black and white as the shader uses the luminance value
(osl in Vray currently does not have sliders for floats so we use a color as workaround).
A value of 0.0 melanin content results in white hair, 0.2 is blond, 0.3 is auburn, until you get to 1.0 for black hair.
The "Dye Color" can be used to emulate dyed hair, acting as a multiplier. Note that the dye color by default appears black,
but is actually set to white (no dye).
To use it, download (right-click "save link as") DFhairTex.osl
and load it into a VRayOSLTex. The resulting texture hair color goes in "transmission color" and "diffuse color" of a VrayHairMtl3,
with the "diffuse value" ideally less than 0.5. The secondary specular is the hair color multiplied with itself
(which is what the "lock secondary" checkbox in the VrayHairMtl does).
/*
 *
 * Hair color defined by Melanin and Dye color parameters
 * based on the paper "An Energy-Conserving Hair Reflectance Model"
 * http://www.eugenedeon.com/wp-content/uploads/2014/04/egsrhair.pdf
 * written for OSL by Derek Flood
 * from http://docs.sharktacos.com/vray/osl.html
 *
 */

 color getTextureDif(string texture_name, color no_texture_default_color)
{
    int channels = -1;
    if (gettextureinfo(texture_name, "channels", channels))
    {
        return texture(texture_name, u, v);
    }

    return no_texture_default_color;
}

shader hairColorTex
[[ string description = "Hair color defined by Melanin and Dye color parameters " ]]
(
    string Dye_color = "color.png"
        [[ string description = "White for non-dyed hair. If using a map,
        put it here and set Melanin Amount to zero" ]],
    string Melanin_amount = "rand.png"
        [[ string description = "Melanin concentration in hair fiber (from 0 to 1).
        0.0 is white hair, 0.2 is blond, 0.3 is auburn, ... until you get to 1.0 for black hair.
        Since there are no sliders, we use a color and grab the luminance" ]],
    float Texture_Gamma = 1,

    output color result = 0
)

{

    /* Read texture map or default to white color */
    color DyeColor = getTextureDif(Dye_color, color(1,1,1));

    /* Read texture map and convert RGB value to float for Melanin amount */
    color MelaninAmount = getTextureDif(Melanin_amount, color(0.3,0.3,0.3));
    float Melanin = luminance (MelaninAmount);

    /* Compute a perceptually linear absorption weight from Melanin_amount */
    float Weight = max( pow(Melanin, 2.0) * 33.0, 0.02);

    /* The fiber color is actually an absorption term. As light travels through fibers,
    	melanin particles filter out some wavelengths. We compute it using Beer's Law. */
    color hairColor = exp(Weight * -color(0.187, 0.4, 1.05));

    /* Now we model the dyeing process as a thin transparent film over the fiber that will filter transmitted light.
    	This is simply a multiplication. */
    hairColor *= DyeColor;


    result=pow(hairColor, Texture_Gamma); //optionally gamma correct color

}
Part II. Writing OSL Shaders
If you'd like to try writing your own OSL shaders, here are some helpful resources to get you started.