| This technique is good for adding additional frilled feathers protruding from the body like on the Pixar short For the Birds.
Normal bird feathers should instead be made using a combination of a WYSIWYG model of the bird with feathers using displacement maps together with individually modeled larger feathers on the wing. In the following image we can see this illustrated. The pink area indicates the solid mesh with displacement feather details and the blue area is individually modeled feather geometry. Note how the main mesh (pink) seamlessly integrates with the individual feathers (blue):
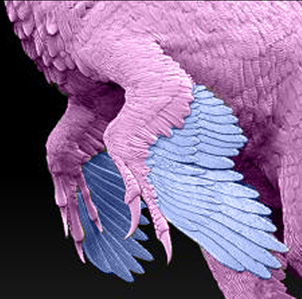
(Model by David Krentz)
The shading would then be done using an anisotropic material with painted direction maps, and/or vray fur with vector maps.
nHair PFX Setup
The following will convert an nHair system into PFX geometry planes which can them be texture mapped with feather textures and opacity maps.
- Create a hair system.
(Note that the orientation of the feathers will be determined based on the object normals of the mesh only if the follicles are attached to the geo as described here).
- Paint effects > reset template brush This will reset PFX to its default values.
- Select the Hair System and nHair > Assign pfx brush to hair
- On the pfxHairShape node turn
"drawAsMesh" ON (to preview the feather shape)
- On the brush set:
- brushType = Mesh
- Brush Profile: softness = 0
- Brush Profile: flatness = 1
- illumination: illuminated = on
- On the hair system:
- ClumpWidth = 0
- hairsPerClump = 1
- HairWidth = desired feather width
- hairWidthScale = set graph to desired feather shape (or all 1 if using texture alpha for feather cutout opacity)
- SubSegments to 1 or higher (adjust for smoothness or more shaping detail for feather)
At this point you will be able to see the geo feathers.
- Select the pfxHair and modify > convert PFX to poly. Although it is now a polygon, it is still driven by the curves and dynamics.
- Assign a feather material to the geo.
Notes on creating a feather material The trick here is to use opacity maps for the cut out, and anisotropic highlights. You can then map the anisotropic rotation to get the direction to change for each side of the feather (i.e. from the quill outwards in opposite diagonal directions). This is done with a black and white map where black (0) equals zero degrees, and white (1) equals 360 degrees. Thus differing shades of grey in between represent the other angles. Remember that the direction of the anisotropic highlight will be the opposite of the feather barbs. A good way to visualize this is with a ramp split into two shades of grey.
To derive the feather color from the bird's body UV but have the transparency come from the feather UV see Creating Multiple UV sets on complex geo |