| Thanks to Akin Bilgic for this tutorial!
Part I. Common Pitfalls
Let's begin with some common pitfalls to watch out for:
- UVs Are Important.
Displacement mapping generally requires a good UV layout of your object. There can be no overlapping UVs as it will cause errors in the generated maps. Also, make sure your UVs are always placed slightly within the edges of the UV sheet (this is more important for Zbrush but is good general practice).
- Floating-Point Displacement Maps Are Scale Dependent.
A correctly generated floating-point displacement map works in a very logical way: The displacement map's pixel values correspond directly to your 3D package's scene units. So a pixel value of 1.0 will displace your mesh by 1.0 scene units. A pixel value of 0.5 displaces your mesh by 0.5 scene units. And a pixel value of 0.0 doesn't displace your mesh at all. All very logical. And because the displacement map's pixel values are stored in floating-point format, they can contain pixel values far above 1.0, and negative pixel values far below 0.0. It's a great way to store precise displacement information.
Since the pixel values of a floating-point displacement map correspond directly to scene units, your object's scale becomes an important factor for guaranteeing accurate displacement amounts. If you scale your low-res mesh up or down after you've already generated your displacement map, your displacement map will no longer have accurate intensity values relative to the new scale of the basemesh. The map will either have to be regenerated with the new object scale, or compensated for by the 'Displacement Amount' setting in V-Ray, or displacement 'Height' setting in Arnold. For example: if you scaled your object up x2, then you'll have to increase the displacement amount setting x2 to compensate.
Part II: Mudbox (2013)
Follow the settings in the following screenshot. (Explanations are given below for the items marked with red numbers)
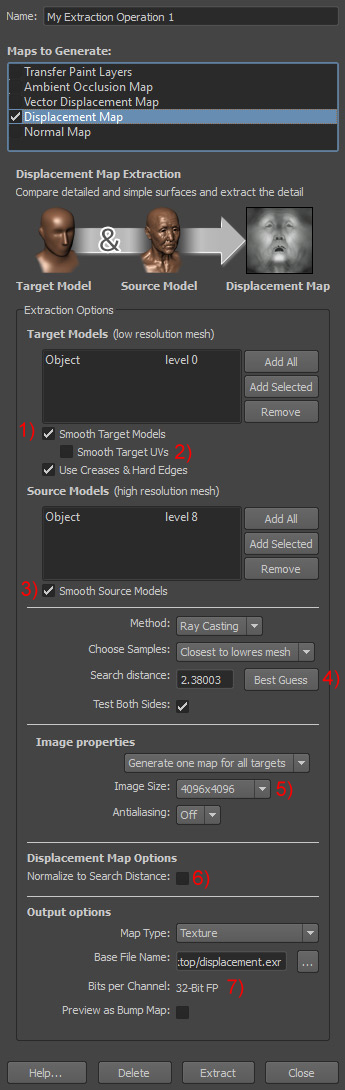
- Smooth Target Models: ON. This will generate the displacement map from the low res mesh after it has been turned into a subdivision surface.
This is also how we will setup Vray to treat the low res mesh at render time (see III.4).
- Smooth Target UVs: OFF. This disables UV Smoothing on our low res mesh.
We'll match this setting in Vray to ensure an accurate mapping of displacement details (III.5).
- Smooth Source Models: ON. This will apply a polygon face smoothing to the highest level mesh, which will smooth any polygon edges still visible in the high res mesh. This value becomes less important the higher polycount your highest subdivision level is, and can optionally be left unchecked at very high polygon levels.
- The Best Guess button to estimate a Search Distance number. The search distance specifies how far rays are cast from the low resolution mesh's surface to search for the high resolution mesh's surface.
The Best Guess button usually does a good enough job coming up with a value for this, but sometimes in cases of extreme displacement it can fall short.
If you know your object has extreme displacement amounts, it may be better to manually set this to a higher value to ensure no clipping occurs in your displacement map.
- Image size: Choose the image resolution that best suits your needs (Recommended 2048 or higher).
- Normalize To Search Distance: OFF. This makes sure no pixels in your displacement map get affected by antialiasing - which would distort their height values.
- Image Format Save as 'OpenEXR 32bit Floating-Point'. You can also use 16bit floating-point (half-float) and still get practically identical results. However it's important to be sure you use floating-point format (FP), and NOT a 16bit integer format. An integer format will not work correctly in this workflow, and you'll have to do the whole 'displacement amount' and 'shift' song and dance to make them work. This is because integer formats do not support negative pixel values, which are used by floating-point displacement maps to represent carved-in areas. If you're not sure how to get one or the other, stick to the 32bit floating-point displacement maps to be safe.
Note: if you are seeing clipping on your displacement, this can be fixed by using 32bit rather than 16bit.
Part III: Vray
- Double check that your low-res mesh is the exact same mesh you generated your displacement map from.
- Add the following Vray attributes to your mesh's Shape node.
- Subdivision
- Subdivision and Displacement Quality
- Displacement Control
- Follow the settings in the following screenshot. (Explanations are given below for the items marked with red numbers)
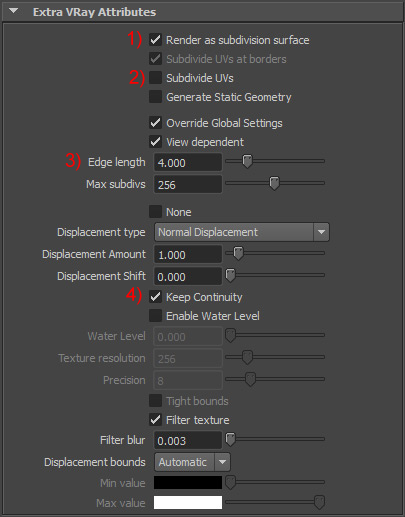
- Render As A Subdivision Surface: ON.
This matches the way we set it in Mudbox (see II:1)
- Subdivide UVs: OFF. This disables UV Smoothing on our low res mesh, like we did in Mudbox (see II:2).
- Edge Length. Set this to 4.0 to begin with, and lower as needed for better displacement quality (At the expense of higher render times).
- Keep Continuity: ON. This will have V-Ray keep displaced face edges connected without splits.
- Displacement Bounds: Explicit If you are getting clipping the two color swatches can be set to -1 and 1.
Leave all other settings at their defaults
Part IV: Displacement Map
Finally we need to do a little voodoo on our displacement map itself...
- Connect the Red Channel.
Next we need to connect our map into the material's SG displacement slot. Mudbox stores the displacement map's information to the RED channel only. So we need to either
- A) shuffle the red channel to the alpha in Nuke
- B) Connect the OutColorR from the texture to the displacement value
This avoids Maya's tendency to average the RGB channels together -
Which would result in a displacement intensity 1/3 what it should be (since the other channels are just black).
- Negative Colors. Next we add two vray attribute to the texture:
- Texture Input Gamma. Change color space to 'Linear'
- Allow Negative Colors. Check this ON.
|