Mipmaps save several resolutions of an image into a single texture file.
This speeds up render time because it can load the high-resolution mipmap image if the object
is close in the render, and smaller images when it is farther away. For this reason both Arnold and Renderman
default to using mipmap textures.
The specific goal of this tool is to provide a GUI for converting textures into mipmaps using OCIO color space linearization.
The GUI uses maketx.exe which is an open source command-line utility
developed by Larry Gritz at Sony Pictures Imageworks. Maketx works for both 8-bit files like PNG or JPG, and for high
dynamic range floating-point images used for things like displacement maps (EXR, HDR). Because maketx is made by the
same folks who make OCIO, it obviously works with OCIO color spaces.
maketx
maketx -- convert images to tiled, MIP-mapped textures
OpenImageIO 1.4.14 http://www.openimageio.org
Usage:  maketx [options] file...
    --help                   Print help message
    -v                       Verbose status messages
    -o %s                    Output filename
    --old                    Old mode
    --threads %d             Number of threads (default: #cores)
    -u                       Update mode
    --format %s              Specify output file format (default: guess
                               from extension)
    --nchannels %d           Specify the number of output image channels.
    --chnames %s             Rename channels (comma-separated)
    -d %s                    Set the output data format to one of: uint8,
                               sint8, uint16, sint16, half, float
    --tile %d %d             Specify tile size
    --separate               Use planarconfig separate (default: contiguous)
    --compression %s         Set the compression method (default = zip, if
                               possible)
    --fovcot %f              Override the frame aspect ratio. Default is
                               width/height.
    --wrap %s                Specify wrap mode (black, clamp, periodic,
                               mirror)
    --swrap %s               Specific s wrap mode separately
    --twrap %s               Specific t wrap mode separately
    --resize                 Resize textures to power of 2 (default: no)
    --noresize               Do not resize textures to power of 2
                               (deprecated)
    --filter %s              Select filter for resizing (choices: box
                               triangle gaussian sharp-gaussian catrom
                               blackman-harris sinc lanczos3 radial-lanczos3
                               mitchell bspline disk cubic keys simon rifman,
                               default=box)
    --hicomp                 Compress HDR range before resize, expand after.
    --nomipmap               Do not make multiple MIP-map levels
    --checknan               Check for NaN/Inf values (abort if found)
    --fixnan %s              Attempt to fix NaN/Inf values in the image
                               (options: none, black, box3)
    --fullpixels             Set the 'full' image range to be the pixel
                               data window
    --Mcamera %f %f %f %f %f %f %f %f %f %f %f %f %f %f %f %f
                             Set the camera matrix
    --Mscreen %f %f %f %f %f %f %f %f %f %f %f %f %f %f %f %f
                             Set the screen matrix
    --prman-metadata         Add prman specific metadata
    --constant-color-detect  Create 1-tile textures from constant color
                               inputs
    --monochrome-detect      Create 1-channel textures from monochrome
                               inputs
    --opaque-detect          Drop alpha channel that is always 1.0
    --ignore-unassoc         Ignore unassociated alpha tags in input (don't
                               autoconvert)
    --stats                  Print runtime statistics
    --mipimage %s            Specify an individual MIP level
Basic modes (default is plain texture):
    --shadow                 Create shadow map
    --envlatl                Create lat/long environment map
    --lightprobe             Create lat/long environment map from a light
                               probe
Color Management Options (OpenColorIO DISABLED)
    --colorconvert %s %s     Apply a color space conversion to the image.
                               If the output color space is not the same bit
                               depth as input color space, it is your
                               responsibility to set the data format to the
                               proper bit depth using the -d option.
                               (choices: linear, sRGB, Rec709)
    --unpremult              Unpremultiply before color conversion, then
                               premultiply after the color conversion.
                               You'll probably want to use this flag if your
                               image contains an alpha channel.
Configuration Presets
    --prman                  Use PRMan-safe settings for tile size,
                               planarconfig, and metadata.
    --oiio                   Use OIIO-optimized settings for tile size,
                               planarconfig, metadata.
Renderman ships with a utility called txmake
which can create .tx files. If you just want to linearlize from sRGB this works fine. However,
txmake is not able to read in different OCIO color spaces for linearlizaion. This utility, which works with maketx
allows one to create .tx files for Renderman with OCIO color spaces for linearizing. All you need to do to make things work
for Renderman is make sure the --prman option is set in the additional options field of the GUI (and that the --oiio option is not
set there, as the two options are mutually exclusive).
Note that Renderman does not like mipmaps made with non-power of two resolutions (for example a map that is 1024 or 2048 is fine,
but a map that is 1000 or 2000 is not) and will give you really crazy results. If you have maps that are not power of two resolutions
you can add the --resize option which will resize textures to power of two.
Vray does not have a means to create mipmaps at all, so this utility is obviously useful there. For Vray you'll want to
set the --oiio option instead of the --prman option.
Arnold ships with a utility for converting files to .tx called the
TX Manager that works great.
If you are making textures for Arnold,
use that instead. Note that maketx ships with mtoa Maya for Arnold installation. However this version of maketx is not
Renderman compatible, so we will be using a different compile of the maketx executable that does work with Renderman.
1. Setup
First you'll want to download this zip archive dfMakeTex GUI. Unzip it and
you will find a python script named dfMakeTex.py and a folder called makeTx containing the maketx.exe and two .dll files it needs
to work with OCIO. Put the python script into your maya script folder (on windows “c:\Users\YOUR_USER_NAME\Documents\maya\scripts\”) so Maya can find it.
The folder with maketx can go anywhere you like, but the .exe and .dll files all need to be together in the same folder for it to work properly.
Before running the Python script to launch the GUI you will need to set a system variable to tell it where your OCIO config is located.
To do this on Windows, open the Control Panel and make sure "small icons" are selected. Click on User Accounts, then on
Change my Environment Variables (located on the left margin). From there you can define a new environment variable named "OCIO"
(without the quotes)
with the value being the full path to you OCIO config. For example h:\ANM\shared_assets\configs\spi-anim-look\config.ocio
Note that this version of the Python script GUI is currently hard coded to use the DT16 and Inf color spaces from the
spi-Anim OCIO config for linearizing images. A future version could query the available color spaces from the OCIO config and
provide them as options in a drop down menu. If you want to write that and send it to me, that would be super awesome. In the meantime,
if you want to use a different color space from a different OCIO config, all you need to do is open the script in a text editor
and do a search for the line with the DT16 and lnf color spaces, replacing them with the ones you want to use instead.
2. Running the GUI
To launch the tool in Maya, open a Python tab in the Script Editor and type:
This is a modified version of the original script by Luca Fiorentini.
This 2.0 version of the GUI streamlines the conversion process, taking into account a number of issues detailed below.
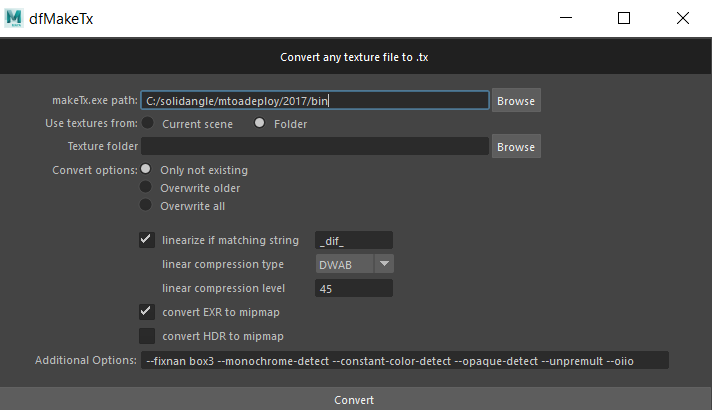
Once the GUI opens, the first thing you'll need to do is click the top "browse" button and navigate to where the maketx.exe is located. You can edit the python script
to default to this location too if you like. Next click on the second "browse" button where you can choose the folder where your textures
are located that you want to convert. The original textures will not be overwritten.
Linear Options
In a classic linear workflow diffuse textures are linearized from sRGB with a simple gamma conversion.
Since we are using the spi-anim OCIO config we are doing something a little more fancy. The DT16 color space
converts sRGB images into a range limited linear space that is the inverse of the
VD view transform. That view transform is not just a gamma adjustment, but also does tonemapping and applies a film emulation curve
in order to make the render act more like a film camera (you can read more about that here).
That is, DT16 is based on the spi VD transformation but limits the conversion into linear space so that no values above
diffuse white can be created. This ensures that textures do not add light to a render.
Linearizing of diffuse textures needs to happen before mip-map generation, otherwise the apparent intensity of
texture values will change as the object approaches or recedes from the camera. So we will linearize
all the diffuse textures now using maketx, rather than doing a gamma correct on them in Maya.
This is what the "linearize textures matching string" checkbox is for. If a texture matches the string,
it will be linearized. The default string here is "_dif_" which matches our naming convention for diffuse textures,
but you can of course change it to match your naming convention.
Further, the linearized file will need to be 16bit instead of 8bit to avoid banding, so we will be converting all the files to EXR.
This would normally result in a
significant increase in the file size, so we use DWA compression which results in 16-bit half EXR files that are smaller than
an 8-bit PNG.
EXR and HDR Options
Mipmaps are for textures. You don't want to convert an HDR image used for IBL in a light, so this defaults to off,
however you do want to convert an EXR used in a displacement map. In this case we use DWA compression again to keep
the file size down (using whatever it is set to in the linear options, even if it is unchecked),
however we do not linearize EXR files they are already linear.
Additional Options
Finally, we have the "additional options" field. This is pre-populated with some suggested options, but you can of course
type in anything you want here (see the command line usage above). As mentioned above, if you are creating textures for Renderman,
make sure the --prman option is set instead of the --oiio option, as these two options are mutually exclusive.
When you click "convert" if you open the Maya Script Editor you can see the command line options used by maketx for the conversion of each file.
3. Replacing the files in Maya
Since we have linearized the diffuse mipmap textures, we need to make sure that we are not linearizing them again in Maya.
So the color space in the texture File Node should be set to linear. You can do this globally for all the file nodes in the Maya
Color Management section of the Preferences by setting the default input color space to linear (or lnf in the case of the spi config)
and then clicking "Reapply rules to scene" button. If you are using the VrayTexOCIO node, then you will need to remove this and instead
have your file node plug directly into you shader. You can try this mel code to remove then (no error checking, so use at your
own risk!)
Next we need to replace all our old texture maps in Maya with the new mipmap files. To do this, open the .MA file in a
text editor like Notepad++ and search for the file's extensions (.png .jpg .exr and so on) replacing this with .tx
(the extension for our mipmap files). Make sure to save the Maya file with a new name (version it up) in case you make a
mistake in the text editor.
Notes:
Render Element Masks
Mipmaps should not be used for masks in render elements (ExtraTex RE).
Fur maps (length, direction, etc)
Vray incorrectly takes the alpha of a mipmap plugged into channels that take black and white values, rather than using the rgb (this is a bug). To fix this, check "Alpha is Luminance" in the texture's attributes "Color Balance" section.
3. Setting the texture filter
For mip mapping to work in Maya the texture filtering needs to be set to mipmap so it will read the appropriate size map based on the screen space taken by the texture.
By default Maya uses Quadratic filtering for textures. Vray substitutes Maya's filtering with its own texture filtering,
in the case of Quadratic, Vray will instead use mipmap filtering, which is what we want. So if you have your textures set to
the default quadratic filter, you don't need to do anything. The following table shows the texture filtering Vray actually
uses based on the texture filter set in a Maya file node.
Maya texture filter
Filter used by Vray
Off
Smooth (bilinear interpolation)
Mipmap
Smooth with mipmaps
Box
Smooth with mipmaps
Quadratic
Smooth with mipmaps
Quartic
SAT (summed area table)
Gaussian
SAT (summed area table)
If you have changed the filter types (what were you thinking!?) You can use the following mel script to set all the file
node's texture filters to "Quadradtic" in a scene, which will give you mipmap filtering. Note the explanation of the
script in the comments below
/* select all the file texture nodes in the scene
    and put them in a string array */
string $selected[] = `ls -type "file" -long`;
/* declare a string for file node's filterType  */
string $filterType;
/* loop through all the file nodes */
for ($member in $selected) {
    /* get the current attributes */
    $filterType = `getAttr ($member+".filterType")`;
    /* set new values for the attributes.
        0: off
        1: mipmap
        2: box
        3: quadratic
        4: quartic
        5: gaussian */
    setAttr ($member+".filterType") 3;
}