Follow the step by step instructions below for setting up an asset turntable.
You can download and unzip the setup files here (note that for studioX shows you should use the project's turntable template)
Before you begin: Checking a new asset
- Check the hierarchy. Open the Outliner. You should see all the geo under a single group. The Outliner should not contain any extra "garbage". All the geo and groups should have senseible names (not polygon79) and be prefixed with the asset name (ex: Gramp_shirtGeo).
- Check the geo. There should be a geo for each material (for example, a belt needs a geo for the metal and a geo for the leather. These cannot be in one geo).
- Check the UVs. Make sure they are layed out optimally. If you are unsure how to do this, ask.
- Check character's eyes. Make sure it uses our standard eye model.
- Check character for hair. Make sure the model has a scalp geo in addition to stand-in hair geo.
- Check the shader pack. Make sure it is clear.
- Clean the file. Select the top group, and export as an FBX. Open a new Maya scene, set the render preset, and import the FBX. This will clean up stuff that may be in the model scene (display layers, wrong scene scale, unknown nodes, geo history, etc.)
If you find anything that needs to be changed above, a ticket and release must be created for it so we can track the changes. Speak with a lead about doing this. Do not change things without informing anyone, as this will break things in the pipeline.
Initial Setup:
- Set the project
- Open the asset
- Reference in the turntable setup
- Change namespaces
In the reference editor select the reference and in the namespace field change it to sayTurntable
- If the asset is not centered, translate it to the center IMPORTANT: Do not freeze transforms after doing this. We will move it back to its original position later (see below) and are temporarily moving it so it rotates properly in the turntable.
- Scale the turntable to the object
in the Outliner select the top TURNTABLE_control group and scale it to your asset. This will uniformly scale the lights and camera to match your asset's size. Note that this must be done before the asset it parented under the turntable (step 7)
- Attach to turntable
In the outliner: parent the asset's main group under the group named "parentAssetUnderMe"
- Adjust camera height (optional)
Select the TURNTABLE_controls group and, in the channel box, adjust the "camera elevation" attribute as need to align your asset in frame.
If the above does not work, you can duplicate the turntable camera and re-position it. Set a key on the first frame of this camera to lock it. Make sure that the camera position is as close as possible to the original camera for sake of production uniformity
- Set the render settings preset
- Choose the camera in the render settings
- Save the turntable using the naming convention
make sure the version up, and append the name with "turntable"
for example: Mara_tex_v22_atzue_TT.ma
Creating materials
- Create materials using the material presets
- Use the asset's shader pack as a guide
- Assign material IDs for Multimattes
- Consult the multimatte field on the SG Assets page to find the ID for your asset
- Apply that MM number(s) for all your materials
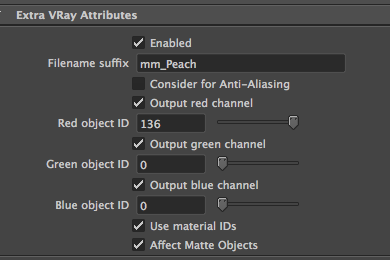
- Create a multimatte pass for the asset. Apply the ID number(s), change the filename suffix to MM_assetName. Example: Peach_tex_der_v01 is MM_Peach. (See the naming conventions for details) and ensure that "use material IDs is checked"
- Render it
Composting
- Open the comp turntable template
- Fill out the yellow variables
- Save the Nuke file as the name of your asset (see the naming conventions doc for details)
- Write out the sequence. The images will automatically be named according to the Nuke file name
Submitting for Review/Dailies
Submit your comped turntable sequence to Shotgun using the RV Submit Tool. See Submitting Turnables and Shots to Shotgun
You will render in EXR and comp in PNG. Turntables MOV files are auto generated by RV.
Your turntable must be submitted for class review at the latest by 6pm the day before class (class is Wednesday so the deadline is Tuesday 6pm). For midweek deadlines it must be submitted by midnight the day before (midweek deadline is Saturday so the submission is due Friday at midnight)
Finalling an asset
Once a turntable has been approved by me, it needs to be submitted as an asset file:
- Go to frame 1 and unparent the asset from the turntable curve
- Set the translations back to to zero if the asset was centered at setup.
(This is generally only relevant for environment elements which are not positioned at the world origin.
If you asset's translations are at zero you can skip this step)
- Remove the turntable setup ref (Reference Editor: Reverence > Remove Reference)
- "Save as" and name the file the same as the current turntable, but with the TT (short for TurnTable) suffix removed.
Example: Monkey_tex_v22_atzue_TT.ma would be saved as Monkey_tex_v22_atzue.ma
- Submit the following in your student dropoff:
- Maya turnable and asset files
- textures
- Nuke turntable file
- xGen folders (if any)
The directory structure for all of these files on your STUDENT DROP folder must mirror the show's directory structure.
|