Creating Custom Nuke Nodes
We'll look at three examples of writing custom nodes and menus in Nuke. First we'll cover basic menu creation, then group nodes, and finally gizmos. Each new part will build on the previous one.As a bonus I've included some useful expressionsat the end.
    Part 1: Creating a Pulldown Menu

      There are many types of menus you can create in Nuke. In this example we will be creating a pulldown menu (sometimes called a dropdown menu). However, the main thing is to understand the basic workflow which involves a two step process of (1) creating the menu GUI, and (2) hooking up the menu functions using expressions.

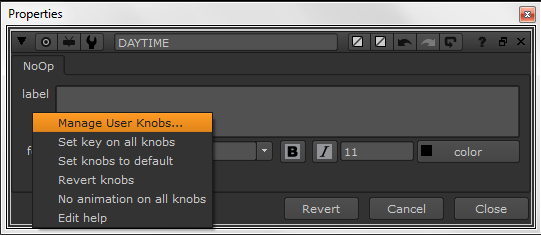
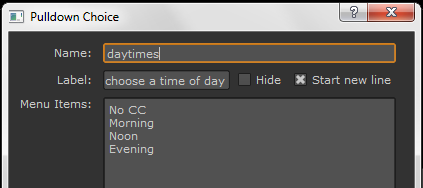
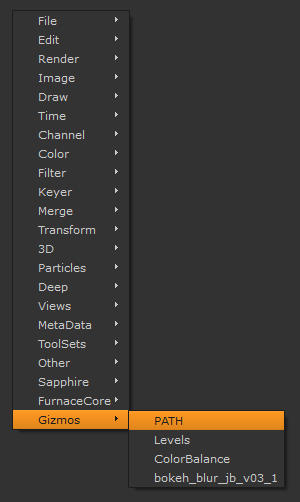
      To keep things interesting we'll be using some real world examples from production. In this first example we will create a menu we can use to switch to different lighting conditions in our comp (morning, noon, evening). Doing this kind of re-lighting in Nuke is described in its basic form here, but basically involves setting up a number of color correct (CC) nodes for the GI and direct light of the various times of day. If we want morning lights for a particular shot, we need to toggle off all of the other light CCs. Turning all of these on or off for every shot would be quite complex, so to avoid the potential for operator error we want to instead set up a pulldown menu to automate the whole process: turning all sorts of things on or off as needed with a single switch. The moral is: we take something very complex to setup and make it simple for the artist to use.

      Step I: Creating the menu GUI

      1. Create a NoOp node, and name it DAYTIME
      2. Double-click to open the node properties, then right-click and choose "manage user knobs" from the dropdown menu

      3. In the window that opens, click "add" and then "pulldown choice"
      4. Fill out the options as follows:

        Note the use of all caps on the node name, and lowercase on the menu name above to differentiate the two. This will become important below when we call the function in TCL (That's Tool Command Language, not to be confused with Tender Loving Care for the slightly dyslexic among us!).

        This will create the following custom menu:


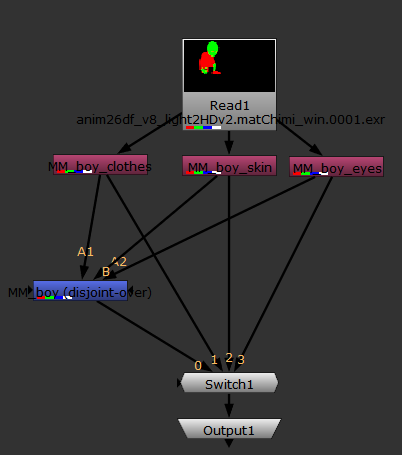
      Step II: Connecting the menu item functions using expressions

      Now that we have our menu we need to connect it to our corresponding CC nodes.

      1. Open the first CC node, and in the node tab right-click on "disable" and choose "add expression" from the dropdown menu.
      2. type the expression:   (DAYTIME.daytimes)
      3. Do the same for the next CC, this time using the expression:   -(DAYTIME.daytimes)+1
      4. For each subsequent CC you then increment the expression by one. So the next one would be:   -(DAYTIME.daytimes)+2   and so on.
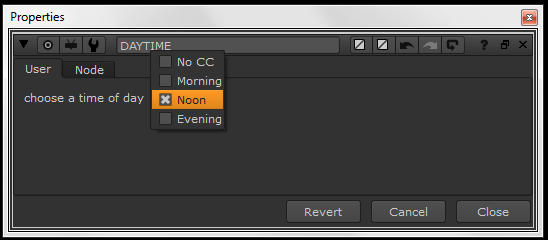
      5. Explanation: Here "DAYTIME" refers to our node name, and "daytimes" is the name of our custom menu. So we call the function with the syntax node.menu and perform a math operation on it. Our menu items are numbered sequentially beginning with zero. So No_CC = 0, morning = 1, and so on.

        If the disable checkbox is equal to 0 it will be off (not disabled). If it is 1 it will be on (disabled). Actually though, in Nuke if it is set to any number besides zero it will be on (disabled). That's odd, but we'll take advantage of that oddity in our expression: What we need are expressions that will result in a value of zero (i.e. not disabled) if it's corresponding pulldown is selected, and non-zero if another pulldown value is selected.

        We start with our first menu item "No_CC" which is menu item 0. Here our formula is: (node.menu) which means the expression's return value will be zero. So if menu item 0 (No_CC) is selected then the expression will be zero (not disabled), and if another menu item is selected the value will be non-zero (disabled).

        If "morning" is selected then this is menu item 1 and the formula is: -(node.menu)+1 which means the value is -(1)+1 or written more conventionally: -1 + 1 = 0. So again, if menu item 1 (morning) is selected then the expression will return the value of zero (not disabled), and if another menu item is selected the value will be non-zero (disabled). We then get the same results for the other CC nodes by incrementing each subsequent expression by 1.

        In short: the CC that is selected in the pulldown menu gets turned on, while all the others get turned off (i.e. disabled).

      Step III: Connecting additional child nodes

      We can then connect other CC nodes to be enabled or disabled when one of the main daytime CCs are selected. For example to connect Evening_GI_CC to the main Evening_CC you would

      1. Open the properties of both nodes
      2. Then Ctr-LMB drag & drop the disable from the Evening_CC to the disable of the Evening_GI_CC.
      3. Explanation: This creates a linking TCL expression that parents the disable checkbox in the first node to the second one. So our pulldown menu controls the main CC for each time of day, and this is parented to all sorts of other CC nodes that become its children. In the case of this example the auto-generated expression is: parent.Evening_CC.disable


    Part 2: Creating a Group Function

      Next we'll take what we learned above about creating a custom menu GUI and combine it with the power of a group node. Group nodes allow us to group together the functionality of several nodes into a single node with a custom menu. So if you have a particular set of nodes you are always hooking up to do the something you can make these into a group node with their own custom menu GUI.

      Step I: Creating the group

      1. Select the nodes you wish to include in your group and hit Ctl-G. This will open up a separate tab with these nodes. You can later access these by selecting the group node in the main node graph and hitting Ctl-ENTER or by clicking the S icon at the top right corner of the group's property window.
      2. Next we setup the nodes in our group the way we want. You can add new nodes here as needed simply by creating them as you would any node while inside the group tab. In this case we're creating a custom mask node:

        Explanation: As you can see above we begin with a multimatte of our character, then extract the red green and blue channels using shuffle nodes, and then combine all these channels together with a disjoint over. This gives us a total of 4 mattes. These are then put into a switch node in the order that we want them to appear in our menu.

      3. Next we add a pulldown menu to our group node using the workflow described above in Part 1.
      4. We then need to connect the menu function to our switch node and add the expression syntax: node.menu which in our example here was MM_Boy.mask_boy. This will link the menu item numbers to the numbers in our switch node.

        In this example we only have 4 masks for simplicity of explanation, however you could of course add as many as desired using the same process.


    Part 3: Creating a Gizmo

      Group nodes can be turned into gizmos. While a group node exists within a particular nuke script, the advantage of a gizmo is that it can be accessed as a menu item like all of other nodes in Nuke. In our group node example above we made a node for masks. Since this uses multimattes from a particular render it does not really make sense to make this into a gizmo. However, if we were doing something more general (say for example creating a node that generates chromatic aberration or a bokeh effect) then this would make a nice gizmo since it is general rather than scene specific.

      Step I: Creating the Gizmo

      1. Open the group node, go to the node tab, and click the "export as gizmo" button. Save the gizmo in your home directory in the .nuke folder. This is a hidden folder where your Nuke preferences are stored.

        Here's a link to a Gizmo used to auto populate image sequences: Nuke gizmos. Unzip it and follow the instructions in the Readme.

      2. Next we will add our gizmo as a menu item: Open the menu.py file (also in the .nuke folder) in a text editor and add the following line to the top:
        toolbar.addCommand( "Gizmos/PATH", "nuke.createNode('PATH')")
        toolbar = nuke.toolbar("Nodes")
        
        Of course you'll want to Substitute "PATH" above with the name of your own gizmo. This will create an extra menu category called Gizmos along with your PATH Gizmo.

        You can of course add other gizmos you create here as well. Once a group has been turned into a gizmo it can no longer be edited in Nuke. However you can open the gizmo file in a text editor and change the word "gizmo" at the top to "group" then copy-paste the text into Nuke.

    Part 4: Useful Expressions

    Here are some useful expressions (I'll be adding more periodically, so check back)

    1. Testing variables
      Make a Backdrop node and write your expression in the label. The result will be displayed.

    2. Auto-populate Write node
      [file rootname [file tail [value root.name]]]
      
      This will return the name of your nuke file without the .nk extension. So if your file is called Shot02_v01.nk it will return Shot02_v01. You can put this in a path node gizmo called WRITE and then use the following code in your write node.
      [value WRITE.project_path].###.exr
      
      This variable will give you the file name. Again in our example it would be Shot02_v01.001.exr for the first frame. You'll want to append the path before it using additional path nodes like this:
      [value ROOT.project_path]/Comps/BG/[value SHOT.project_path]/Master/[value WRITE.project_path].###.exr
      
    3. Create directories with write node

      Add the following code to your menu.py in your $HOME/.nuke directory. This allows Nuke to create new directories when writing out files if they don't already exist. (Note: Python is very picky about indentations i.e. tabs or spaces which may result from copy pasting code)

      
      #-------------------- Custom Merge Function -------------------------------#
      '''More info on callbacks here:
       http://docs.thefoundry.co.uk/nuke/90/pythondevguide/callbacks.html'''
      
      def MergeNodeAfterKnobChange():
      
        if nuke.thisKnob().name() == "operation":
      
      	outputRGB = [ "plus", "minus", "screen", "multiply", "divide", "difference", "hypot" ]
      	outputRGBA = [ "over", "under" , "disjoint-over" , "conjoint-over", "in", 
      	"out", "overlay", "stencil", "mask", "matte", "copy" ]
      	
      	if nuke.thisKnob().value() in outputRGB:
      		nuke.thisNode()[ "output" ].setValue( "rgb" ) 
      	elif nuke.thisKnob().value() in outputRGBA:
      		nuke.thisNode()[ "output" ].setValue( "rgba" )
      
      nuke.addKnobChanged( MergeNodeAfterKnobChange, nodeClass="Merge2" )
      
      
All content © copyright Light Collab.